Week Number & Date: Week 2 (10/02/20)
List of Tasks planned for this week:
This week, I may have planned a little too much, but I did start early (05/02/20) – I believe I can get this done this week, as I’m planning to start early to get my 3D assets done since I don’t want to solely focus on 3D for this project.
I plan to make a simple 3D model which I can use as the player character which I’m going to do concepts for and I’m going to rig and animate myself. Since I want to push myself for this project.
Current Position –
What did I do this week and why did I do it? (Screenshots/Videos/Photos)
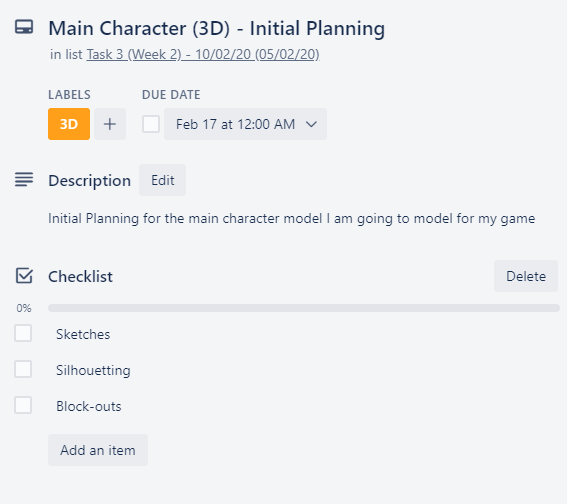
Main Character (3D) – Initial Planning
Sketches – I began doing this task by drawing out sketches of what I want my dragon to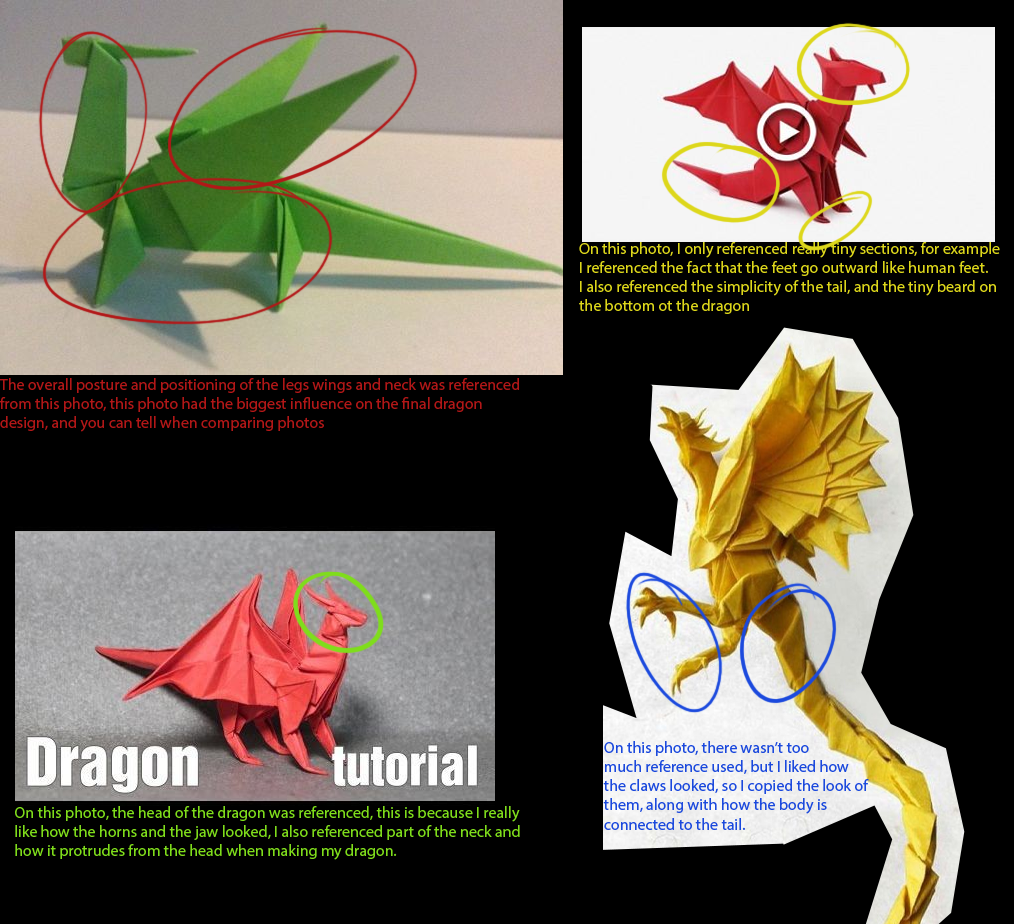 look like, referencing my Papercraft pinterest board, this was helpful since I know my final dragon won’t be too detailed at all, so the sketches won’t be too detailed, since I was wanting to stick with a low-poly style.
So I done a few sketches until I found one which I was happy with.
I used these parts for my reference because they stood out to me the most out of all of the pictures on there, they also stuck with the low-poly style which I wanted to go with.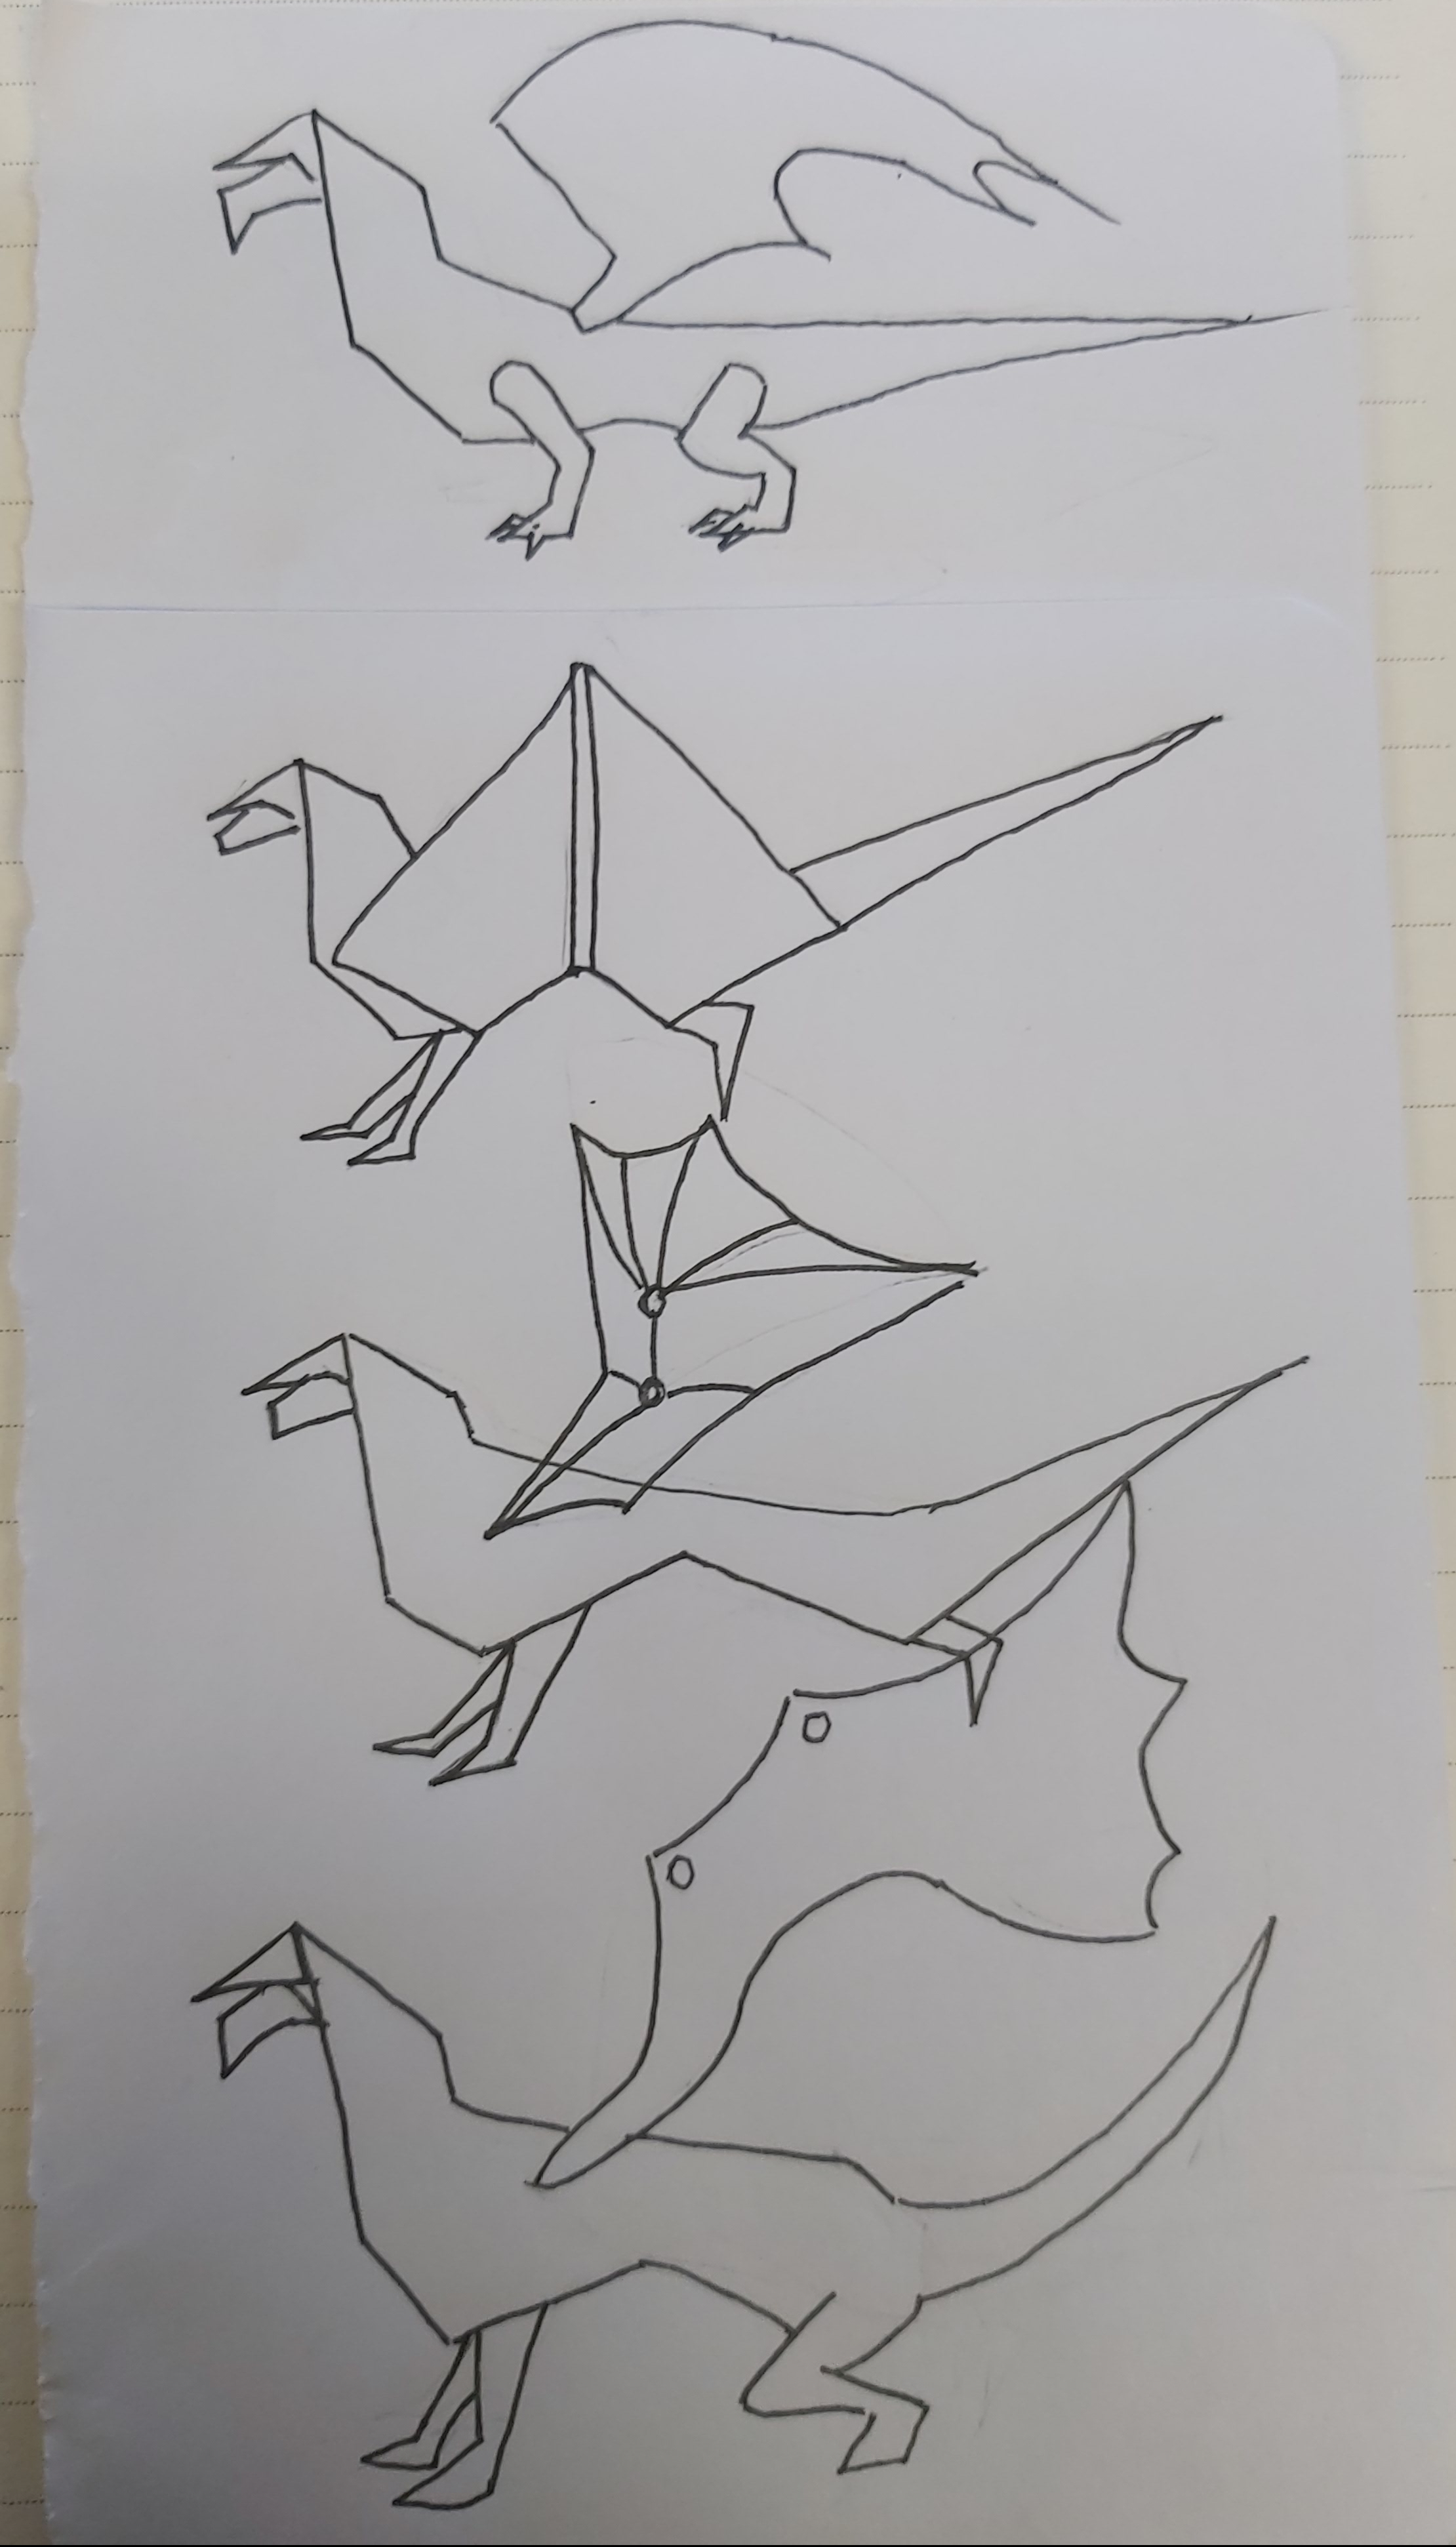
I ended up not really liking these, since you couldn’t tell these were dragons at first glance, they look more like dogs they look like dogs because of how their body is laid out, for example, on the last sketch out of the three, the legs look like they’ve just came off of a dogs body, and the tail emphasises that look of a dog, so I took what I liked from these and what looked more like a dragon and then made a final design which looked more like a dragon, I changed a few things, like how big the bottom jaw is, in comparison to the top jaw, and I liked it when it was larger, I also smoothed out the body so it wasn’t sharp, I added more detail to the legs and then I added horns, and a nicer looking pair of wings, this is my result:
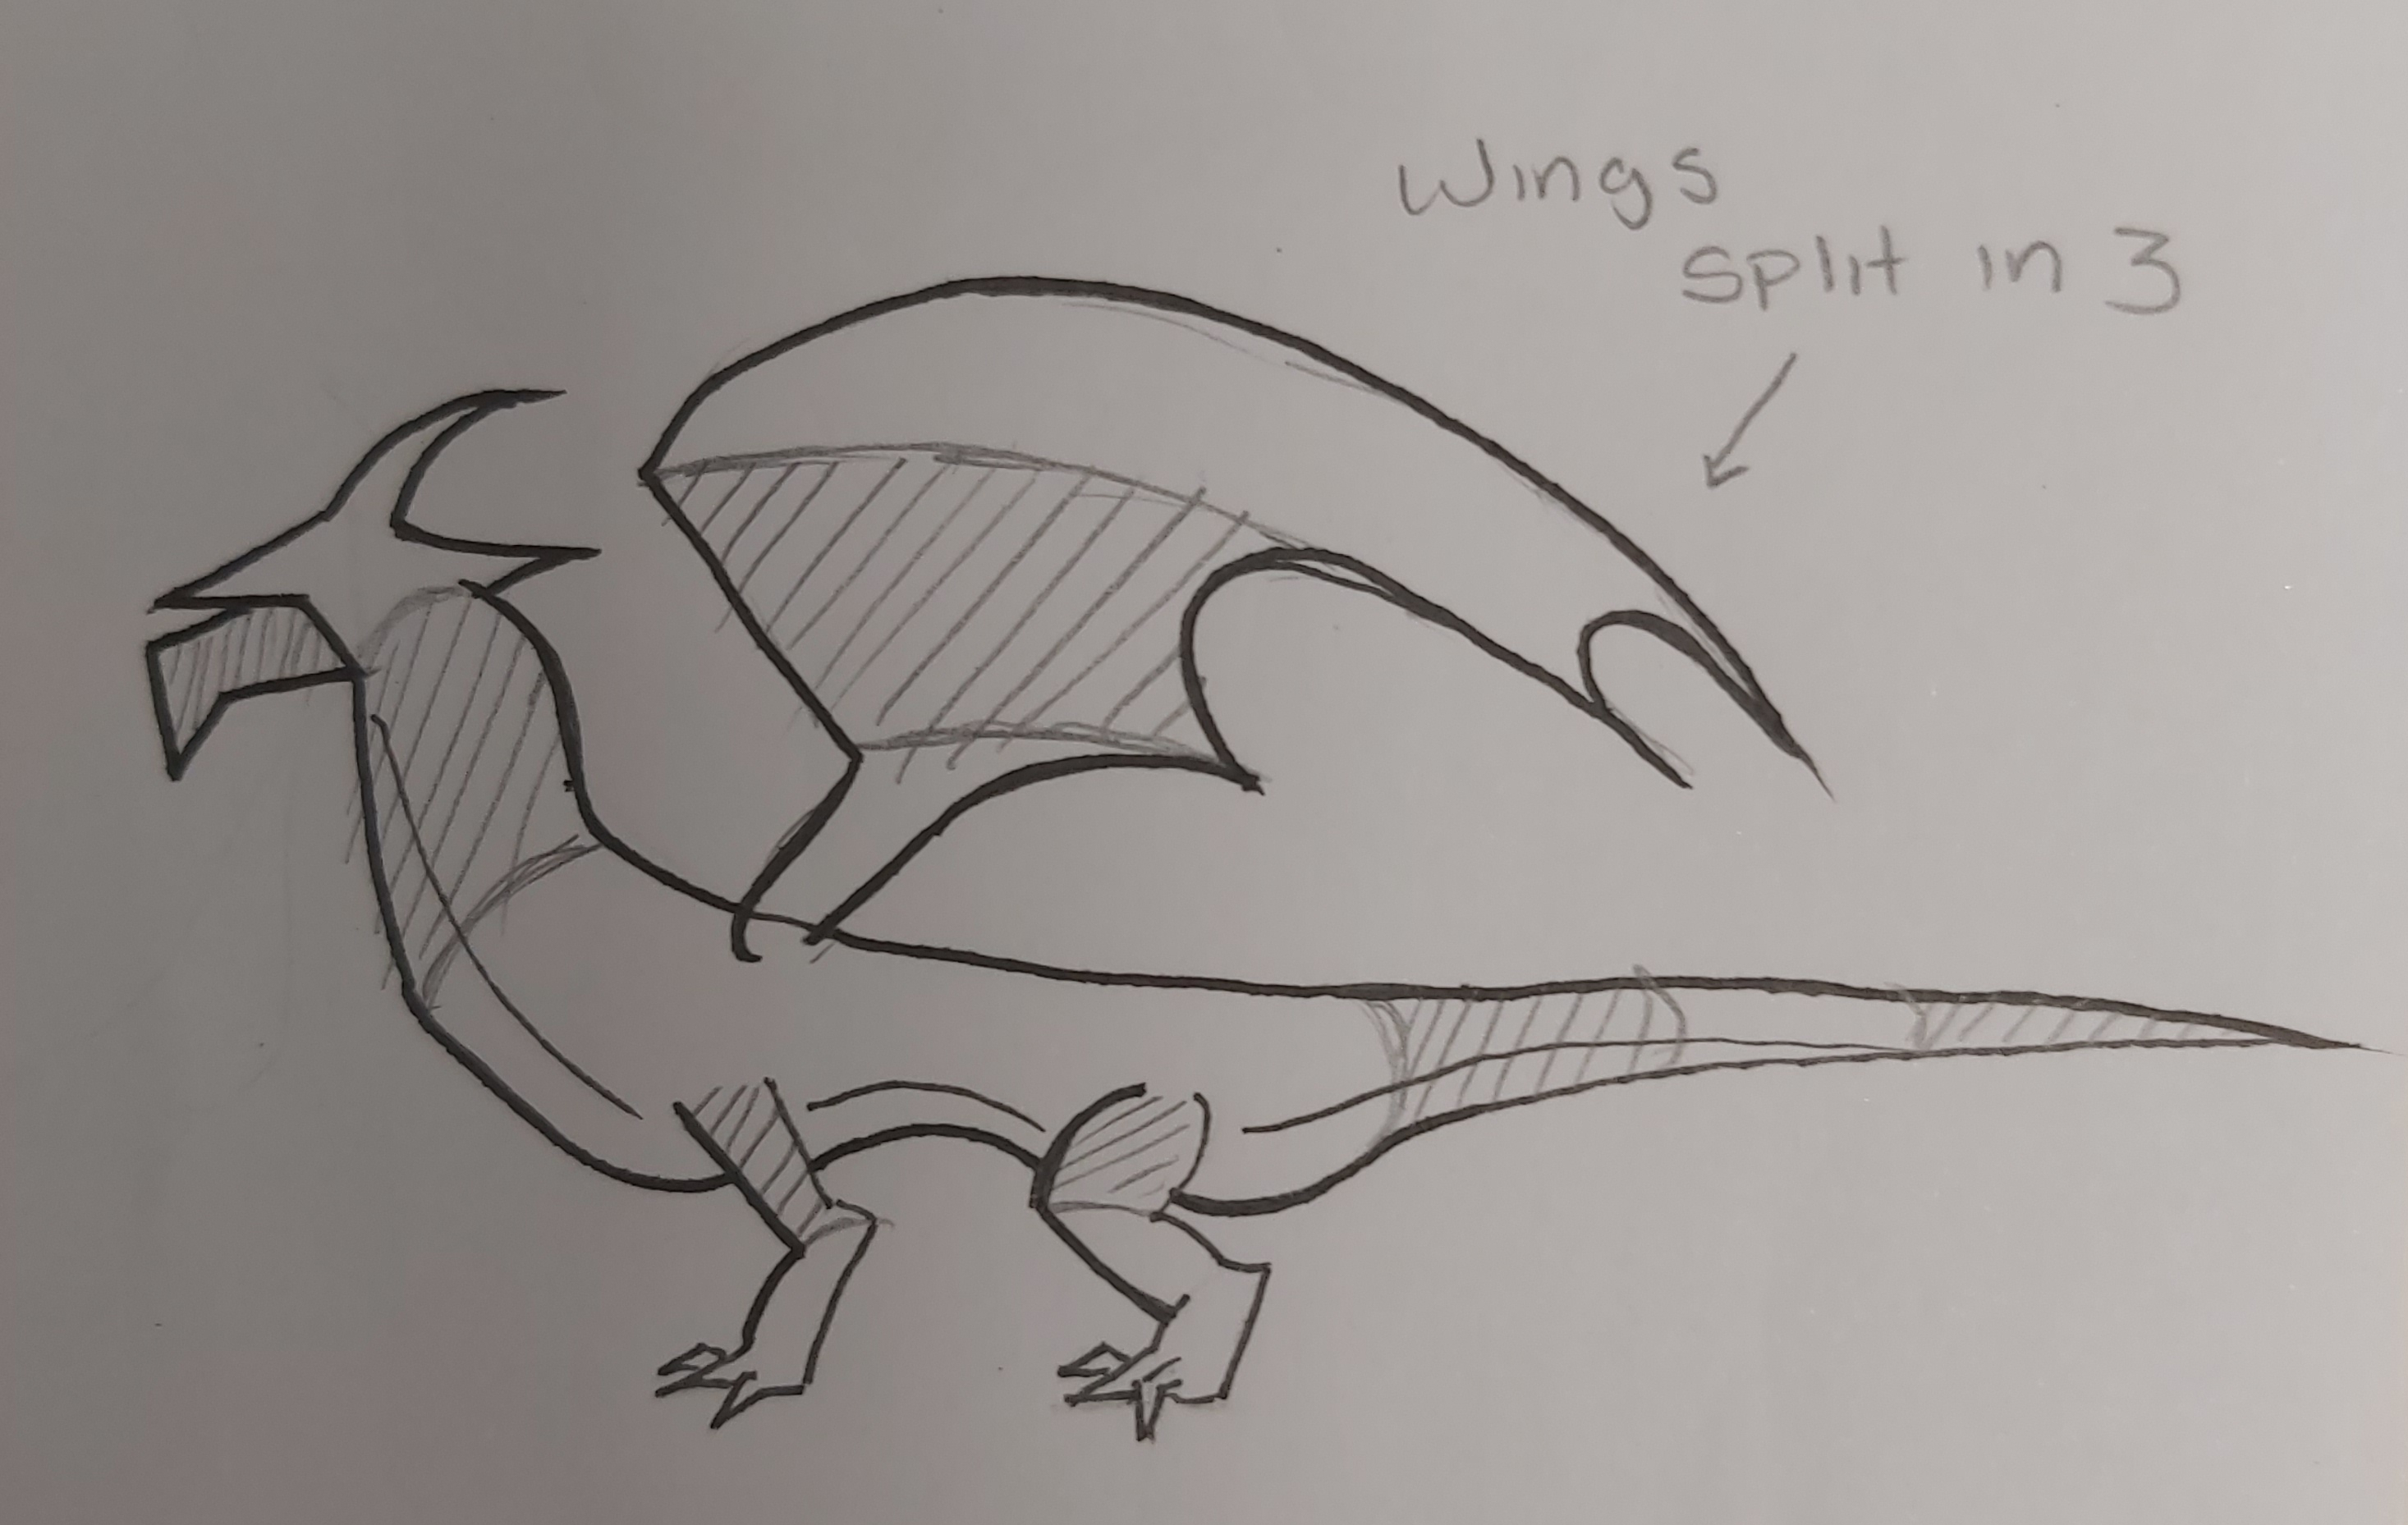
I knew I wanted to go for a low poly style for many reasons, the first being that it would be easier to sketch and plan out a low poly model, since I wouldn’t have to draw all the little tiny details on it and then write details about details and how things would work, another reason that I stuck with low poly is the fact that all my research is paper craft, which is a style which I really like, doing eveything in this style is a lot easier and less harmful on my time, allowing me to have more time to do something else like programming and texturing for the game. Low poly would also be ideal because it would avoid making animation really complicated when I come to it, since I wouldn’t have to have loads of bones for the rig and I wouldn’t have anything extra which needed to be animated. The wings, and the body is split up so I know where to section up the body, I wanted to work on this dragon in lots of different parts, not just one whole body.
I really like how this looks, since you can easily tell this is a dragon, and it looks terrifying, thanks to the sharpness of it’s horn, jaw, tail, claws and wings, that was the sort of look I was going for.
The things that I don’t like about this design is how simple I had to go, since I wanted to add so much more detail, but I just don’t want my 3D modelling to consume too much of my time.

I done this just for clarity, so I can see what a neater version of this dragon would look like instead of my sketches, I also used this just incase I would rather use this for my 3D modelling reference.
![]()
Silhouetting – To make sure that my dragon looks like a dragon, I made the drawing into a silhouette, silhouettes are very useful to make sure your model will be clear and easy to tell what it is, it’s also useful so you can notice any faults with your design, since you don’t want any important detail to be hidden away and not visible, silhouetting is also useful when you’re trying to make many variants of enemies and characters, and you need to make them all look different, it’s also useful to use silhouettes to help with the characteristics of a character, and from the silhouette, I can see there’s a lot of sharp shapes, mixed with smooth curves in this design, which indicates the dragon is neutral.
Making these silhouettes would help me with my time management because I would be able to see a mistake straight away with the design of my dragon before I 3D model it.
To make me understand the importance of silhouetting, I read through this blog: http://characterdesignnotes.blogspot.com/2011/03/use-of-silhouettes-in-concept-design.html
This was simple to do, I took my cleaned up lineart of my dragon and filled it in, and this was the result.
I personally think this is clear enough to tell that this is a dragon, so I’m happy with this design and I’m happy to start 3D modeling this dragon as it is.![]()
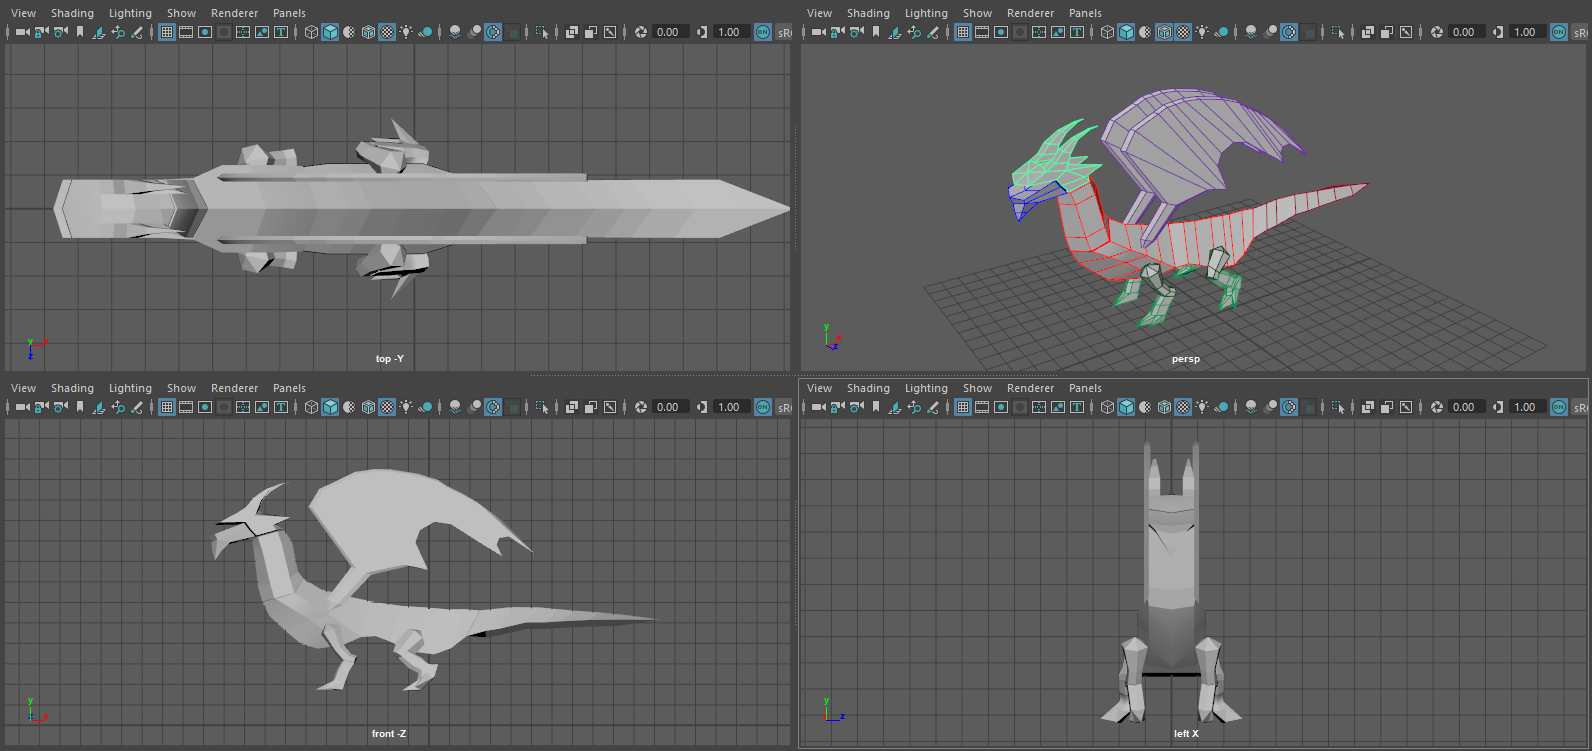
Block outs – To do my block outs I headed to Maya and put a reference picture of my dragon on there.
I simply traced the dragons shape with cylinders, this is useful to see if I like how the dragon (roughly) looks in 3D.
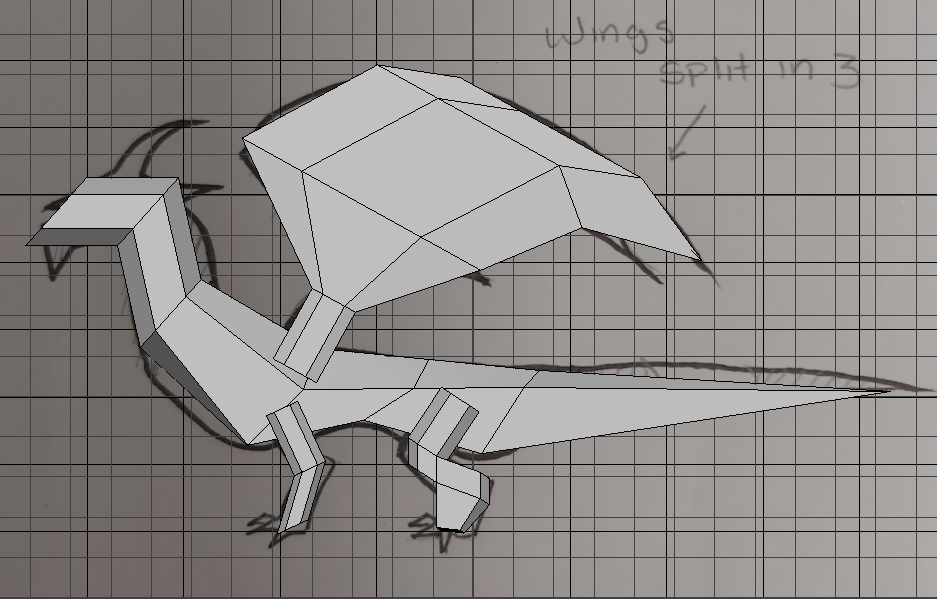 Now doing this blockout has taught me, that if I’m working with cylinders, I want each cylinder to only have 6 faces, because it’s easier to work with them that way since there is 3 faces each side, and that prevents things like, for example, 4 faces being on one side and 5 being on the other making it overall look unequal, so when I come to 3D modelling the final dragon, I’ll make sure that there is always 3 faces on each side.
Another thing I learnt whilst modelling this is how to work layer, and how to work the mirror tool.
This makes 3D modelling a whole lot easier for me, since I can use the layer tool to split up my modelling into sections.
The mirroring would help me with mirroring the legs and the wings on the dragon.
To get the mirroring to work with my wings, I have to do it object by object, so I can’t mirror both the wings and the legs.
I pressed the little mirror simple and turned Cut Geometry off, I then changed the axis to the Z axis, and then it is done, I done that with both the legs and wings, and my block out is complete!
Doing these block outs really help me with time management, because at this stage, I can decide whether I am happy with the 3D model or not, and if I am not, it’s fine because it’s only a block out, this would also help with time management because it would help me with understanding risky techniques during the modelling of this dragon instead of trying these risky techniques on the final model and messing everything up.
I’m working on this model in Maya, since I am more comfortable with making my 3D models in Maya than I am in any other 3D modelling software.
I am using the traditional art sketch of my dragon instead of the lineart since I felt like it helped more than the lineart because the lines were thinner, there wasn’t really much difference between the lineart and the sketch.
![]()
- What went well with this task?
I managed to quickly put together a sketch, a refined sketch and a silhouette for my dragon character, all of which I liked, even though beforehand I didn’t know how to draw dragons, I learnt how to draw them by using my reference photos of dragons on my Pinterest.
I’m also very impressed that I’ve learnt some new 3D techniques, I’m beginning to get comfortable with 3D modelling.
- What didn’t go so well with this task?
I feel like since I need to restrict myself with my concept and 3D modelling, I could’ve produced a nicer looking dragon, but I needed to stay low poly, for my times sake, and my final projects sake since 3D isn’t my focus at all.
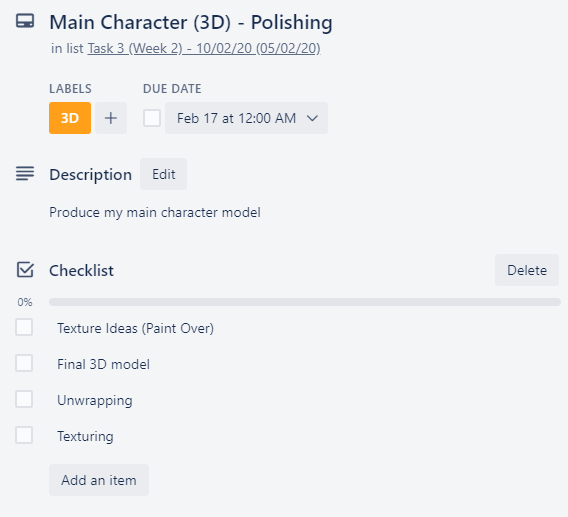
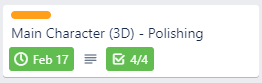
Main Character (3D) – Polishing
Since my production for this 3D modelling won’t be as detailed as a 3D modelers work, I 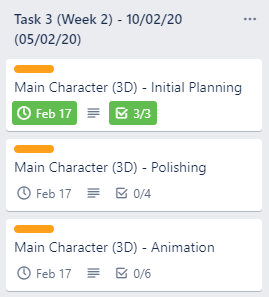 narrowed down my tasks a bit, since I wasn’t going to produce a whole detailed 3D piece.
This is what my weekly task list looks now I’ve narrowed it down.
The task which I’m working on now is polishing, so I’m going to be working on the actual final 3D model, and texture ideas, I am then going to do some unwrapping.
Final 3D model – Using the techniques from my block out (but more detailed) I produced a final 3D model which I’m going to use in my game, this didn’t take me too long, and the final product of this model is exactly what I was hoping for, a cool (in my opinion) looking low-poly dragon.
The techniques I used from my block out was that the cylinders had the same amount of faces, the amount of faces I used in my block out I found was perfect for making this dragon model, and if I needed to add any detail in the long run, it wasn’t hard to add more cuts so I could have more faces. Another technique used was the mirroring which I done in the blockout, this was used for the wings and the legs on this model.
The reason this model didn’t take me long to do is because I had all the basics done on the blockout, so I knew where to start and how to do all the complicated parts of this model.
Doing the blockout in the end was very useful on saving time for me because otherwise, I would’ve been stuck on starting the final model right away and it may have not turned out as nice, I could’ve made multiple detailed 3D models which didn’t turn out how I wanted them to if I didn’t do a block out plan.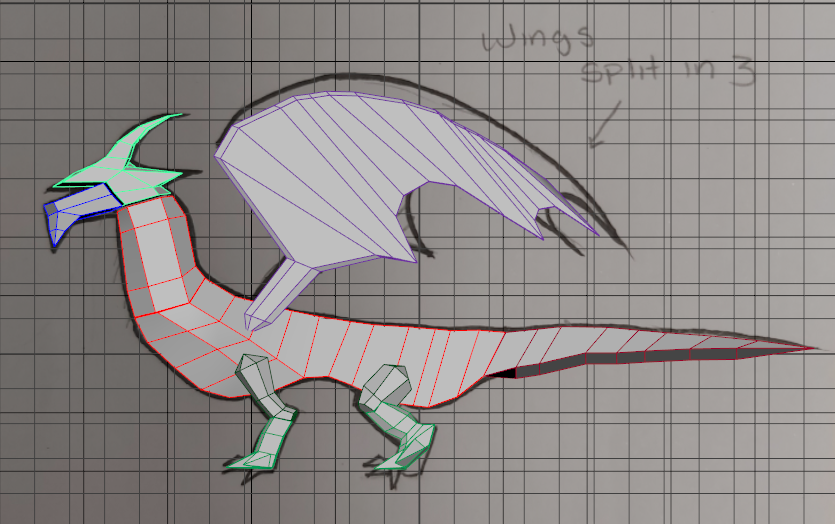
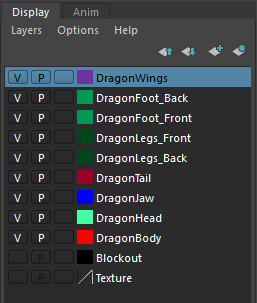 Whilst producing this model, I split it up into sections, which would make animation later easier.
I put these sections into their own separate layer, so I can easily turn them on and off when I please, and this is what different layers I used on the dragon
Learning how to use the layer tool in Maya has really helped me with my modelling, since I could have a Texture on one layer, which I set the 3rd box to R, so I can reference the texture, but I can’t click on it, and then I can also set one of the layers 3rd box to T, to make it transparent, so I can work on other sections, I then could click the V in the 1st box to make the wireframe and model disappear, this is useful with my block out.
My use of layers would be really useful later on in the development of my game because I am planning to use gibs in my game, similar to how objects break apart when they’re destroyed, I want my character, and my enemy characters to break apart into body parts when they’re killed.
![]()
Unwrapping – Unwrapping has always been annoying for me I just find it annoying because there is so many different ways of doing it, and I only just understand doing one way, it is quite a challenge in my opinion to try and imagine how to unwrap a 3D model so it is easy to texture and understand, I was considering just leaving my dragon untextured and just make it a flat one coloured dragon, the reason I wanted to do this is because many of the papercraft dragons I had on my ideas generation only had one colour on it, but I decided against it, since texturing it won’t be too much work anyway, and I felt like my dragon didn’t really look like papercraft anyway.
I began unwrapping by doing each layer section separately, for example, I will unwrap the body and that would be a separate texture.
This is my process of unwrapping the main body, step by step.
I unwrapped it this way because this is the only way which I know how to unwrap 3D objects, and I’m sure that automatic unwrapping would produce a much poorer job, I also used this method of unwrapping because I find it’s a lot quicker for me personally because I know how to do it this way.
I began by selecting the body, and using a cylindrical projection, this is because the texture has to wrap around the dragon.
From there, I rotated the cylindrical projection and changed the size of it so it wrapped entirely around my dragon, this is so I don’t get any parts of my dragon missing.
After that, I sewed the entire UV together, this is so I can do my own cutting on the UV.
I selected every edge on the under belly of the dragon, this is because this is the section the player will see the least.
I then cut that and Unwrapped the UV, I cut off a few other sections and then neatened everything up and then I was done with unwrapping the dragon.
After that I moved onto the other parts of the body, applying the same technique.
This is the result of my unwrapping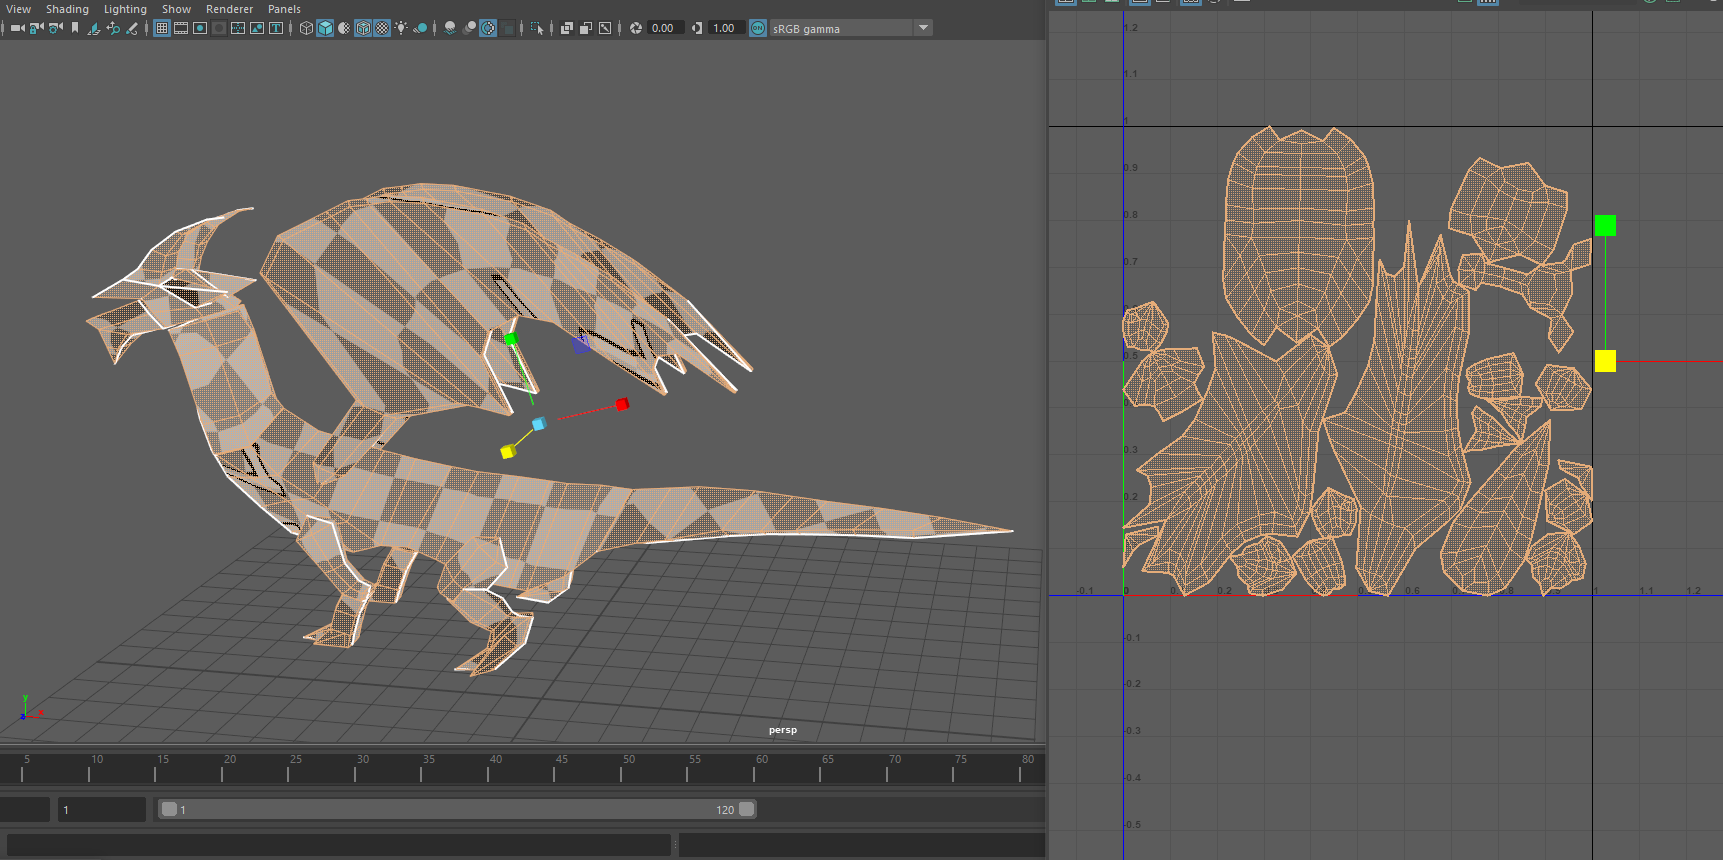
![]()
Texture Ideas (Paint over) – To do this I needed to take a screenshot of the dragon and paint over the top of it, I wanted to do it this way because I feel like it would give me a more accurate idea of what I want my dragon to look like at the end.
This is the different colour ideas I’ve come up with through my paint over.
This is useful for my time management because it helps me come up with ideas in the back of my head of how I want the colour scheme of the game to look, so I can always think of these colour ideas when making levels.
I came up with these colour schemes by using https://coolors.co/ This website is helpful when you want to come up with colours which look nice together, and it also prevents me from picking colours which may look nasty together but I don’t notice personally.


I didn’t know which colour scheme I liked out of these, but I feel like I wanted to wait until I’ve done more work for my game and see what colour scheme fits in best then.
![]()
Texturing – I began to texture the shape of the dragon’s body onto my texture sheet, but colours can be changed later, this is what the Texture sheet looked like at the end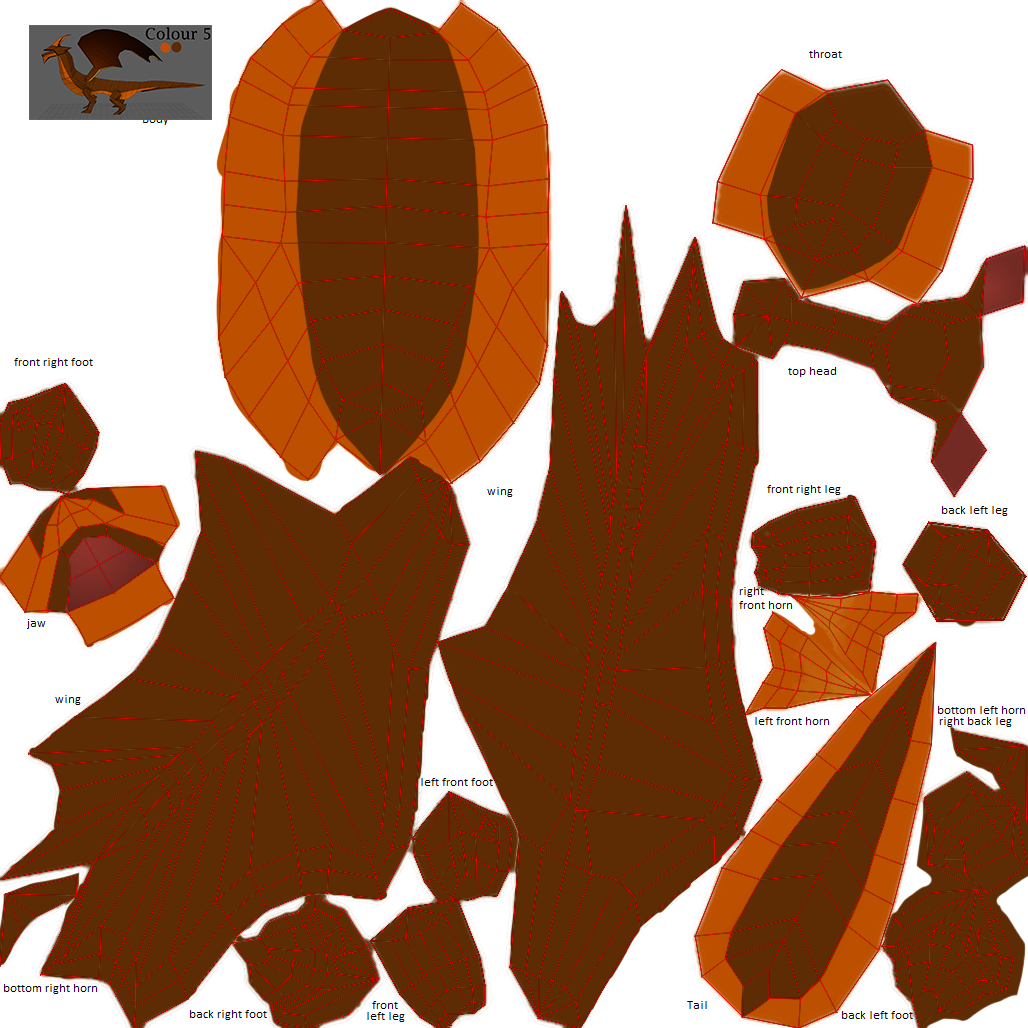
I stuck with colour 5 because on this one, I can just adjust the hue and saturation and be close to the other colour ideas which I had.
What I done to make my texture more smooth on the model is I coloured the background in the colour of the wings, since thats what colour the majority of the stuff on my texture sheet is.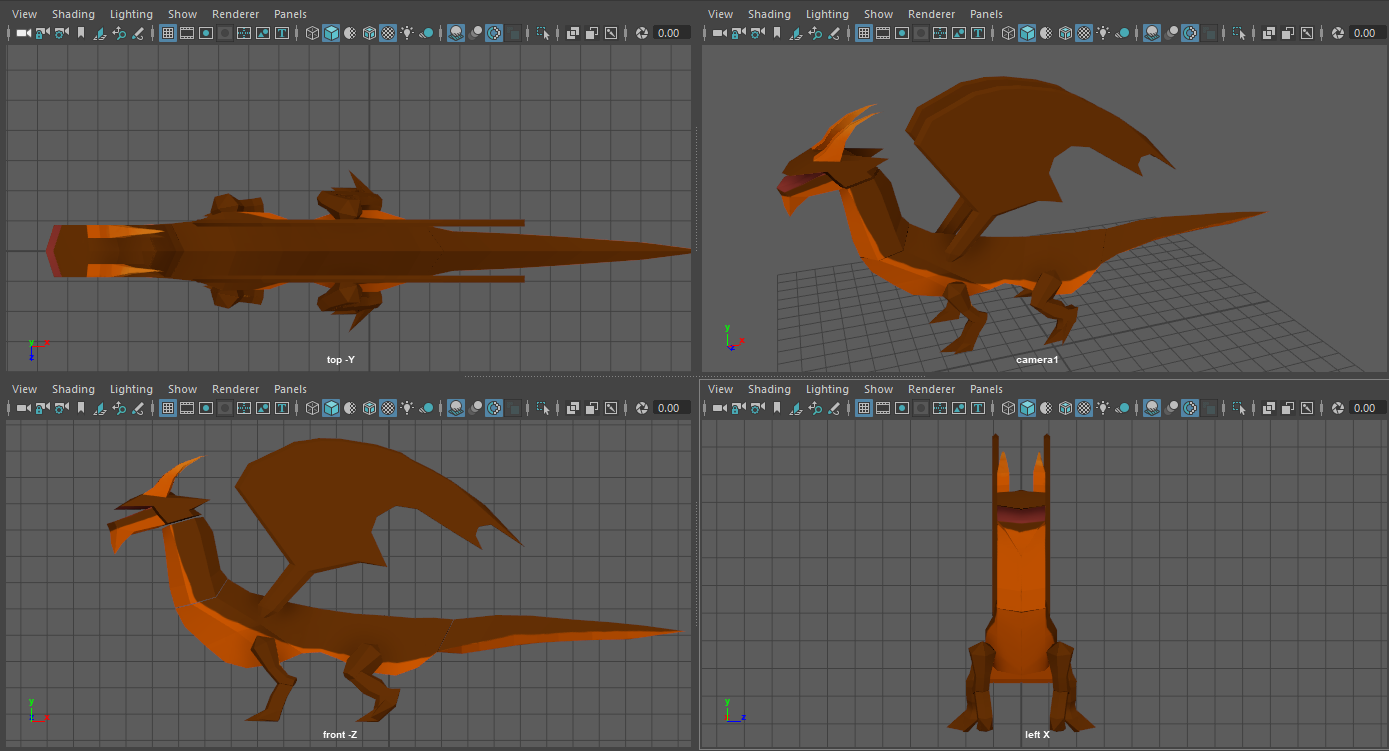 This is what it ended up looking like and I’m happy with the results. the colours may change later on.
To make this texturing process quicker, before I began texturing, so I don’t flip between Maya and Photoshop. I began by labelling up what each part of the texture sheet does. This saves me time in 2 different ways, firstly, I didn’t want to have Maya and Photoshop open at the same time, since that would make my computer slow, secondly, if I have labels on my model when I am modelling it, I wouldn’t have to have Maya open, so I can just model the texture sheet by itself and have a rough idea of what it looks like in my head.
I haven’t worked on fully polishing this texture for this model yet since I feel like that’s something which would be better to do when I’m almost finished with the games development so I have a style in mind for everything.![]()
- What went well with this task?
I feel like I achieved a lot today with my 3D modelling as I was able to do this whole task in a single day, which is great for me so that means I can focus on programming stuff instead of 3D modelling.
I love the outcome of the dragon and the style of the dragon, I think it’s very cute, and I like how my simple texturing style fits in with the low poly model.
- What didn’t go so well with this task?
I felt like my colour generation didn’t go so well since my character is the first thing designed and I don’t have a proper colour pallet for my game yet, so I stuck with basic colours but I’m sure the colours would change later on in production.
Main Character (3D) – Animation –
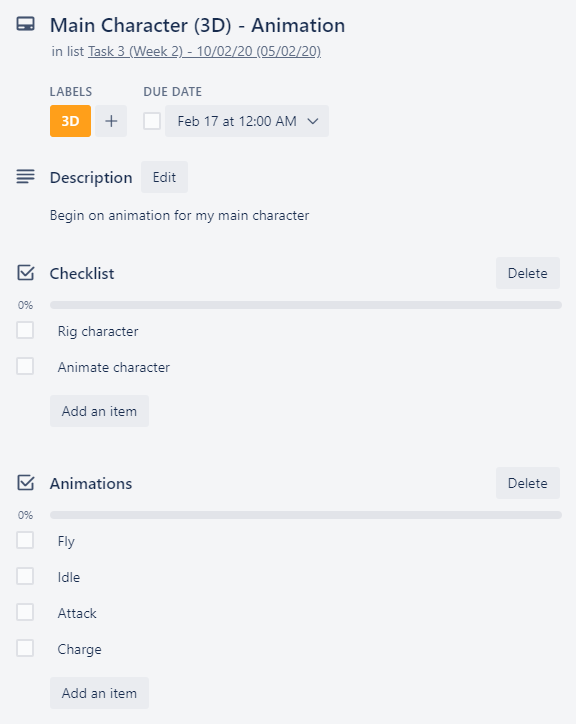
Rig Character –
To start with animation, I had to watch a few videos, I also had a friend help me through 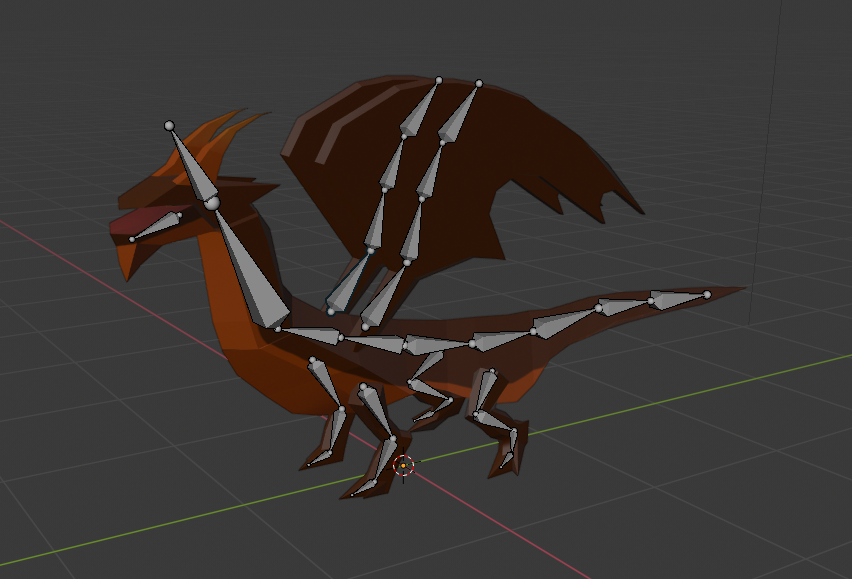 rigging my dragon so I could use what I learn to rig other characters which I’m going to have in my game.
I began by importing the FBX of my dragon into Blender, since I feel like its a lot easier to rig and animate in Blender than Maya.
After I done that I began rigging my character by making use of the front and side cameras on my model and making bones and extruding them out to fit inside my dragon prefectly.
I changed over to Blender to rig & animate my character just because I was more familiar with rigging and animating in Blender since I have dabbled in this before a little, another reason for rigging and animating in Blender is because I have a friend which uses Blender a lot, and I knew if I had any problems or needed any help, he would help me, overall it’s because I feel more confident using it.
I didn’t have to do much research on how to rig my character since I roughly knew what to do, the only thing which I really needed to do research into is the button shortcuts and where everything was since Blender had a big UI redesign since I had last used it.
I don’t think it would have taken much longer to animate and rig in Maya than it would’ve done doing this in Blender, the only reason these would take similar times is because I would’ve known how the UI works in Maya and where to go for things, but I would still have to watch tutorials, whereas with Blender, I only had to research snippets of information because I already knew bits and pieces and how to start rigging in Blender, the only reason why I chose Blender overall is because I felt more confident using it.
Animation TEST –
After that I began with a simple fly animation, to test out how I was going to do the animation and to see how it is to import my character into Unity with the animations, so I didn’t make this fly animation perfect. To make the animation smooth, a simple way I got taught to animate is to animate a keyframe for the beginning and then the end, and then drag out each keyframe for each bone so it looks like it is moving in a smooth animation, it didn’t take long and it wasn’t hard, but it isn’t perfect at all, since this is just a test.
I done this test piece just so I can figure out any problems which I could have going forward when I do the actual animations, overall, if I come into problems during making this test piece and figure out how to fix it, it would save me time when making the proper animations in the long run.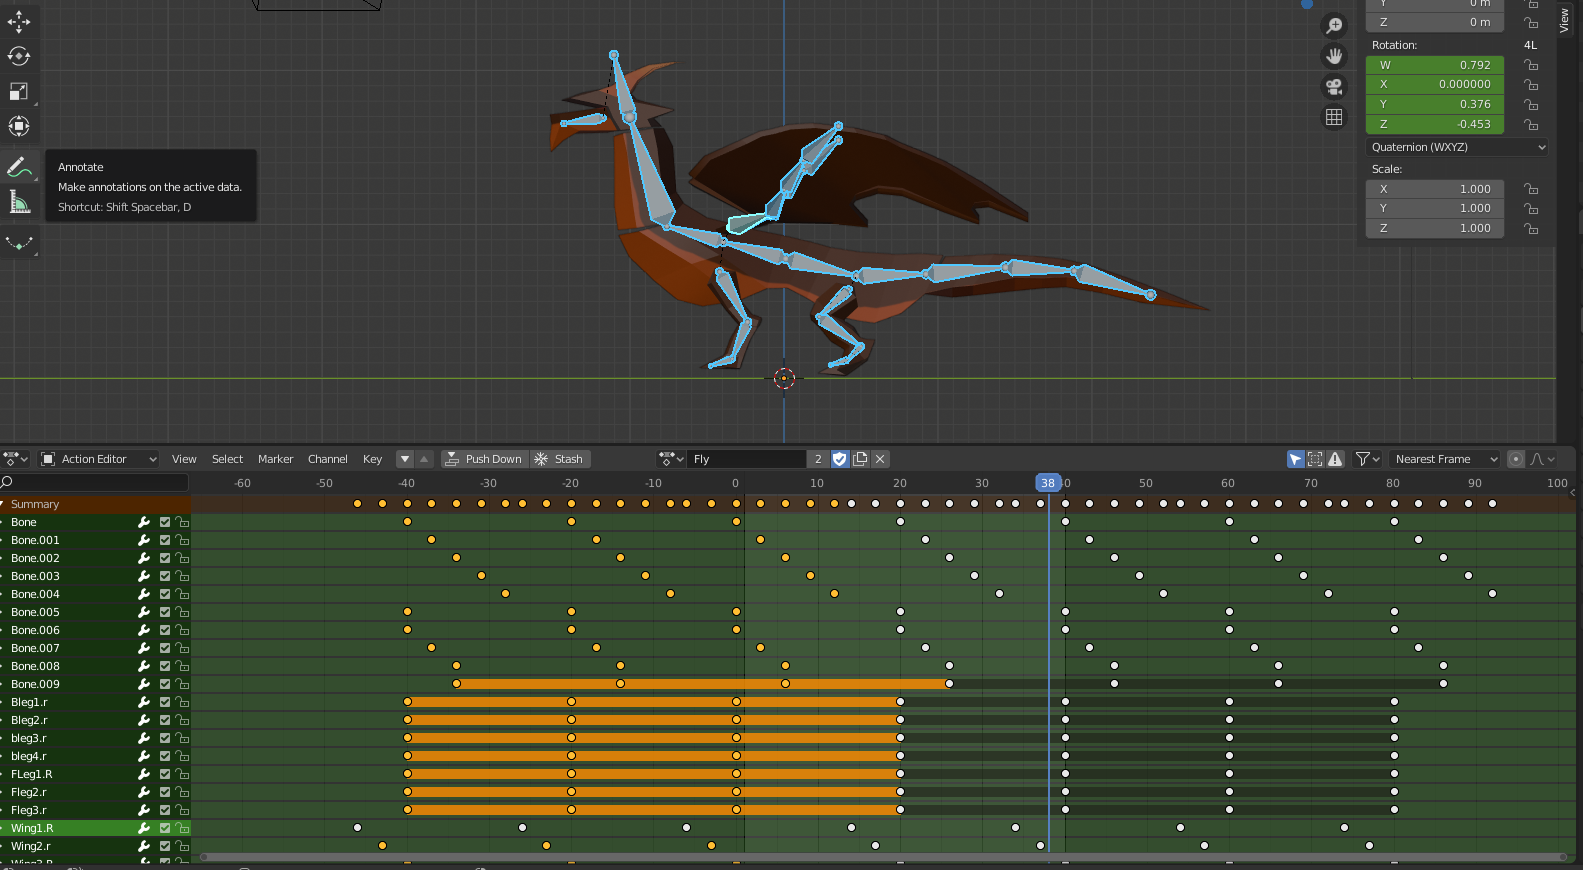
 Once I done that, I exported the dragon as an FBX and imported it into Unity, here is when I was struggling a little bit with getting the looping and keyframes perfect.
I had to set the start and end keyframe for the flying animation to be from 46 – 86, and then it looped perfectly, the reason I had to do this is because in Blender, to make sure the animation curves and loops perfectly, I had to duplicate the keyframes at -46 and then again ending at 86, so then, when I converted the character with the animation into Unity, the keyframes were all shifted up from -46 to 0, so I had to use 46 – 86 which would’ve been the frames in the middle of it. Now I could go onto animating properly.
Fly – So I began to do the fly animation again, as I looked at the test fly animation I had in the game and I don’t think it was dramatic enough, so I redone the animation again, applying the same technique I used on the first test animation. I positioned the dragon for the first keyframe, made sure I was on the dopesheet, since that one is easier to use for animation, and then I inserted the keyframes by pressing ‘I’ and then clicking LocRot, to insert a keyframe for each Location and Rotation which had been adjusted for the first keyframe, to make sure all keyframes for the character were insterted, I clicked ‘A’ on the character to select all bones and I just inserted the keyframes with LocRot for all of them again.
I had to make sure, when making my animation, I saved it by pressing the shield icon on the top of the dopesheet.
Once I done the beginning frame for the dragon, I dragged out to frame 20, and animated what I wanted the end frame to look like, in this case, the dragon flapping his wings down, I simply moved the dragon into the final frame I wanted and then selected all of the bones and inserted all the LocRot on them.
This is the result:
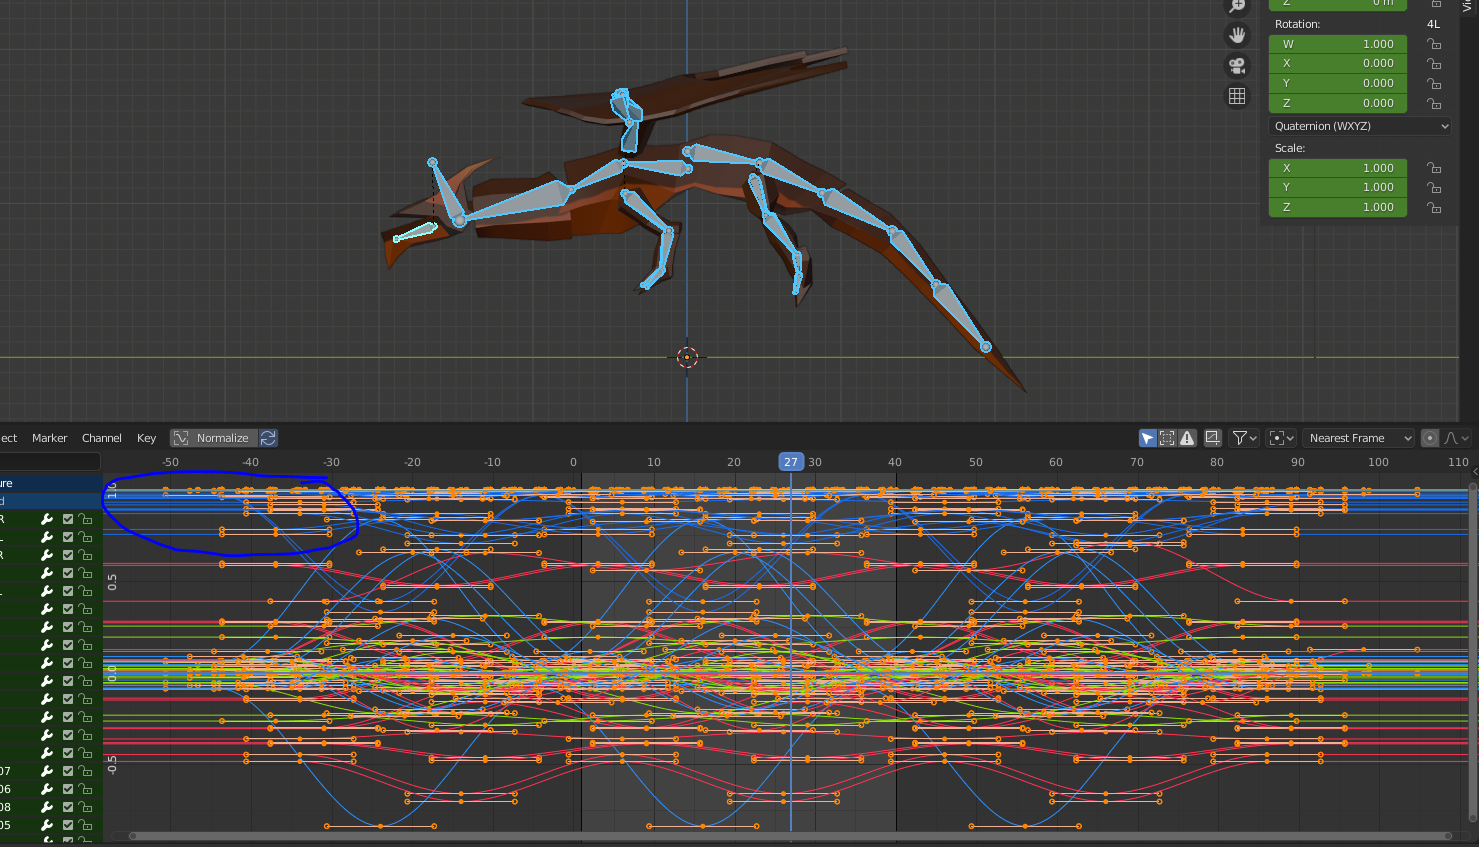
Now, it looks very stiff, so to stop it from looking stiff, I had to shift a few keyframes along.
before I done all of this though, I duplicated all of the keyframes in front of it and behind it as well so the animation is smooth so I don’t have to go into the curve editor.
Once I done that, I started with the head, selecting a few bones from the middle up to the head, these are the bones and how I did it. Since I only done it from the top half of the body, you can tell how much smoother this is in comparison to the rest of the body since you can tell the neck and head follow after much more smoothly.
All I had to so was select the bones, and then grab them and shift them up 3 keyframes, which was just the ‘3’ key.
I done this to all of the bones and this was the final smoothed result.
![]()
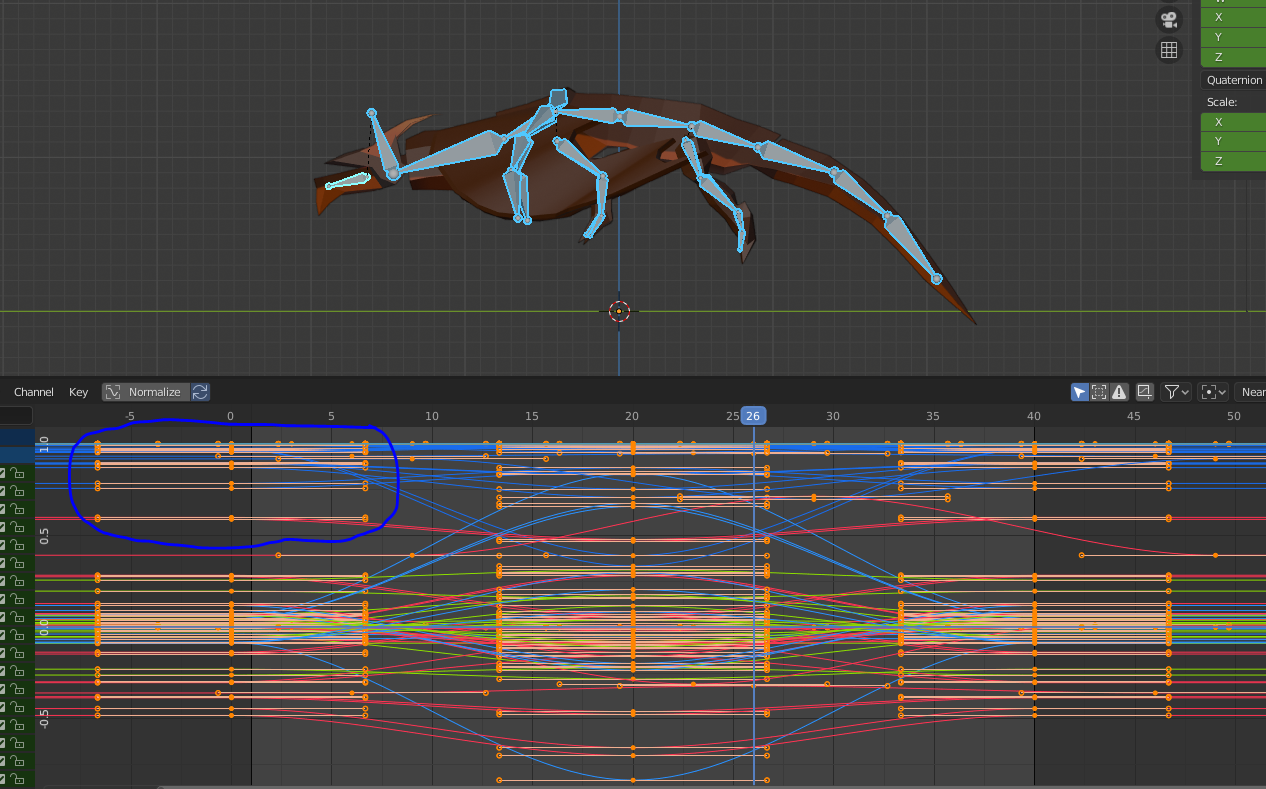
Idle – For my idle animation, I wanted it to look like the dragon is gliding, this animation was a lot easier, and a lot more subtle in comparison to the flying animation which I needed to exaggerate.
I applied the exact same technique as the previous animation and this is what the glide animation looks like:
I inserted both of these into Unity to see what they would look like whilst playing the game and I like them!

Strong Attack – Now, flying and gliding were easy to animate because you can imagine them quite easily and reference something like a bird for this.
But attacking is a different story, I had no idea how I could start with the attacking animations, so I done some research.
I found this image which would really help me with the strong attack animation.
Using this animation, we can see the dragon pull upwards, very exaggerated and then smash back down to attack, so this is what I’m going to try and simulate on my animation, except my dragon would be flying at the same time.
This is the result:

I felt this looked really stiff, and I didn’t like how the head went back really far, so I done this animation again without the head going back.
This one isn’t smoothed out yet.
I came back to this a few days later and made some tweaks and this was my result. (It’s not smooth since I’m using my PC and my PC struggles with running blender and screen recording software.
- What went well with this task?
I feel like my animation went really well in this task since I’m new to animation, I’m very proud of the outcome, knowing animation helps me so much making an indie 3D game.
I enjoyed doing the animation a lot, and I feel like it’s a useful skill to have! I’m so happy with how seamless they are and how well they fit in Unity.
- What didn’t go so well with this task?
I don’t like how I have to put in the weird keyframe numbers in Unity just so the animation loops seamlessly, but it is much better doing it this way then working with the curve editor in Blender.
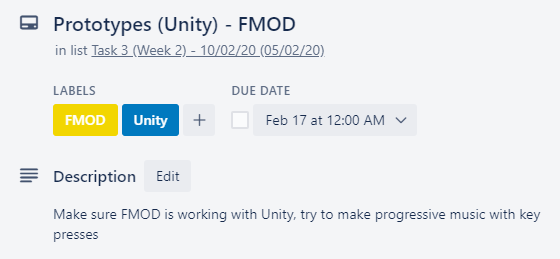
Prototyping (Unity) – FMOD –
I think adding adaptive musing into my final project is really going to make it so much better. The reason for this is because it’s so much more immersive than a game with a looping sound track.
Learning FMOD is a good use of my time because it would make my final project feel so much more polished and impactful, I could also carry these skills over to any other games which I plan to make
Again, I ended up adding more tasks to my weekly planner so I have enough work to do 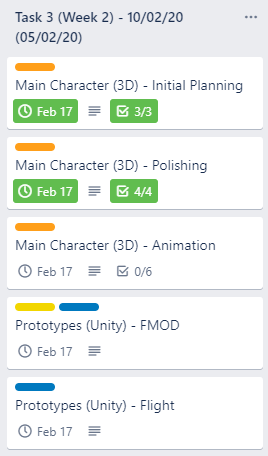 throughout the week, I’ve wanted to test out FMOD with Unity at college to see if it’s all alright to use before I start my project.
What FMOD is is a Unity plugin which allows you to get adaptive music in your game, and I’ve always loved music in games and adaptive music even more since it immerses the player, and tells them of threats or whats happening without saying anything!
I had to have FMOD installed on my USB stick since I had to run it off of that as I couldn’t have it installed on the college PCs.
To get FMOD working, I first had to install the FMOD Package, which I found on the website, I then had to install this package into Unity.
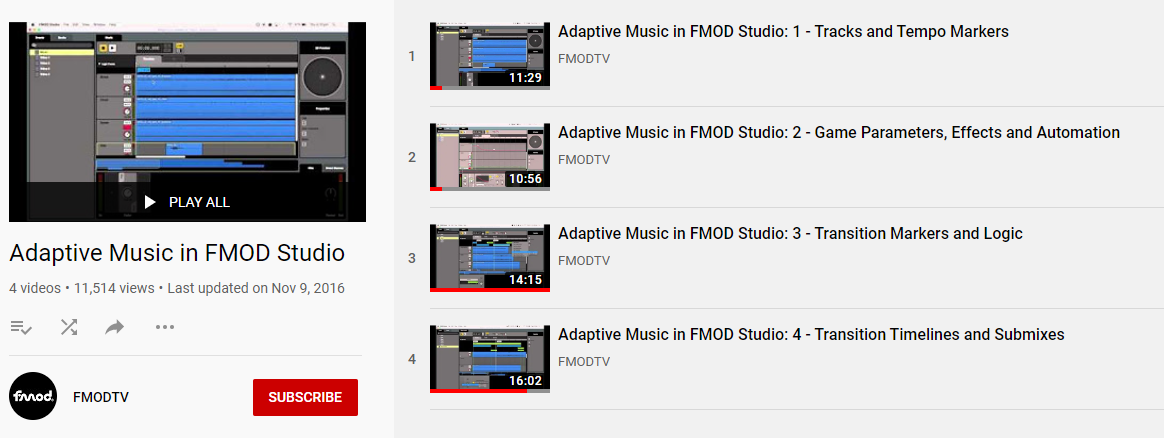
Before I started my FMOD Project, I watched every single FMOD tutorial on the FMODTV channel, and watching this really helped me so much in learning all the different techniques and mechanics.
Next, I went into FMOD, I needed to make an FMOD file and add my music into here.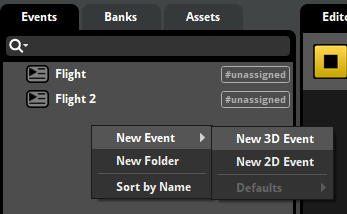
The music I was going to work on first was the flight music for the first level.
I began by making an event by right clicking the event section on the left had side and making a 3D event which I called Flight.
Once I made this event, I dragged in the music which I was going to use for the flight in the game. The music which I am going to use is called Epic by BenSounds, I found this song on GameSounds.XYZ and I think it fits perfectly in my game.
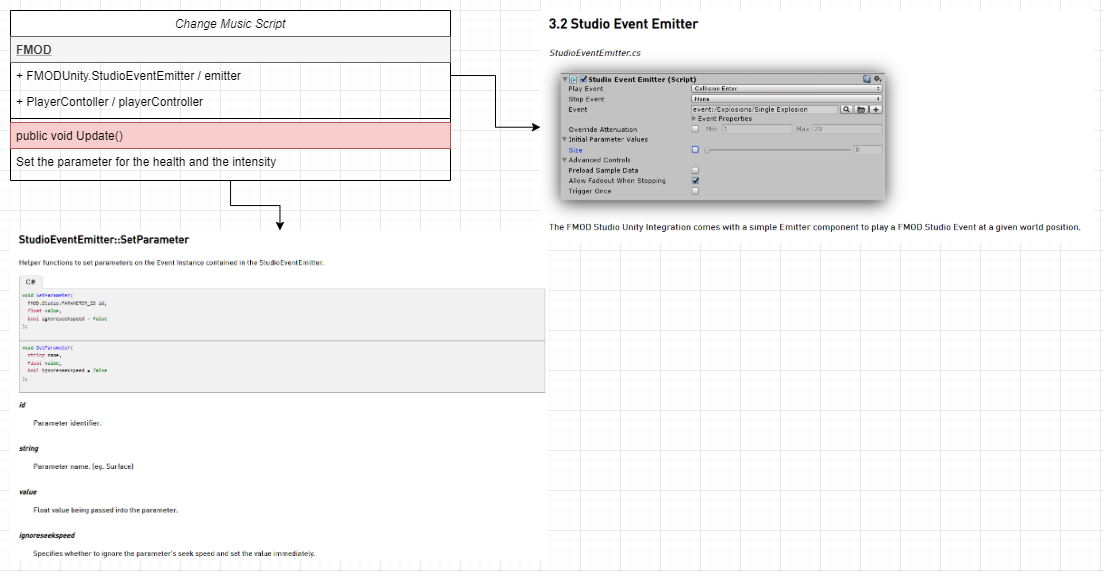
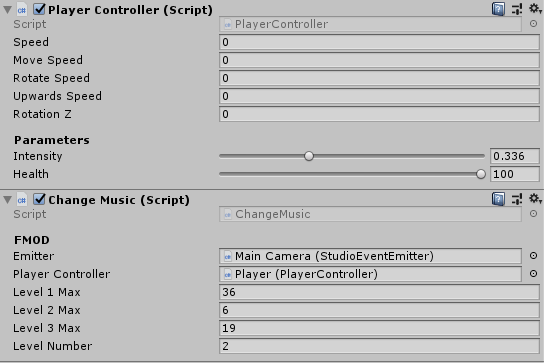
Once the music was in I began adding markers and loop regions for where I want the music to loop and transition depending on the intensity (how many enemies) in the level. In the top of this bar, you can see two tabs, called health and intensity, they’re parameters which determine what stage of the song is playing.
The health parameter is between 0 – 100 and the Intensity parameter is between 0-6.
The intensity is 0 – 6 because I’m planning to have 6 levels of intensity, as shown by the loops on the file, which are Level 1, 2, 3, 4 and then B_Level 1 and 2.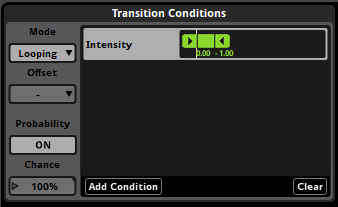
The transitions are what plays between switching between music intensity to give a bit of a build up.
For each loop I set a transition intensity, so this is so it knows what intensity music it should be playing.
I done this for all of the loops.
I then added a transition marker to all the loops so they know where to transition to depending on the intensity of the parameter.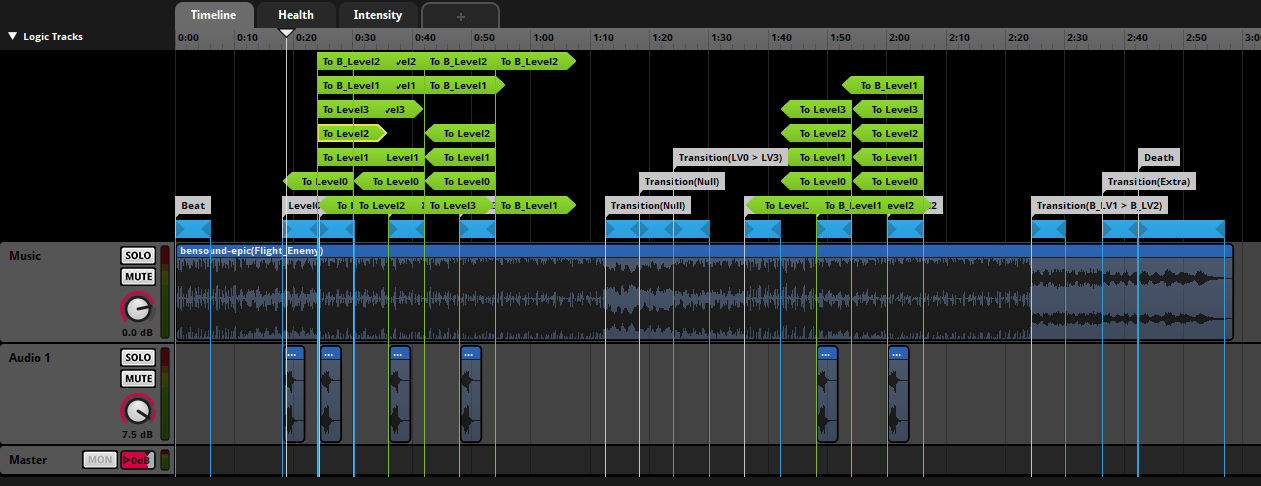 To make the audio seem less repetitive, I added some french horns which have a probability of playing 30% of the time on each loop
Alongside the french horns, for the 2 final loops (B_LV1 & B_LV2) I added french horns and flutes, and every time it plays that loop there is a random one of those which play.
I also added some heart beats to go along with the song which get faster the higher intensity you’re on, these only play when the players health is 20 or below.
Another thing I added to make more intense gameplay is I made it so the lower the players health, the more distorted the music becomes, I done this by applying a lowpass filter to the Music and Hit tracks, I then automated the volume along the health parameter.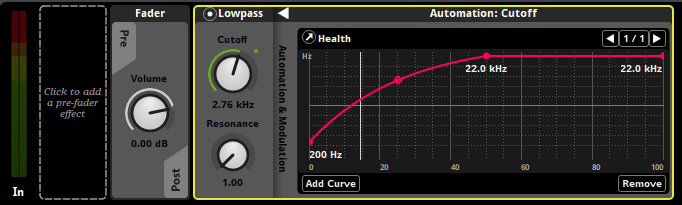
Once I have done that, I built the FMOD project and headed over to Unity, inserting the FMOD build into the FMOD package I had just installed into Unity.
This is what my FMOD preview looks and sounds like in Unity.
I thought this wasn’t much, and I wanted more impact in my music when the intensity is higher, so I headed into mixcraft and made a tune which would play and converted it out as french horns, choirs and bells and inserted them onto the higher intensities as well.
I then had to get this working by adjusting the parameter though a integer which is linked to the player.
This was mostly trail and error.
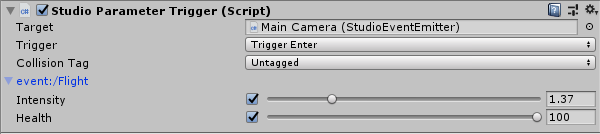 To confirm everything worked properly, I managed to get the music parameters to work through the player passing through a trigger, this was using the scripts which were pre-built along with the FMOD package, but this isn’t something I wanted at all, but at least through this I knew that my FMOD was actually working with Unity.
I began the planning by producing a UML diagram of what I would need to get this all working, this is the diagram.
At first, I was following a few video tutorials, to get a rough idea of how to work my parameters through C# in script, this is the script which I produced through watching a few clips on youtube on Unity Integration.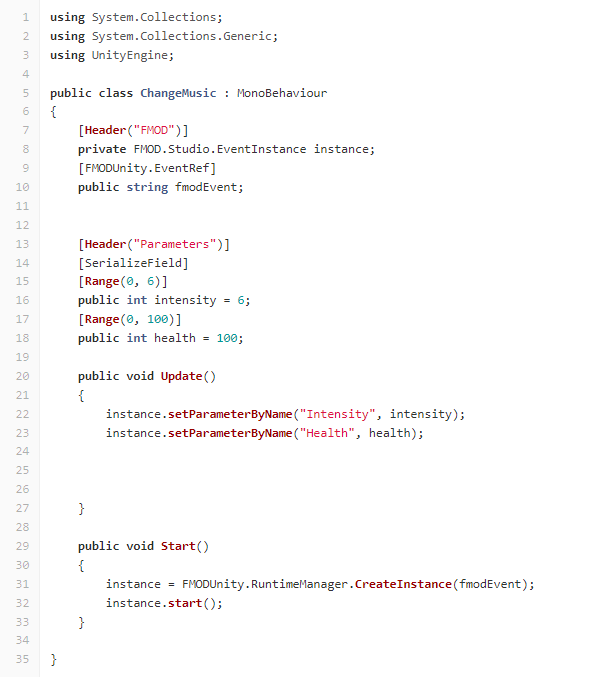
This didn’t work at first since I was trying to call an EventInstance instead of an EventEmitter.
I also didn’t need to have anything in the start function.
The intensity and health parameters are alright on lines 13-18, except that I would change the intensity from an integer to a float, just because I get looping issues with my music if my intensity integer is a whole number.
To fix this, I was looking through the official FMOD Unity API documentation, and I also asked a friend of mine to look through the code and help me out.
This is the working UML planning & code:

This script was a lot simpler than I thought it would be, and I’m making a reference to the playerController to directly reference the health and intensity so it would automatically update when the players updates. This is the result, the parameters are changed on the inspector in the right, and the music changes alongside that.
Adaptive music is going to change the whole production of my final game quite a lot since I would have to consider the music whilst doing level design, and what would make the intensity parameter change.
- What went well with this task?
I am really proud of how the music worked out, and I loved using FMOD, I found it very fun to use, and I’m very happy that I now know how to get adaptive music working in Unity, I’ve always really loved adaptive music in games since it really makes them feel so much more immersive.
- What didn’t go so well with this task?
I felt like it took a lot to understand how FMOD works, I’m still learning new things about the program, but it took me looking through loads of videos before I understood how it worked, I really understood how it worked when I looked through a playlist of Official Fmod Tutorials, but I wasn’t skipping around in the video at all, I needed to watch all of them in full length to understand.
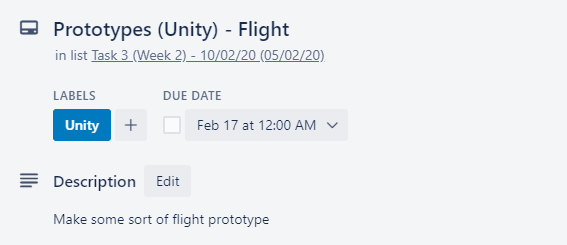
Prototypes (Unity) – Flight –
Now I knew I wanted to get my game working with a controller mainly, so I would be working with Axis instead of button presses.
I wanted to try a few different ways of making my flight seem as realistic as possible. my first way was to have the player be pushed forward and then the player controls the rotation of the character. This is what the script looks like.
I used this tutorial to give me a better idea of how to get flight controls to work.
And I used a UML diagram to plan this out.
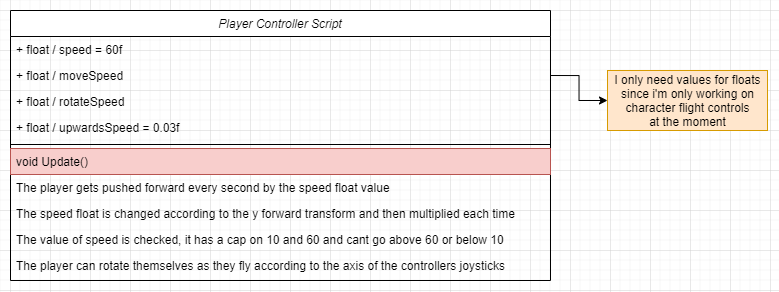
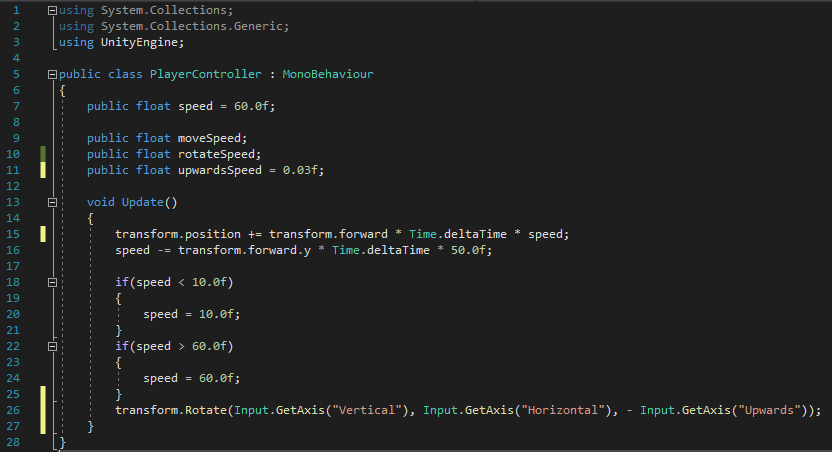
How the script works is the variables define what speed the player is going to be pushed forward every frame and how the player is going to move.
And then inside the update function, the first like is what is pushing the player forward and the second line is controlling the speed of the player when they move up and down to replicate a bird speeding up when they’re flying downwards and slowing down when they’re flying upwards.
There is also 2 if statements which make sure the player doesn’t pick up rapid speed when flying up and then a if statement which makes sure the player doesn’t slow down to slower than 10 so they don’t stop and go past 0 and start moving backwards.
After that, the rotation of the character is set by 3 controller inputs which calculate the Axis of the joysticks on a controller.
This is the result below:
I like how I got the rotation to work on all axis, it feels very smooth to play with a controller, I won’t be making this game to work with the WASD keys since I purely want to work with controllers and axis.
I don’t like how I haven’t clamped the rotation, it feels odd to play if you’re upside down, sometimes it doesn’t feel responsive enough and quick enough, I feel like I need to plan my controls more and do some research into rotations in Unity.
I tried another script as well which is a little bit different from the first, to make this I referenced the Input.GetAxis documentation on Unity Docs.
This is the UML plan and the script:
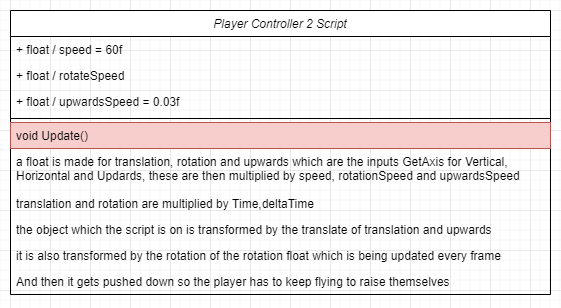

This script works the same as the other script mostly, except it has no forward pull, and the transform is also on the translate as well as the rotation, this script also gives a more realistic output on weight since the dragon always falls downward and the player needs to keep him up high.
This is the result below:
I like how you can control moving forward and rotating with the tight joystick, and then moving around is done with the left joystick, I also like how there is weight to the dragon and I like how it’s not pushing you forward and you’re free to fly around wherever.
I don’t like how there isn’t any roll on the dragon at all. To display what I mean by this, I’ve found this image.

I decided out of these two, I liked the first one the most since it was the smoothest playing with the controller, so I stuck with this one and made some small adjustments.
I decided to try out 2 different mechanics just because I wanted to find one which worked the best, both of these are very different in how they work and I think by doing both of them I was able to get a feel of how I want my final project to be like gameplay wise
What did I find difficult or easy?
I found drawing concepts and modelling the dragon easy, since I stuck with a simple design -I didn’t want to struggle too much, I’m very proud of the result. I found that unwrapping was easy as well since I’ve now got the hang of how unwrapping works.
Texturing was a different story though, it was a lot harder since I couldn’t tell by the UV what part of the model was for what, but I eventually found out and labelled it all.
Implementing FMOD into Unity was very hard at first when I didn’t understand how to use FMOD, but through watching lots of videos and following along, I managed to understand how it all works. Implementing it into Unity was another story, getting it all hooked up and working through code was hard, but it wasn’t until I read through some documentation until I understood what I needed to do.
The animations for the dragon were alright to do, I found the flight and idle animations the easiest, and I also feel like they’re the smoothest ones, but the attack animation was a lot harder since there was different phases to an attack animation unlike a flying animation where its just looped flying.
Getting the flight to work comfortably in my game wasn’t so hard, but I still feel like I’m not done with that yet.
What tasks didn’t I complete from this week?
I’ve completed all the tasks I set myself for this week, I’m on track.
Planning for next week –
How do I plan to catch up? Do I need to change anything about my work or planning?
I feel like I’m very far ahead, so I’m going to leave my college work for the half term since I have many other plans.
Week Number & Date: Half Term
List of Tasks planned for this week: NONE
Current Position –
What did I do this week and why did I do it? (Screenshots/Videos/Photos)
This week, I didn’t do any development on my final major project, but that doesn’t mean I wasn’t busy with other game development stuff!
For my half term, I attended a Game Development Program which I signed myself up for in Brighton, it was a 2 day program. On the first day I went to Fusebox and looked inside the hub for Wired Sussex, for the day, we all chatted about jobs in the games industry, there was also a few pieces of expensive tech we could look at, like Looking Glass, and some AR tech, this day had taught me how useful it would be to learn AR.
The other day in the Games Development Program was a day at Brighton University, I really didn’t find this useful though since I’ve already accepted my Unconditional offer at another university.
On Friday through to Monday morning, me and a friend participated in a 72-Hour Game Jam, although I didn’t do all 72 hours since I had work on the Friday, through the mini jam I’ve learnt lots which could be very useful with the development of my final project. This is the game.
https://horsehead.itch.io/team-swap-heroes
Planning for next week –
How do I plan to catch up? Do I need to change anything about my work or planning?
Next week, I plan to get back onto the production of my game, by developing enemy AI and implementing my animations to play properly when they’re supposed to. I also want to work on a targeting system and wing trails.
Week Number & Date: Week 3 (24/02/20)
List of Tasks planned for this week:
This week, I plan on working on enemies, and making it so the player can target them and shoot at them, I don’t plan to make anything look pretty, or to make anything look complete.
I want to also do some more planning into how I want my games levels to be laid out.
I’m going to do some more research into music, so I can develop a few different types of music for the different levels.
Current Position –
What did I do this week and why did I do it? (Screenshots/Videos/Photos)
VFX (Unity) – Fire Visual FX
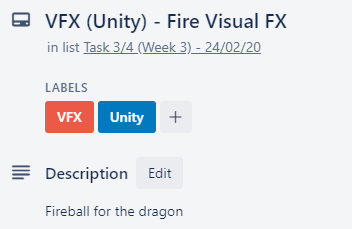
I learnt a lot about visual effects through a program where a visual effects artist came into college and taught us about how to do visual effects, and how to use the particle system, I started out by understanding the different modules of the particle effects system and then doing sketches of what I wanted to make.
Once I got a final idea for the fire I wanted to make for my dragon, I began making it, this is what I came up with:
I then added an animated texture sheet to the tip of the sphere, I made it wrap around by making a mesh of a sphere and cutting off half of it, I also had to make sure the mesh was unwrapped properly.
To make importing into my final project easier, I made the fireball it’s own package, which means, I can just export it into my project when I’m ready.
I decided to add this into the blog since it is how I’ve learnt to make VFX, making a fireball would help me with learning how to make visual effects because I can then produce other VFX quicker since I now know how to do this.
- What went well with this task?
I feel really proud of the outcome of this fireball, I really like how it looks and how it feels cartoony with the texture sheet animation, I feel much more confident with using the particle system in Unity now, so I feel like I can use this to my advantage and produce some more nice looking particles for my game, I could the particle system for when explosions happen, and when big attacks happen, I still have a lot more to make and this is only one of them!
- What didn’t go so well with this task?
I felt like the particle system can be really expensive for the game, I saw lagging on the computers at college when messing around with a few modules in the particle system, and I hope that doesn’t effect how fast the game runs.
Music (FMOD) – Development
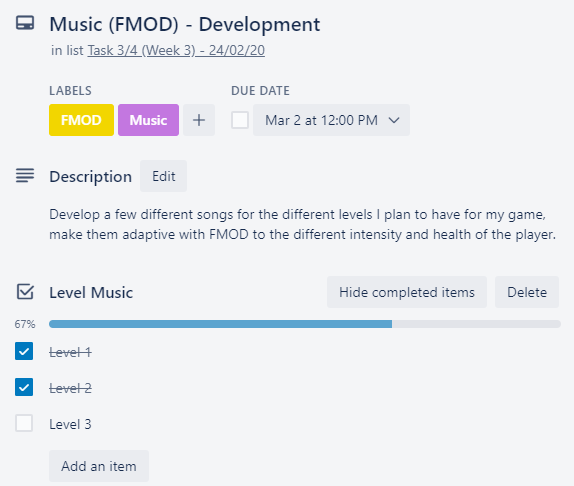
I didn’t want the same music to play all the time, so I began making some more adaptive music for my game, I got the music off of BenSounds, and they’re all royalty free.
This is the adaptive music I made for Level 1
Level 1 –
I made this exactly the same way as I made the first FMOD music, by using loops, and markers, along with parameters and conditions.
This was going to be for the first level, where the dragon is in the distant future, the one which I’ve already developed is going to be for the modern day, so level 2.
I picked the music I want based on what time they feel like they’re from, so the level 1 music has to sound more futuristic, and that’s what I’ve done.
The level 2 music has to sound modern day and the level 3 music has to sound old, as if you’ve time travelled back a long way.
Doing this right now is very useful when it comes to level design for my game, since I can listen to these songs as I’m designing the level so I get the right feel for them.
- What went well with this task?
I feel like this level 1 music is much more clean and adaptive than my level 2 music, but I also feel like it’s adaptive to a point.
I’m really happy with the royalty free music which I have found
- What didn’t go so well with this task?
The change I made between 00:20 in the video above doesn’t feel natural, but some other ones do feel a lot more natural, so I feel like when developing this game I need to make notes on what can transition to what.![]()
Level 3 –
This music had to be a lot more medieval sounding, as if it’s come from a long way in the past, so I found this song from BenSound (The same royalty free music producer for the other two songs) and I felt it fit perfectly, I followed the steps I done for the other two songs to make this one adaptive too.
- What went well with this task?
I feel like my choice of music for this final level is really good, and I’m proud of how seamless the loops are on this one. This song is very empty for the reason that I think that quiet music has more impact for a final level as it allows the sound effects to be amplified and the player knows that this is the end.
- What didn’t go so well with this task?
I felt like the whole song sounded like the same, but in a way that’s what I’m trying to go for.
![]()
Asset Research (3D) – Enemies
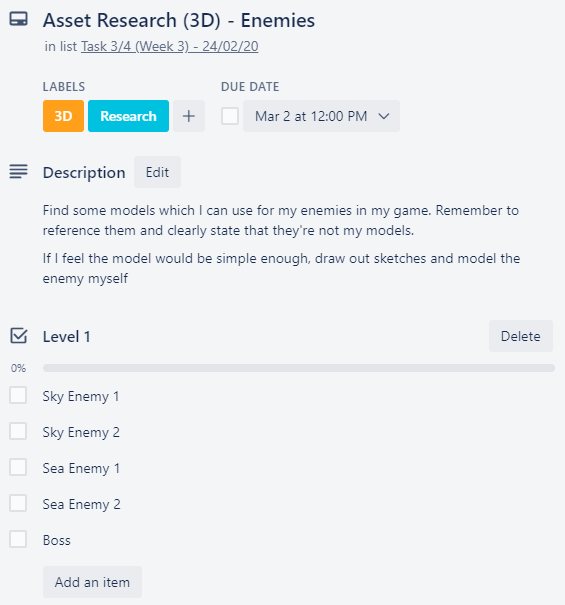
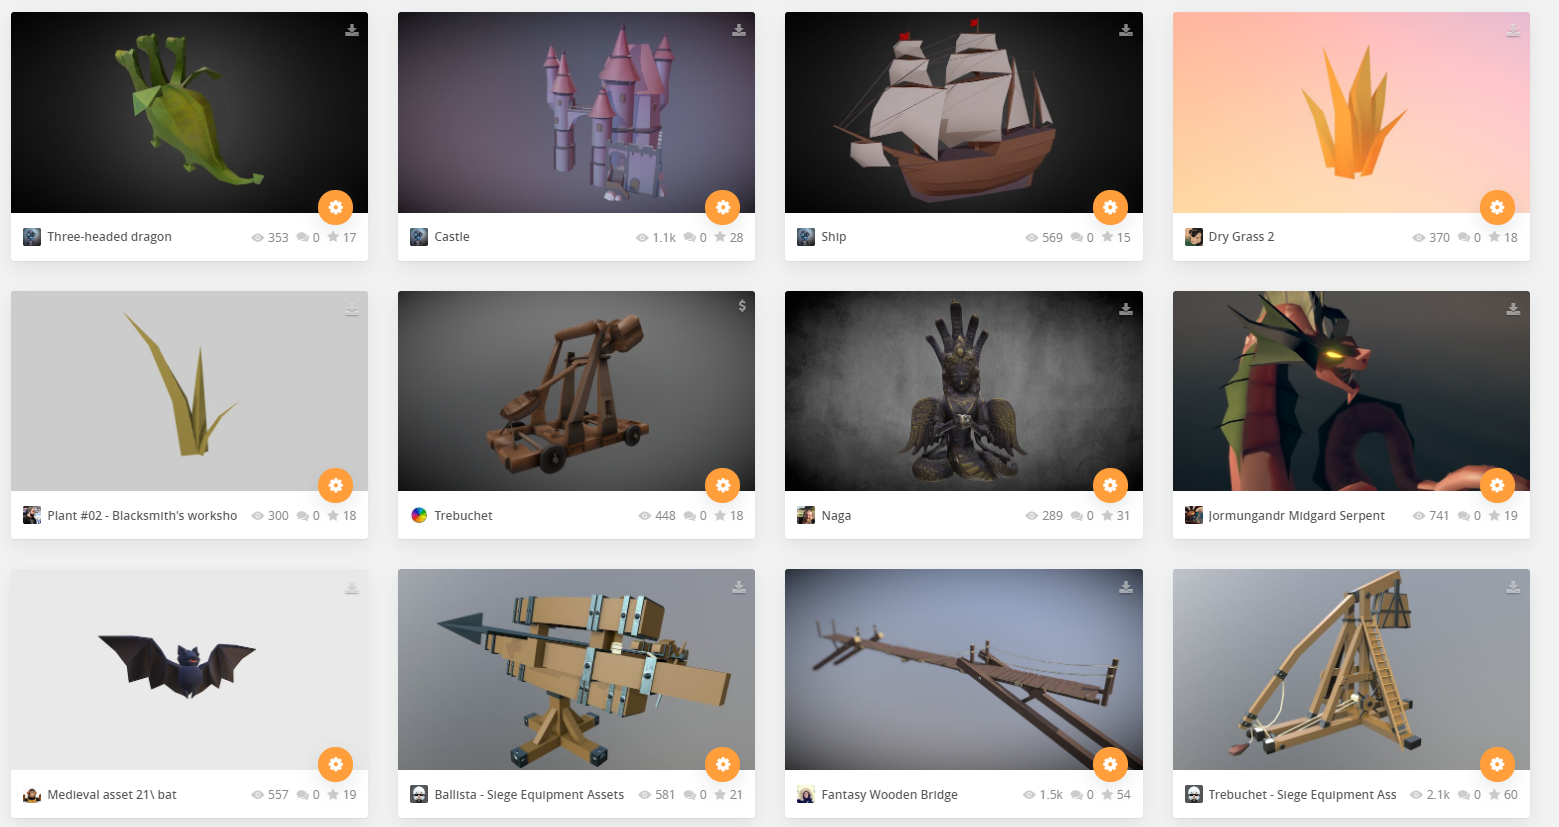
To help me out, I done my research on SketchFab finding models which I feel like would fit perfectly into my game, I made a collection of these.
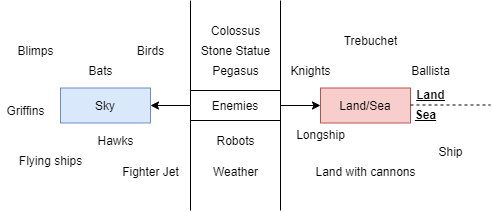
I wanted to try and 3D model as much of these as I can without taking up too much of my time, so I wanted to go with basic models which don’t require any animation or one looping animation, things which came to mind when I thought of this were ships, bats, birds, longships.
I had lots of ideas which weren’t all organized so I made a mind map of them all.
This research would really help me in the long run because it would help me out when I’m doing the level design for my game, since I would pick out of the enemies on here to put into the level even if I haven’t 3D modelled them in time.
This is the collection which I made on Sketchfab to help me with ideas.
This collection would be really helpful when I move onto the concept sketches of my enemies as I can get ideas from them and I can look at what I think is easy to model, this also could be an emergency resource if I don’t manage to make all my 3D models in time.
I also referred back to my enemy research which I have previously done: https://imgur.com/gallery/T0TCoXy
https://www.pinterest.co.uk/amy_elliott12/unit-13task-2-enemies-secondary/
I then done some quick sketches, none of these are neat at all, all I needed to get down is the shape that I want them to be, since the model won’t be too detailed.
These are the sketches


This is all I managed to get done for the enemies this week. Which means I didn’t complete this task in time.
- What went well with this task?
I felt like I was able to gather enough pictures and 3D models which I can use to help me make my own enemy models for the game.
Making the chart of different enemies I could use in the game helped me with ideas which I added to the sketchfab collection. Also having actual 3D models as reference helps alot more unlike a very detailed image of a ship would
- What didn’t go so well with this task?
I don’t like how rough the drawings look, but I didn’t have much time to work on this and detail it so I will work more on the concept of these next week. I didn’t complete this task in time.
Prototypes (Unity) – Targeting System

 I started developing this targeting system by watching a few tutorials to get an idea of what I need to include when making my own targeting system.
I knew I would need a crosshair, but I’ll be working on that in task 5, so for now, I simply made a simple shape for it.
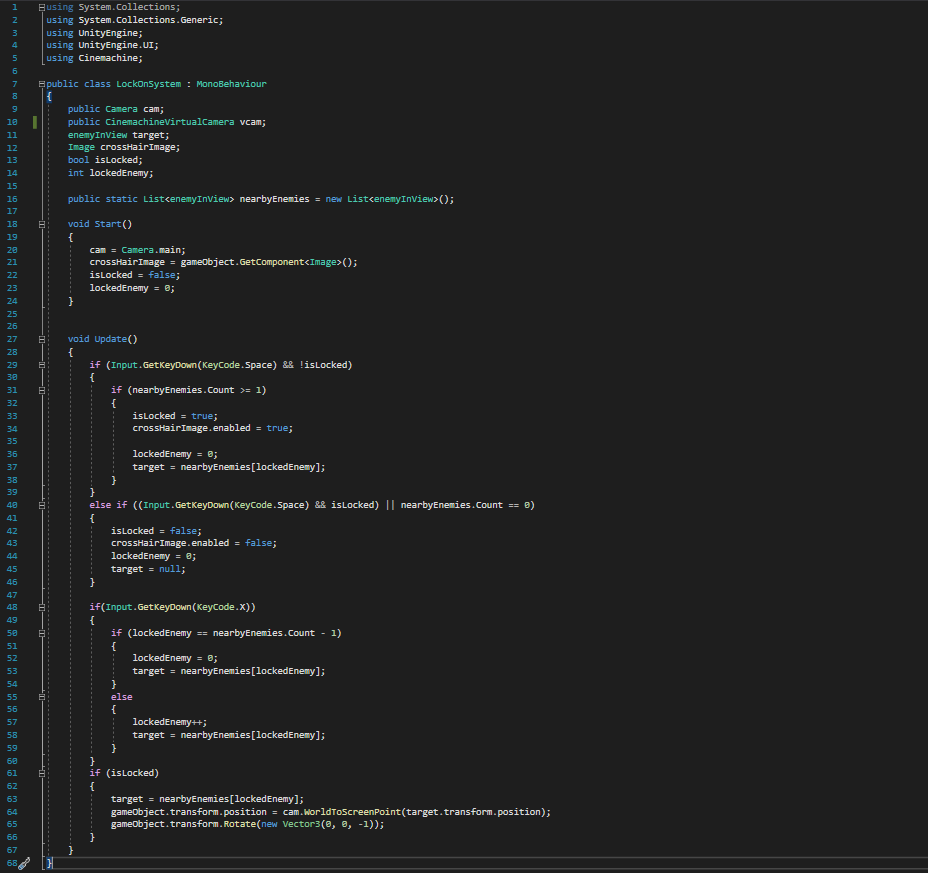
I wrote a script for the targeting system, but this isn’t anywhere complete.
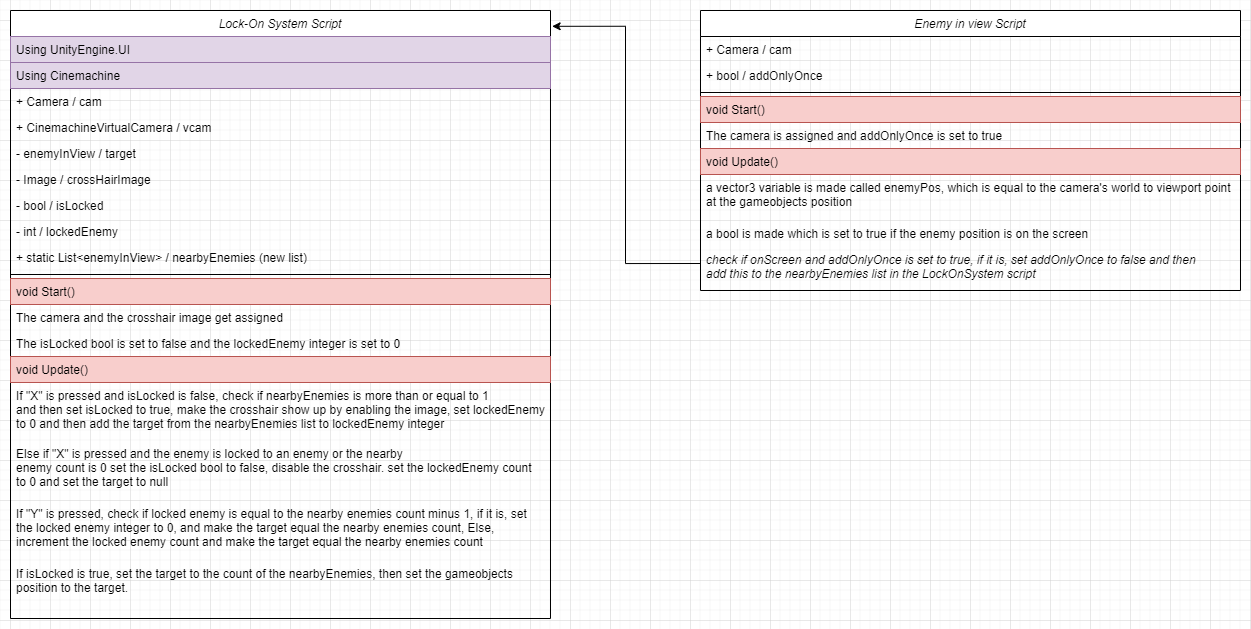
Lock On UML & script:
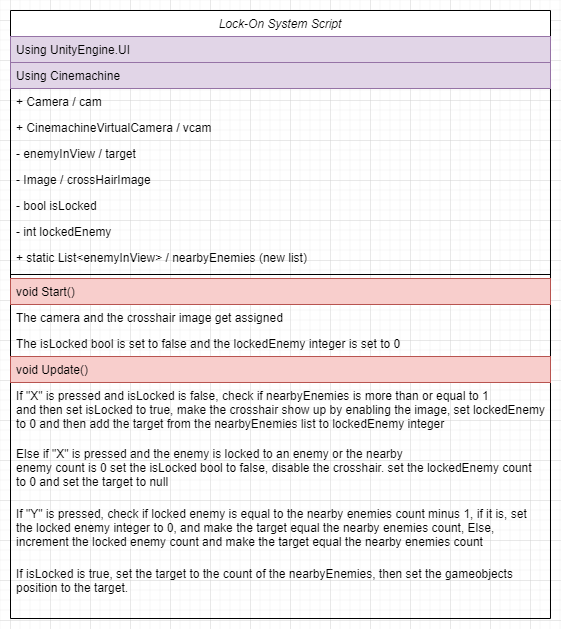
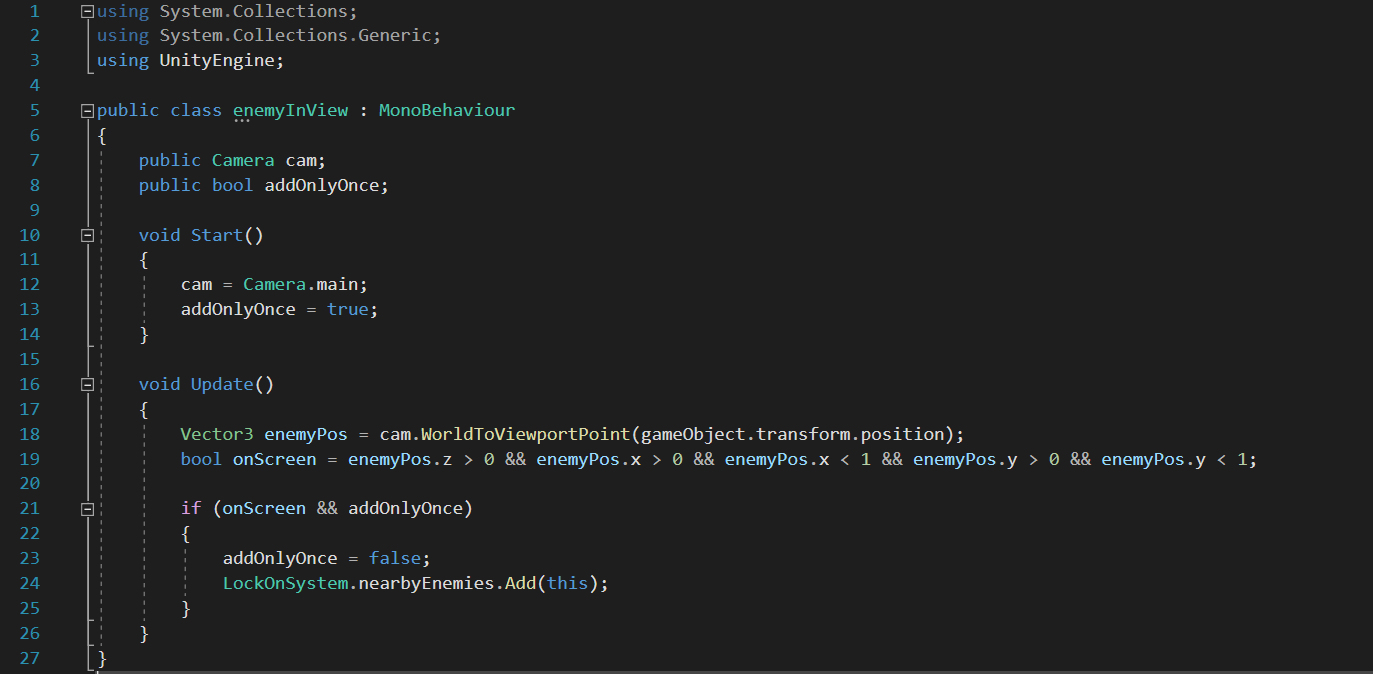
Enemy in view UML & script:

UML Result (1 reference):
Result:
- What went well with this task?
I managed to get the targeting system working how I want it to, it may change in the future, but I’m happy with this at the moment!
- What didn’t go so well with this task?
I don’t like how I have to use the main camera for this to work, I was doing some research into getting it working with Cinemachine, but I didn’t get that finished in time for this week, so I plan to do better planning for this targetting system in the future.
What did I find difficult or easy?
I found the planning and collecting reference images for the enemies in my game easy, since I knew what I wanted. I also found using FMOD easy since I am used to using it.
I found making the fireball slightly complicated, but fun, and a great learning experience for me.
I found getting the targeting system to work a challenge.
What tasks didn’t I complete from this week?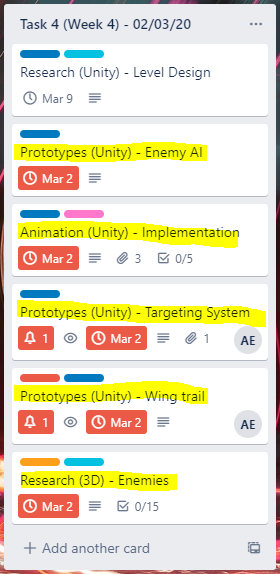
I didn’t complete most of the tasks, I was a lot more busy than I planned to be this week, these are the tasks which I didn’t complete this week and I plan to work on them next week.
I wish that I managed to do more, I had the time to complete more but I felt really exhausted throughout the week and I didn’t have the motivation to work on my project.
Planning for next week –
How do I plan to catch up? Do I need to change anything about my work or planning?
I plan to catch up on my plan and complete all of the overdue work as soon as possible and to the best quality I can, I plan to be more motivated next week and work much harder than I have been. I have booked a few days off work at the end of the month to help me catch up as much as I can.
Week Number & Date: Week 4 (02/03/20)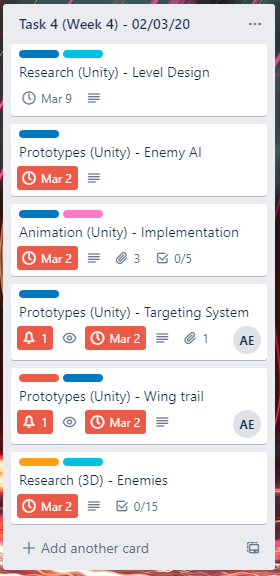
List of Tasks planned for this week:
This week I plan to catch up on all of the work which I didn’t manage to complete last week, extending their deadline to next week so I have time to complete them. I feel like if I work hard, I can complete all of these tasks and even more.
Current Position –
What did I do this week and why did I do it? (Screenshots/Videos/Photos)
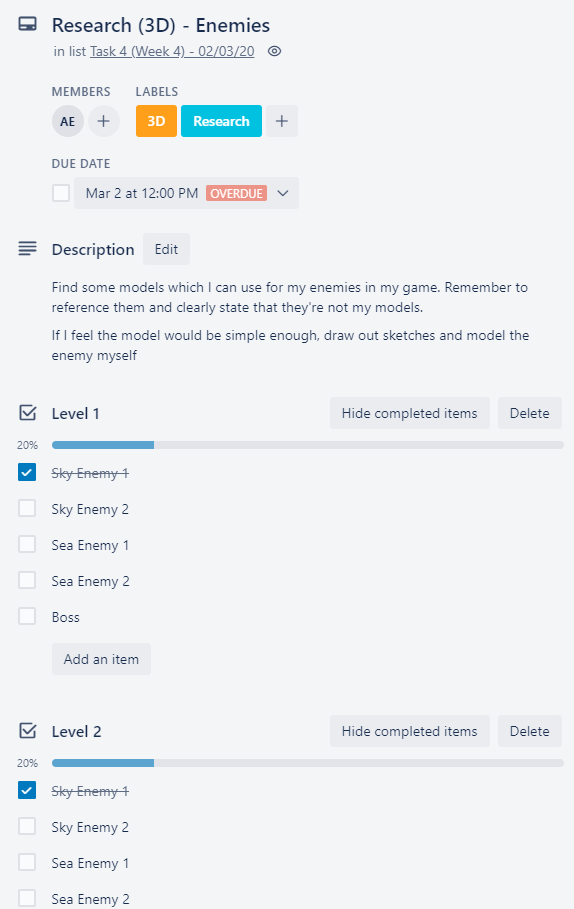
Research (3D) – Enemies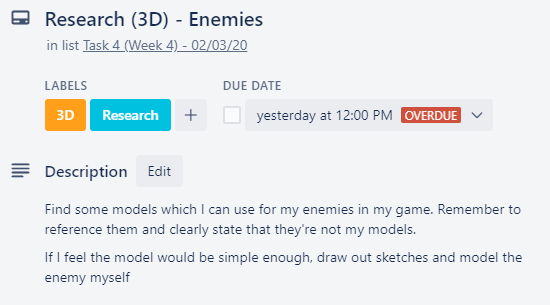
I had to continue on my research for my enemies which I didn’t complete last week. This week I wanted to work on shapes and concept art which I was going to make for the enemies so I can get onto 3D modelling them as quickly as possible.
I didn’t want to spend too much time on this.
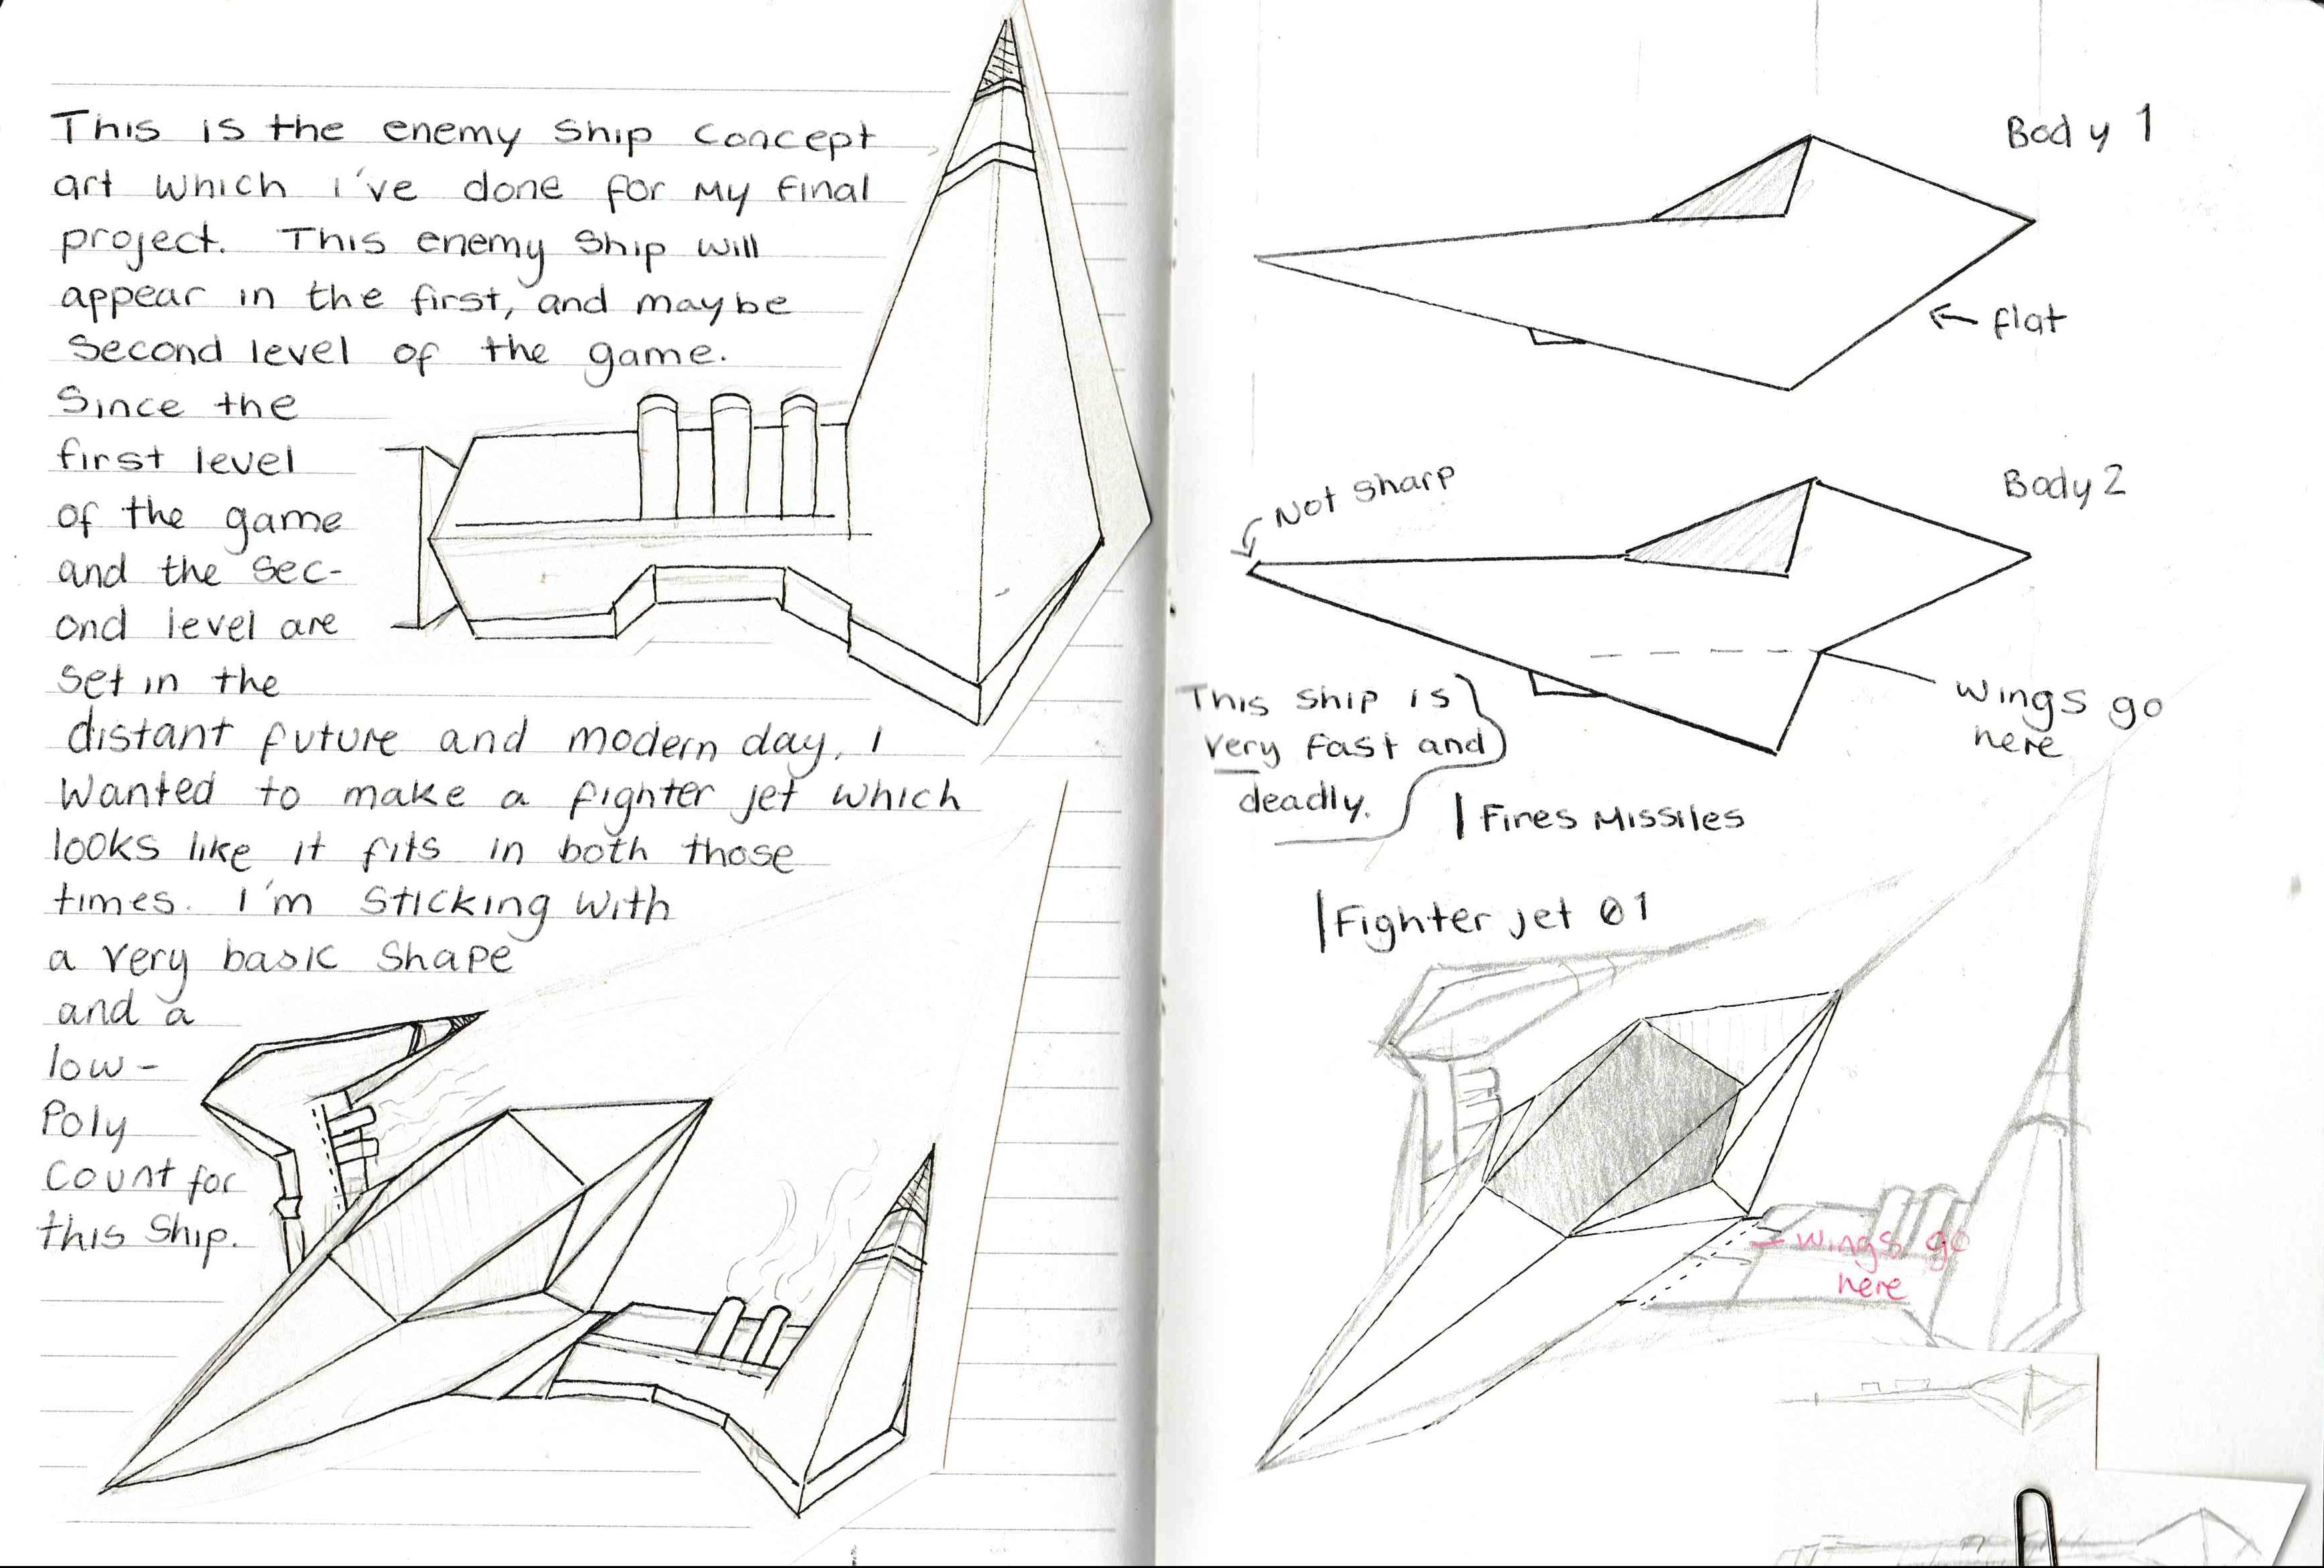
This is concept art which I produced for my enemy flyer jet.
I drew it in this style since it’s easy to distinguish the shapes used in this concept art so it’s easy to produce in a low poly style, this would of course save me time because it’s low poly.
- What went well with this task?
I really like the enemy flyer jet concept which I made, I made this using references from my research which I did last weekend. I like how simple I made it, which means its easier for me to 3D model, I don’t want to spend too long on this in the long run.
- What didn’t go so well with this task?
I felt like I could’ve produced more enemy concepts, but I felt like in a way, focusing on one at a time is better, since I need to focus on making my game functional and all of the enemy models should be done in task 5
Prototypes (Unity) – Targeting System
So, I wanted to plan my targeting system out better, so I can get it working with both cinemachine and the normal Unity camera.
I wrote down some notes from my targeting system scripts and then highlighted the areas which refrerence the camera.


Now I know this, I began planning how I wanted to re-write those lines to make them work with cinemachine.
But before that, I made a few changes to the cinemachine settings, this is a screenshot of my final settings for my camera: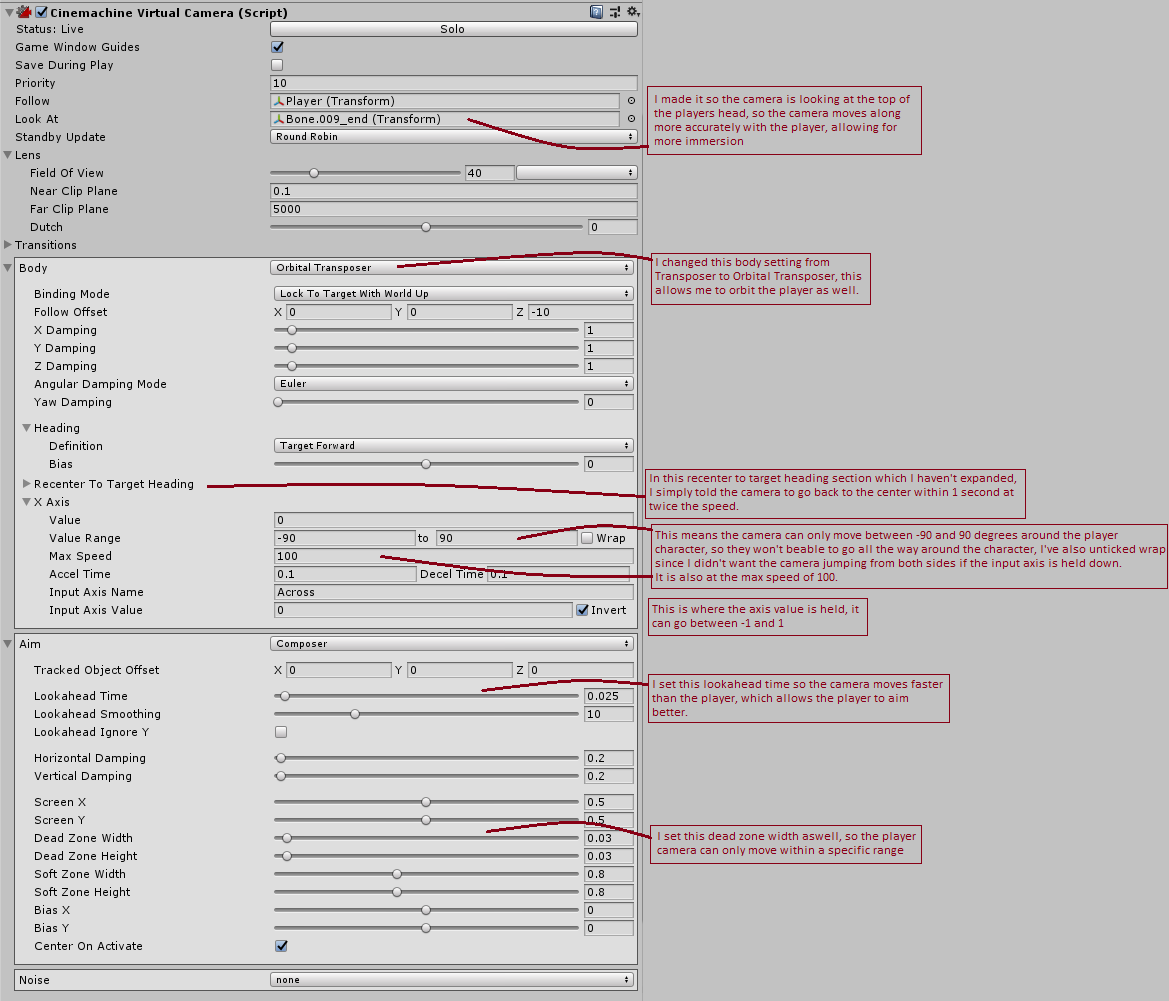
 When I was playing, I noticed this problem.
As you can see from the GIF, the target works fine on the different targets but then I turn around and there is the same target but in the wrong area!
I began re-writing my scripts for the targeting system, since I felt like it was better to start fresh with this since I soon realised that this wasn’t a problem with Cinemachine itself.
Targeting System
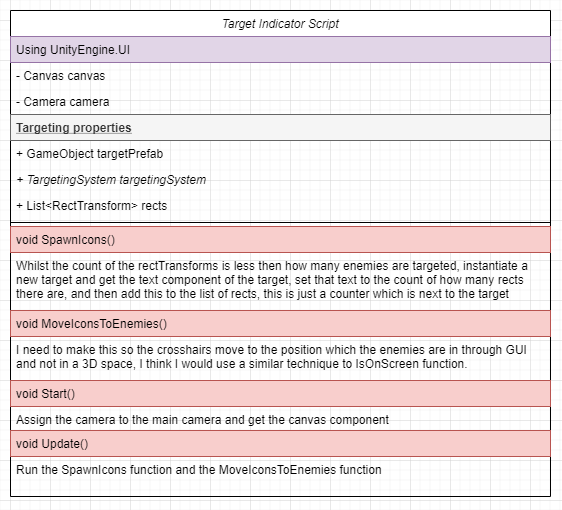
This is the targeting system script which I re-wrote, it’s the main part of the targeting system and checks if any enemies are on the screen and where they are relative to the centre of the screen. It also handles the firing of fireballs and cooling down.
The targeting system has no links to the targeting indicator, this is because all the targeting indicator does is reference the system and draw UI. The targeting system hasn’t got a need to be linked with the targeting indicator.
I have also made a UML diagram for it to help me plan this out
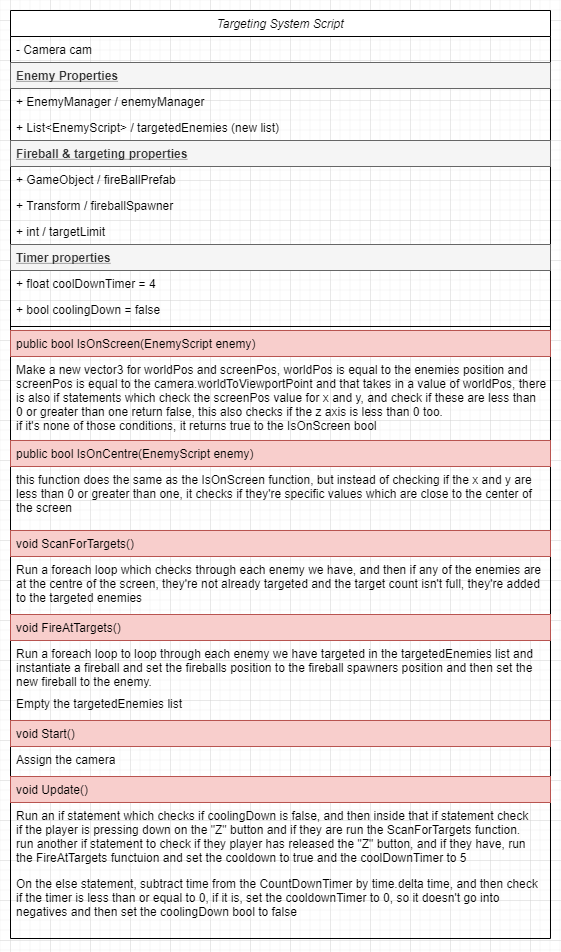
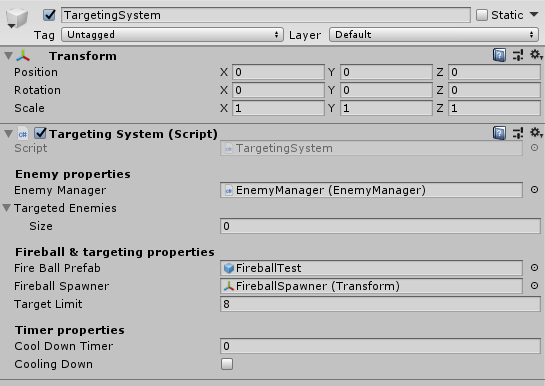
The targeting system is then placed on it’s own empty object within the project, it doesn’t need anything else in it and when another script has to reference the targeting system, all it has to do is reference the script on this empty object.
This targeting system also has a cooldown timer, which means that the player cannot fire rapidly, since I feel like giving the player the ability to do that would make gameplay feel unbalanced and unfair.
Targeting Indicator
This is the targeting indicator, used purely to draw the UI onto the screen, this script references the targeting system to spawn the UI.
I have also done a UML diagram for it to help me plan this out.
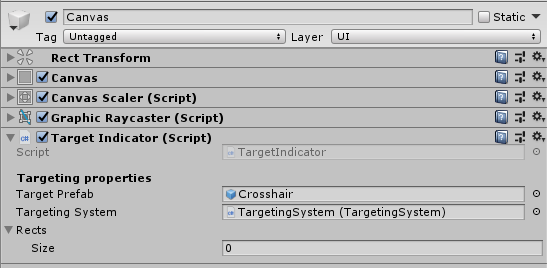
This targeting indicator is placed on the canvas in the scene. This is because the crosshairs spawn as children on this canvas, so it only makes sense to have the script on the canvas.
Enemy Manager
This is the enemy manager script. The enemy manager basically makes a list of enemies in the entire map.
The rotation in the update isn’t needed but it’s just for testing purposes.
I also made a UML diagram for this to help me plan it out.
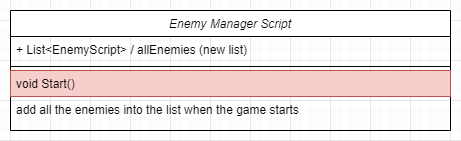
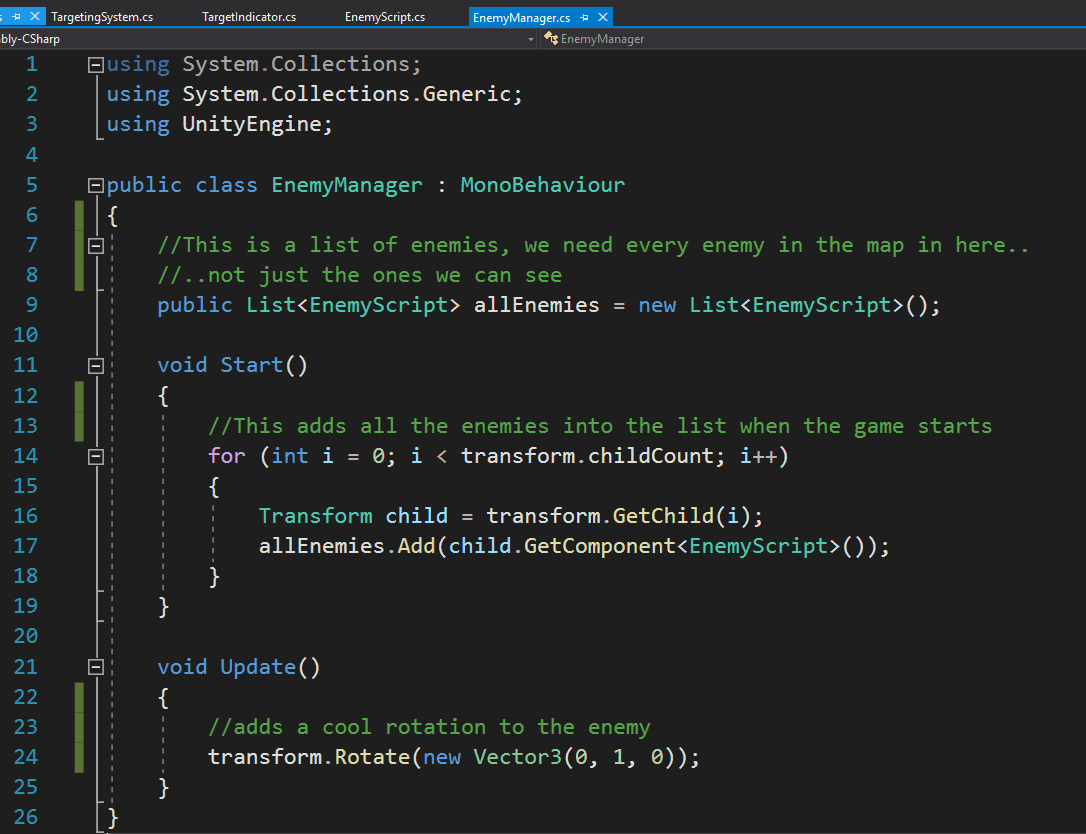
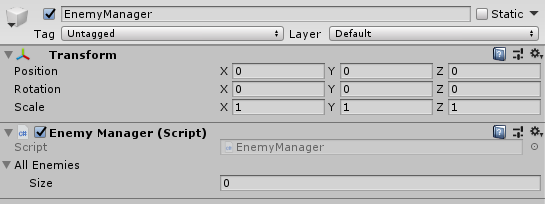
This EnemyManager script is, too placed in it’s own empty object, which had all the enemies for the map as children of it. We don’t need to assign the enemies before we press play since they’re automatically assigned in the start function.
Enemy Script
This is the enemy script, at the moment, the enemy doesn’t do anything, but if the enemy was going to play a death animation when it dies, it would be put in here.
I did a UML diagram for this, but I didn’t have much plans for this at the moment so it’s pretty empty.
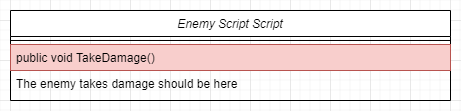

This enemy script is placed on each enemy.
Fireball Script
This is the fireball script and is placed on every fireball which is instantiated.
I have also done a UML diagram for it to help me plan this out

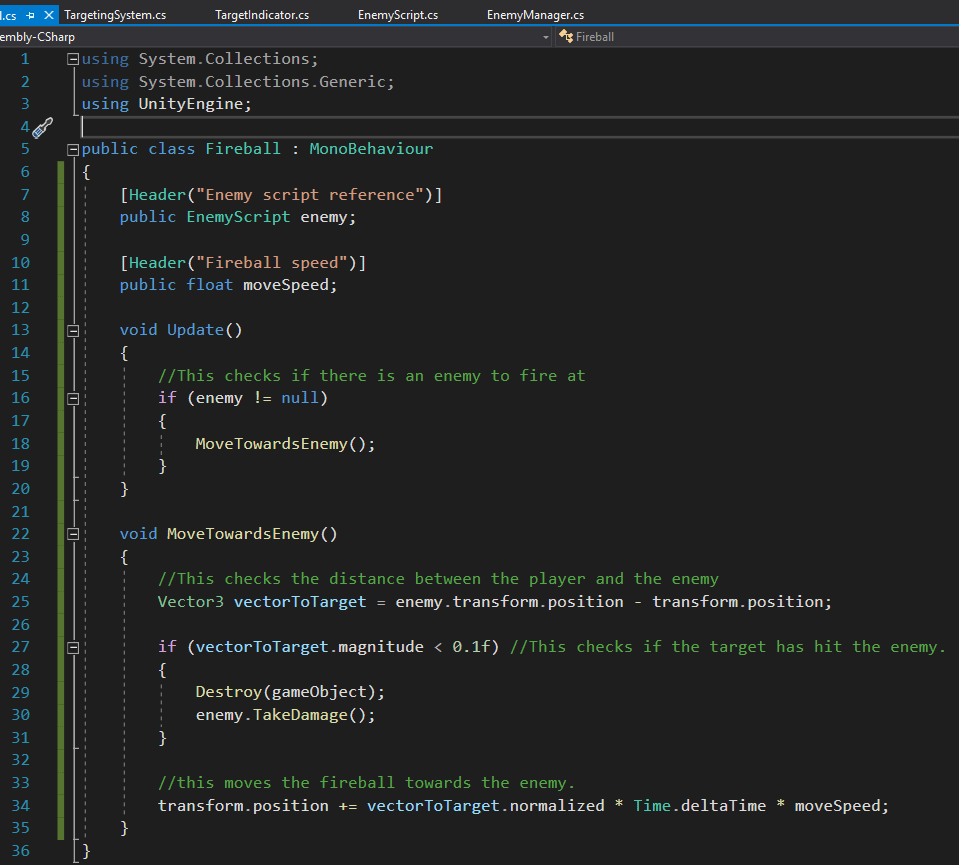

The Fireballs are prefabs since they have to be instantiated.
This is what the script looks like when you place it on the fireball. You can set your own movespeed for the fireball and that would be how fast the fireball hits the enemy.
Result:
I quickly animated the crosshair to scale up and down.
 Another thing I added to get this working is my controller functionality.
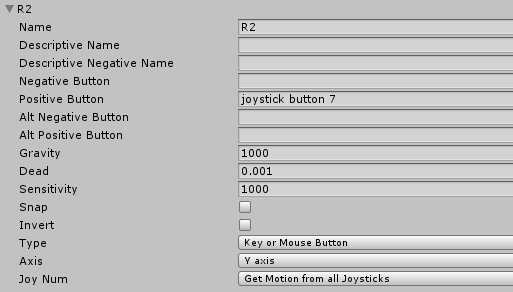
Through searching the internet, I found a PS3 button map for Unity, which I used to help me map my PS3 controller to Unity, I wanted the player to target the enemies by holding down R2 and letting go when they want to fire, so this is what I had to add to my input settings.
- What went well with this task?
I’m glad that I went and redone the code for the targeting instead of going back through my old code and trying to improve that since I knew that I would have been stuck doing that for much longer if I wanted to improve on the old code, so I think it’s good to start fresh and try and find out a better solution, which I did, and I’m proud of myself. Doing this had made me learn some stuff about the Unity Camera.
I am also really proud that I was able to add a cooldown onto this as well, since that balances the game so much better.
- What didn’t go so well with this task?
I think I took too long previously on this code to make it, and it didn’t end up working, I think that was good in a way though since I learnt from the stuff which didn’t work.
I also found out that I don’t even need to worry about referencing the cinemachine camera since everything is better to be done on my normal camera, so my research from beforehand was useless, and wasted time which I could’ve used to do other things.
Music (Unity) – Implementation
This wasn’t initially in my Trello board, so I added it. I knew I needed to do this before I start making the levels in my game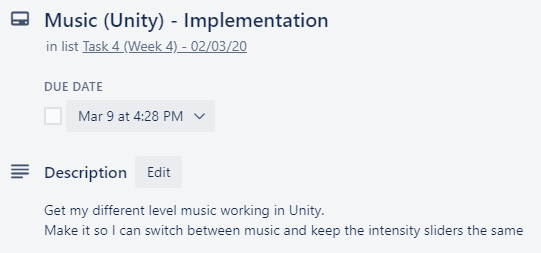
To get this working I needed to change a few things in my script.
On FMOD, each song had a different intensity on it, this is because each song is different.
I made a UML diagram to plan this out before I did it.


This is the script where the music intensity changes consistently.
This is what the script looks like when it’s set on the player character.
You can control the intensity through the player controller


You can select what level music plays through the studio event emitter which is on the main camera.
- What went well with this task?
I think doing this was very helpful since it helps me when I want to implement new levels and new music in my game, without worrying about the sizes of the intensities or anything like that.
- What didn’t go so well with this task?
Nothing, I felt like this was a quick and easy way to make my game easier to add more music to.

What did I find difficult or easy?
I found the enemy concept art easy, since I had many references to use to help me come up with a good, simple idea, it was also easy because it’s going to be symmetrical, so I only have to have the idea of half of the ship and one of the wings, and then I can mirror them when I come to 3D modelling them.
I found getting the targeting system working properly a challenge, but it was a welcome challenge since I learnt some stuff from doing this.
I found the music implementation useful to have in my game, since as I said above, it makes it easier to add more music into my game if I wanted any more.
What tasks didn’t I complete from this week?
I had a lot of tasks which I didn’t complete from this week since I was very busy with other tasks which took up more time then I initially planned.
Planning for next week –
How do I plan to catch up? Do I need to change anything about my work or planning?
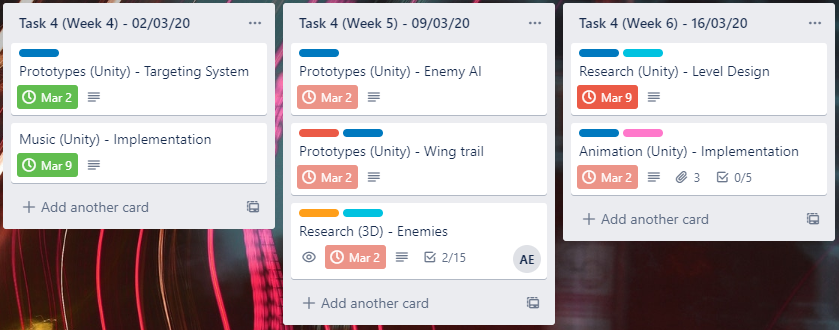
From the image above, you can see all the tasks with the red deadlines on them are tasks which I never managed to finish, I felt like I set myself too much work to do and I should slow down with how much I can do in a week and just set myself a maximum of 3 tasks and if I complete them, I can always start on the tasks from the next week.
I felt like I fell far behind because of my computer at home is slowing down and cannot run my game with all the post processing, so to stop this, I have brought myself a new laptop with specifications which would allow Unity to run, the specs on this laptop would be newer and better than my computer, since my computer is quite old now.
I would have to wait for this laptop to be built and sent though, so for the time being I’m doing as much work as I can towards my game and programming in college, and I’m going to try and do everything else like artwork and concepts at home.
 Looking at what work I have left to do to my game, I feel like I am almost able to move onto task 4, since I almost have the basic prototypes of my game set up.
I quickly re-planned my next week to finish up a prototype of my game.
I’ve planned all this so I have a full prototype of my game to work on for Task 4, and my game feels more complete. I feel like if I get these tasks done quick enough next week, I am able to move onto task 4 next week too.
Week Number & Date: Week 5 (09/03/20)
List of Tasks planned for this week:
I plan to finish the prototyping of my game so I can move onto task 4 and start with polishing and making everything look nice and flow nicely.
I don’t expect these two tasks to take me too long so if I complete them earlier than planned, I would start next weeks tasks in Task 4 – Project Management & Development Log
Current Position –
What did I do this week and why did I do it? (Screenshots/Videos/Photos)
Polish (Unity) – Targeting System
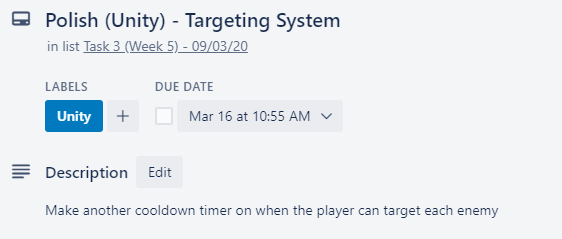
This task is simply making the targeting system I already have seem better, since I don’t  like on my current targeting system how all the targets just snap on, as you can see on this GIF.
I wanted one target to be targeted at a time, similar to how the game Rez works with their targeting system, as seen by this video.
I began my development of this by writing out rough plans of what I would need to do to get it working, and after thinking about it for a little while, I realized that getting this working wouldn’t be as hard as I initially thought.
These rough plans were all written on a rough post-it note which was then neatened up into a bullet-point planner in my other notebook.
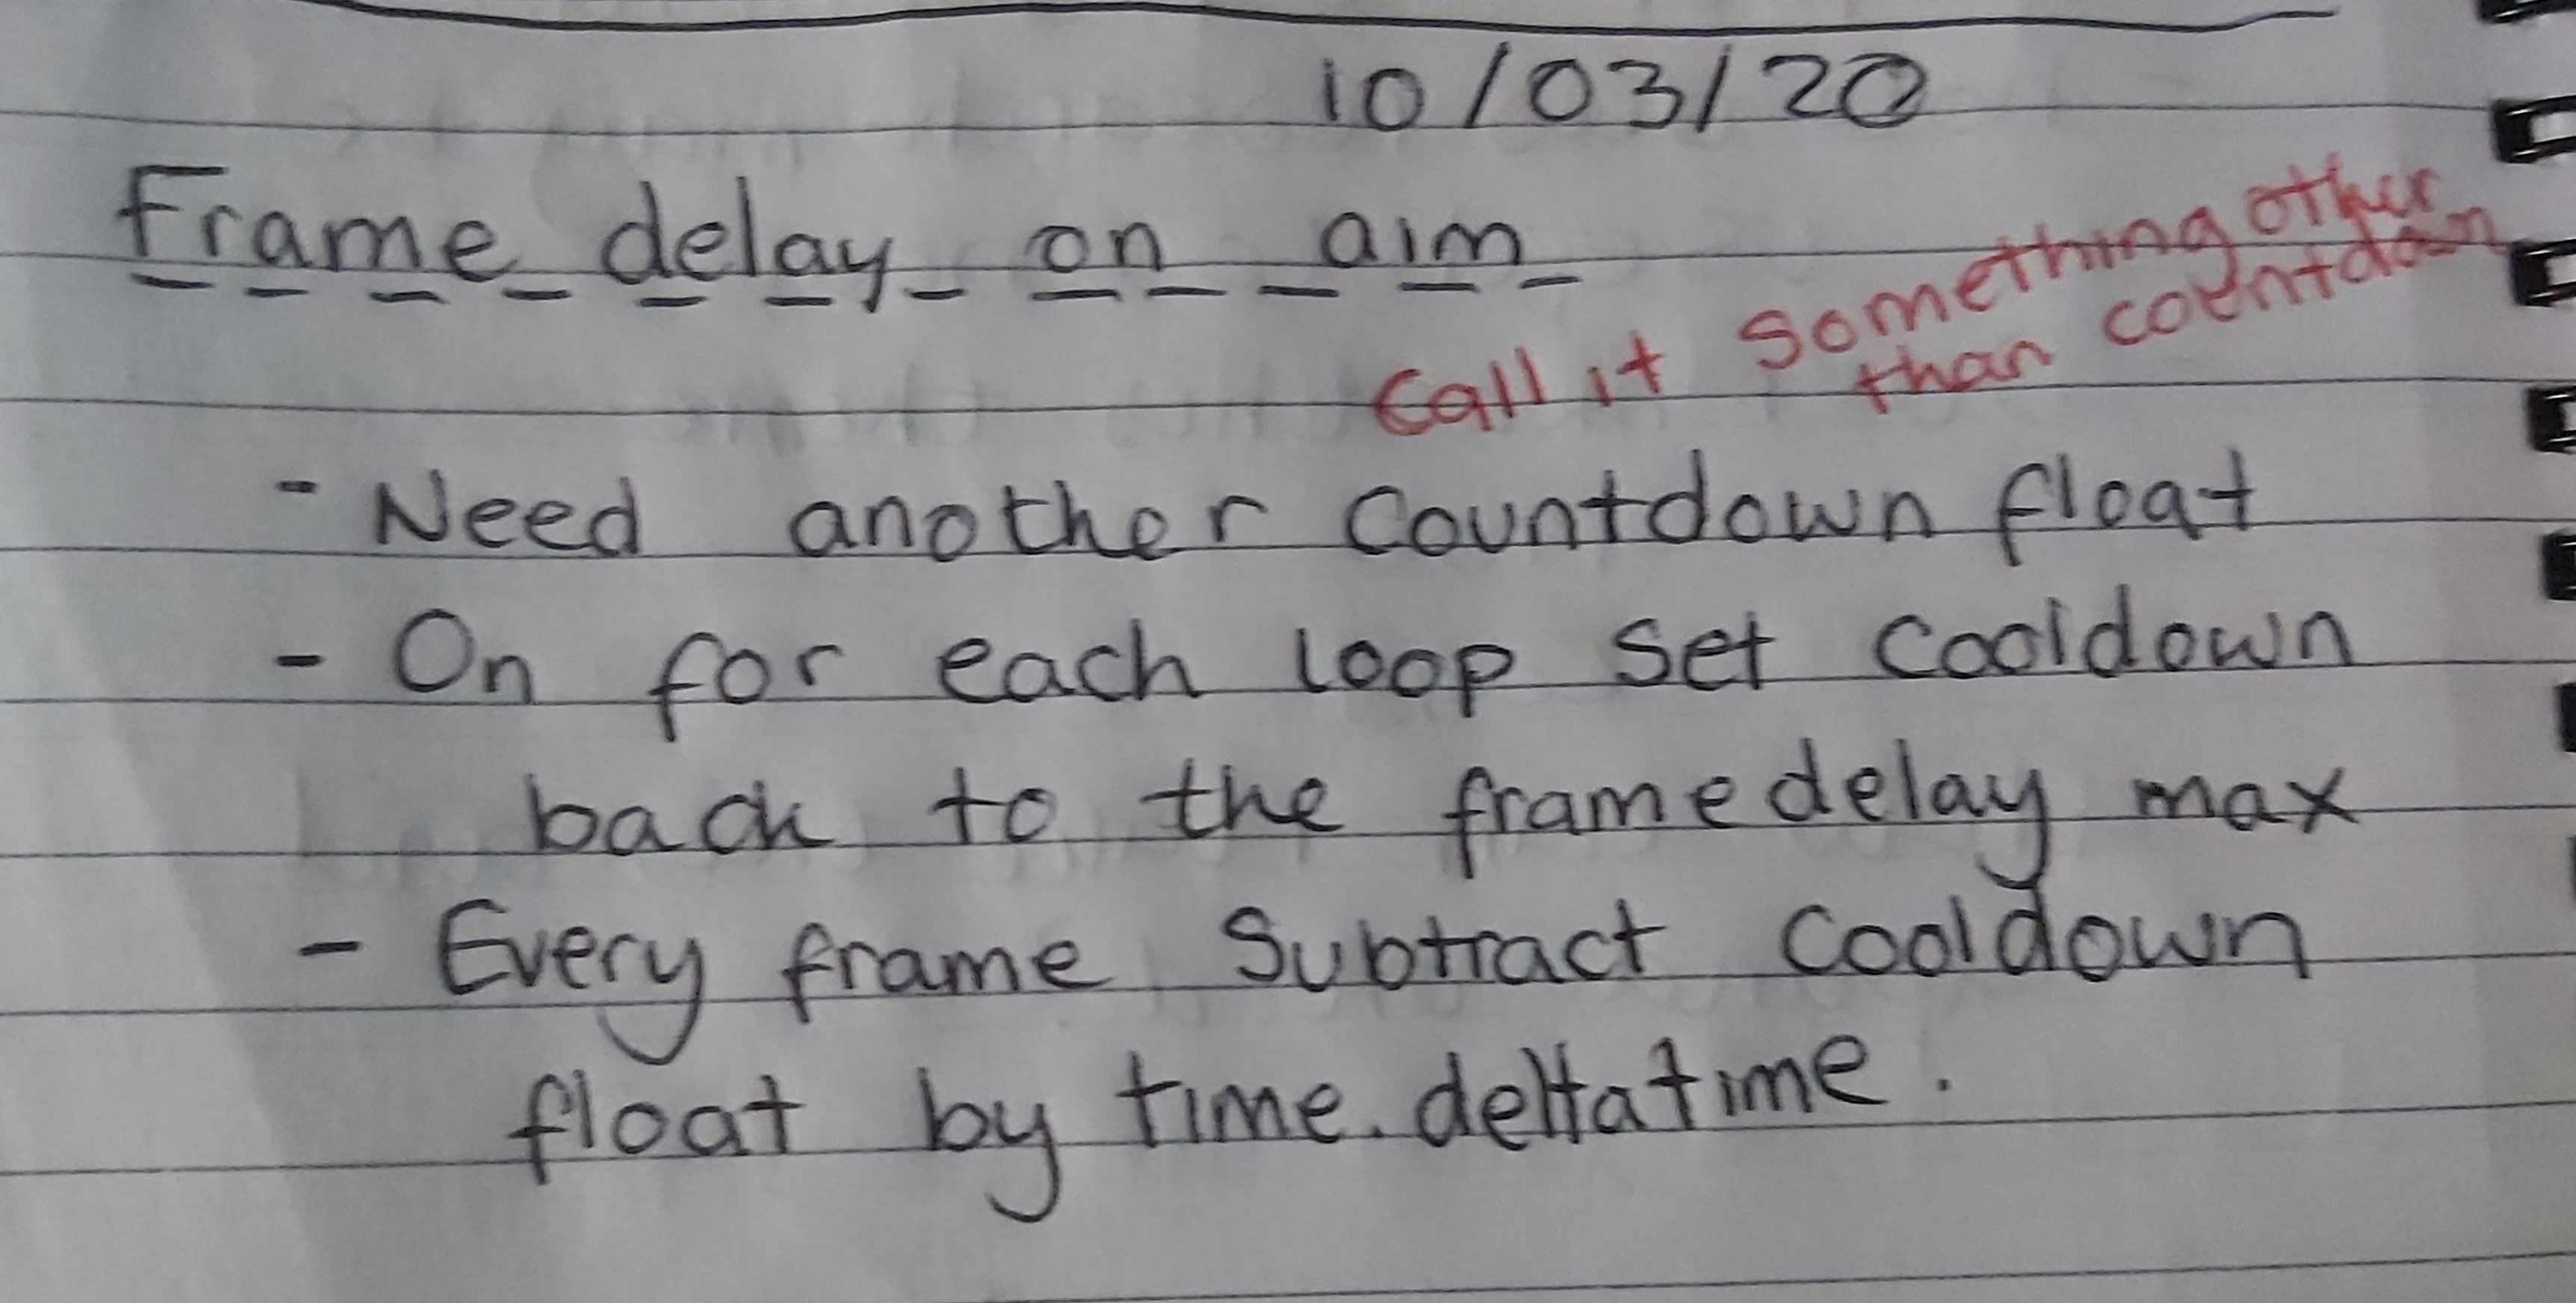
I then added a few things to the TargetingSystem UML diagram to help me with the planning.
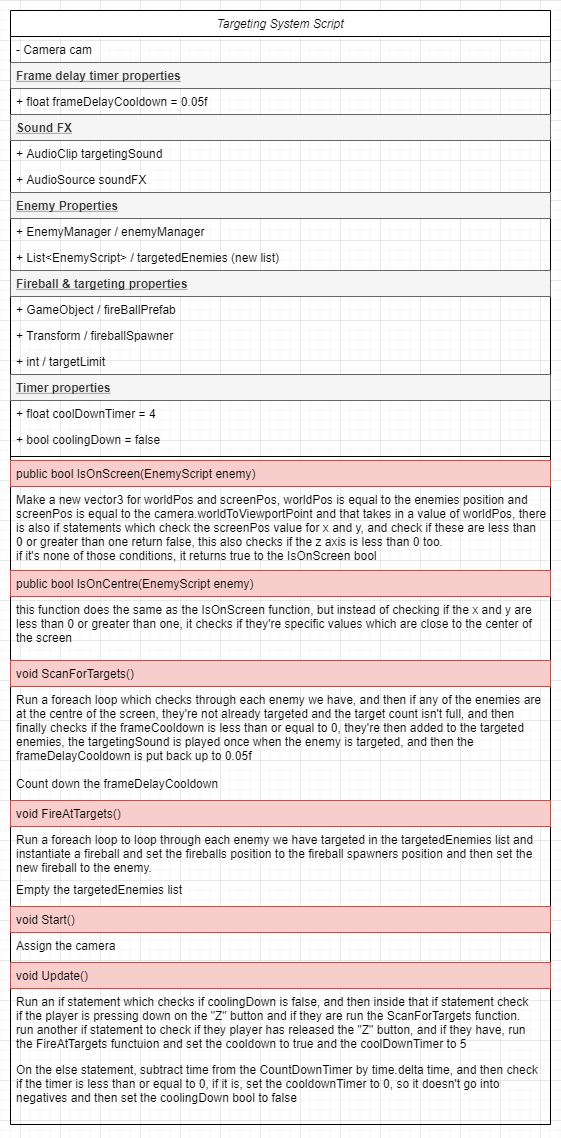
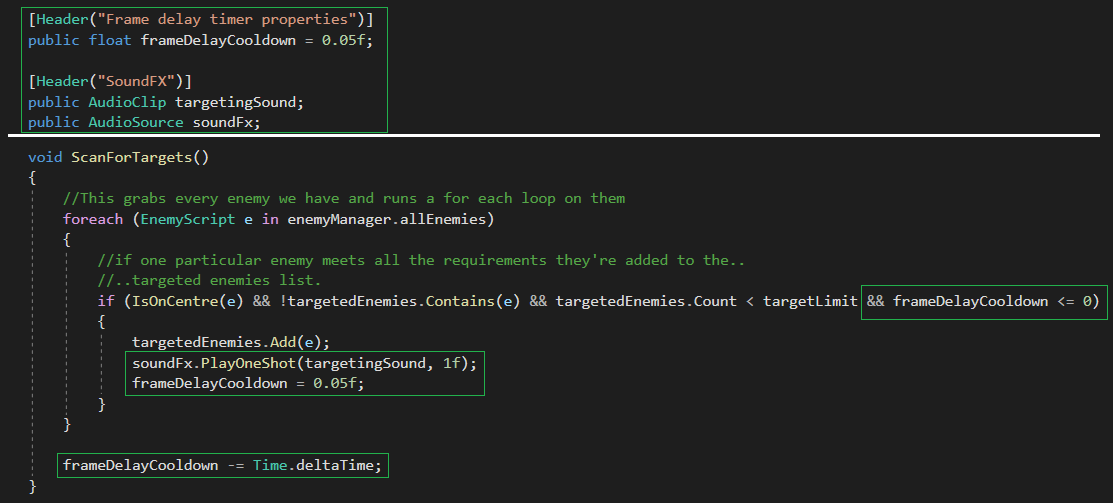
This is what I ended up adding to my script to get this working (All the boxed lines)
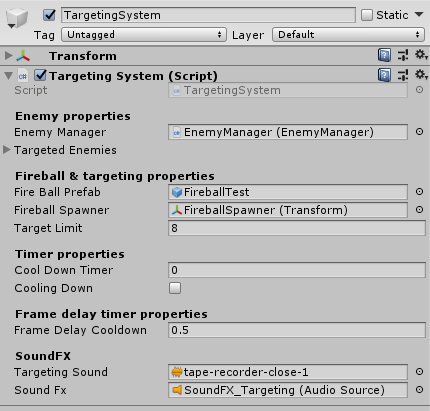
This is what it looked like in editor, and what I had to add in the editor.
I also had to add the sound FX and the actual targeting sound, which will be replaced later on, but at the moment it’s a sound which I got from GameSounds.XYZ, which is completely free for use.
Below is the result.
I have also uploaded this to Youtube so the sound of the targeting system could be heard and it’s easier to tell that the targets are being targeted one-by-one.
I have more plans for the targeting system, but they’re mostly polishing plans which fit more into task 4, so I’ve added it to my trello board.
- What went well with this task?
I felt like I done well with implementing this system in my game since it was a lot easier than I initially thought and I found this out when I was breaking down how I would get this working. I feel like the addition of the targeting cool-down on each enemy and the sound FX makes targeting the enemies a lot clearer, and you have a much better and clearer idea of what enemy you have targeted and how many enemies you have targeted, just by the sound of the targeting.
- What didn’t go so well with this task?
Nothing, I felt like this task went really successful and was really quick and easy to implement.
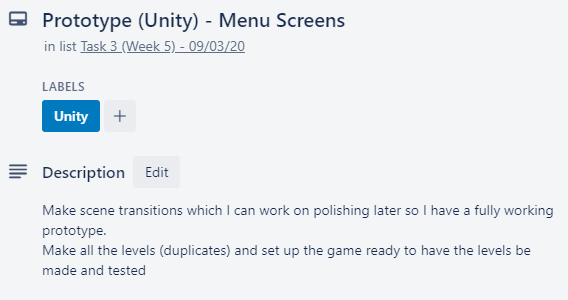
Prototype (Unity) – Menu Screens
I started this by sorting out all the different scenes I was going to have, and adding them into the build settings.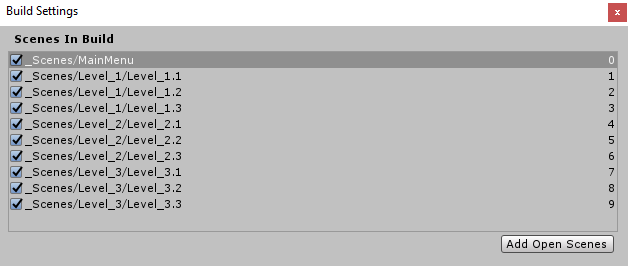
I wanted to do a scene for each level, since I felt like that would be a lot easier to manage.
After I done this, I went into the Main Menu scene, and began adding simple menu functionality, this would be polished later on.
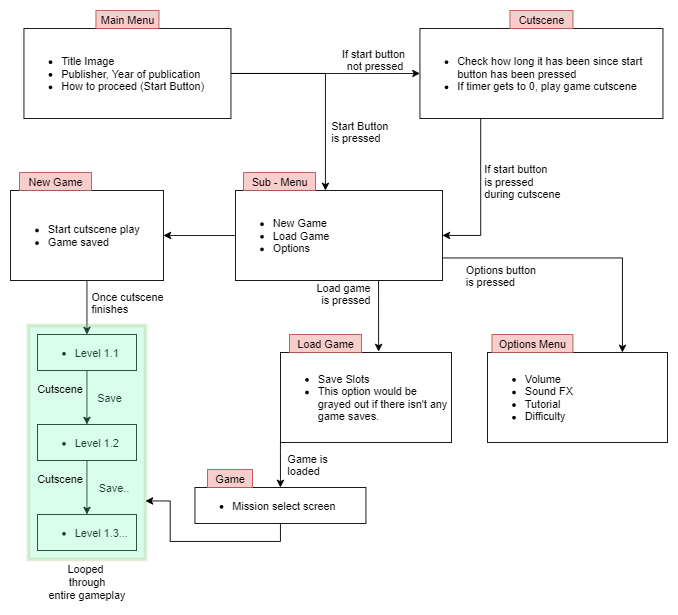
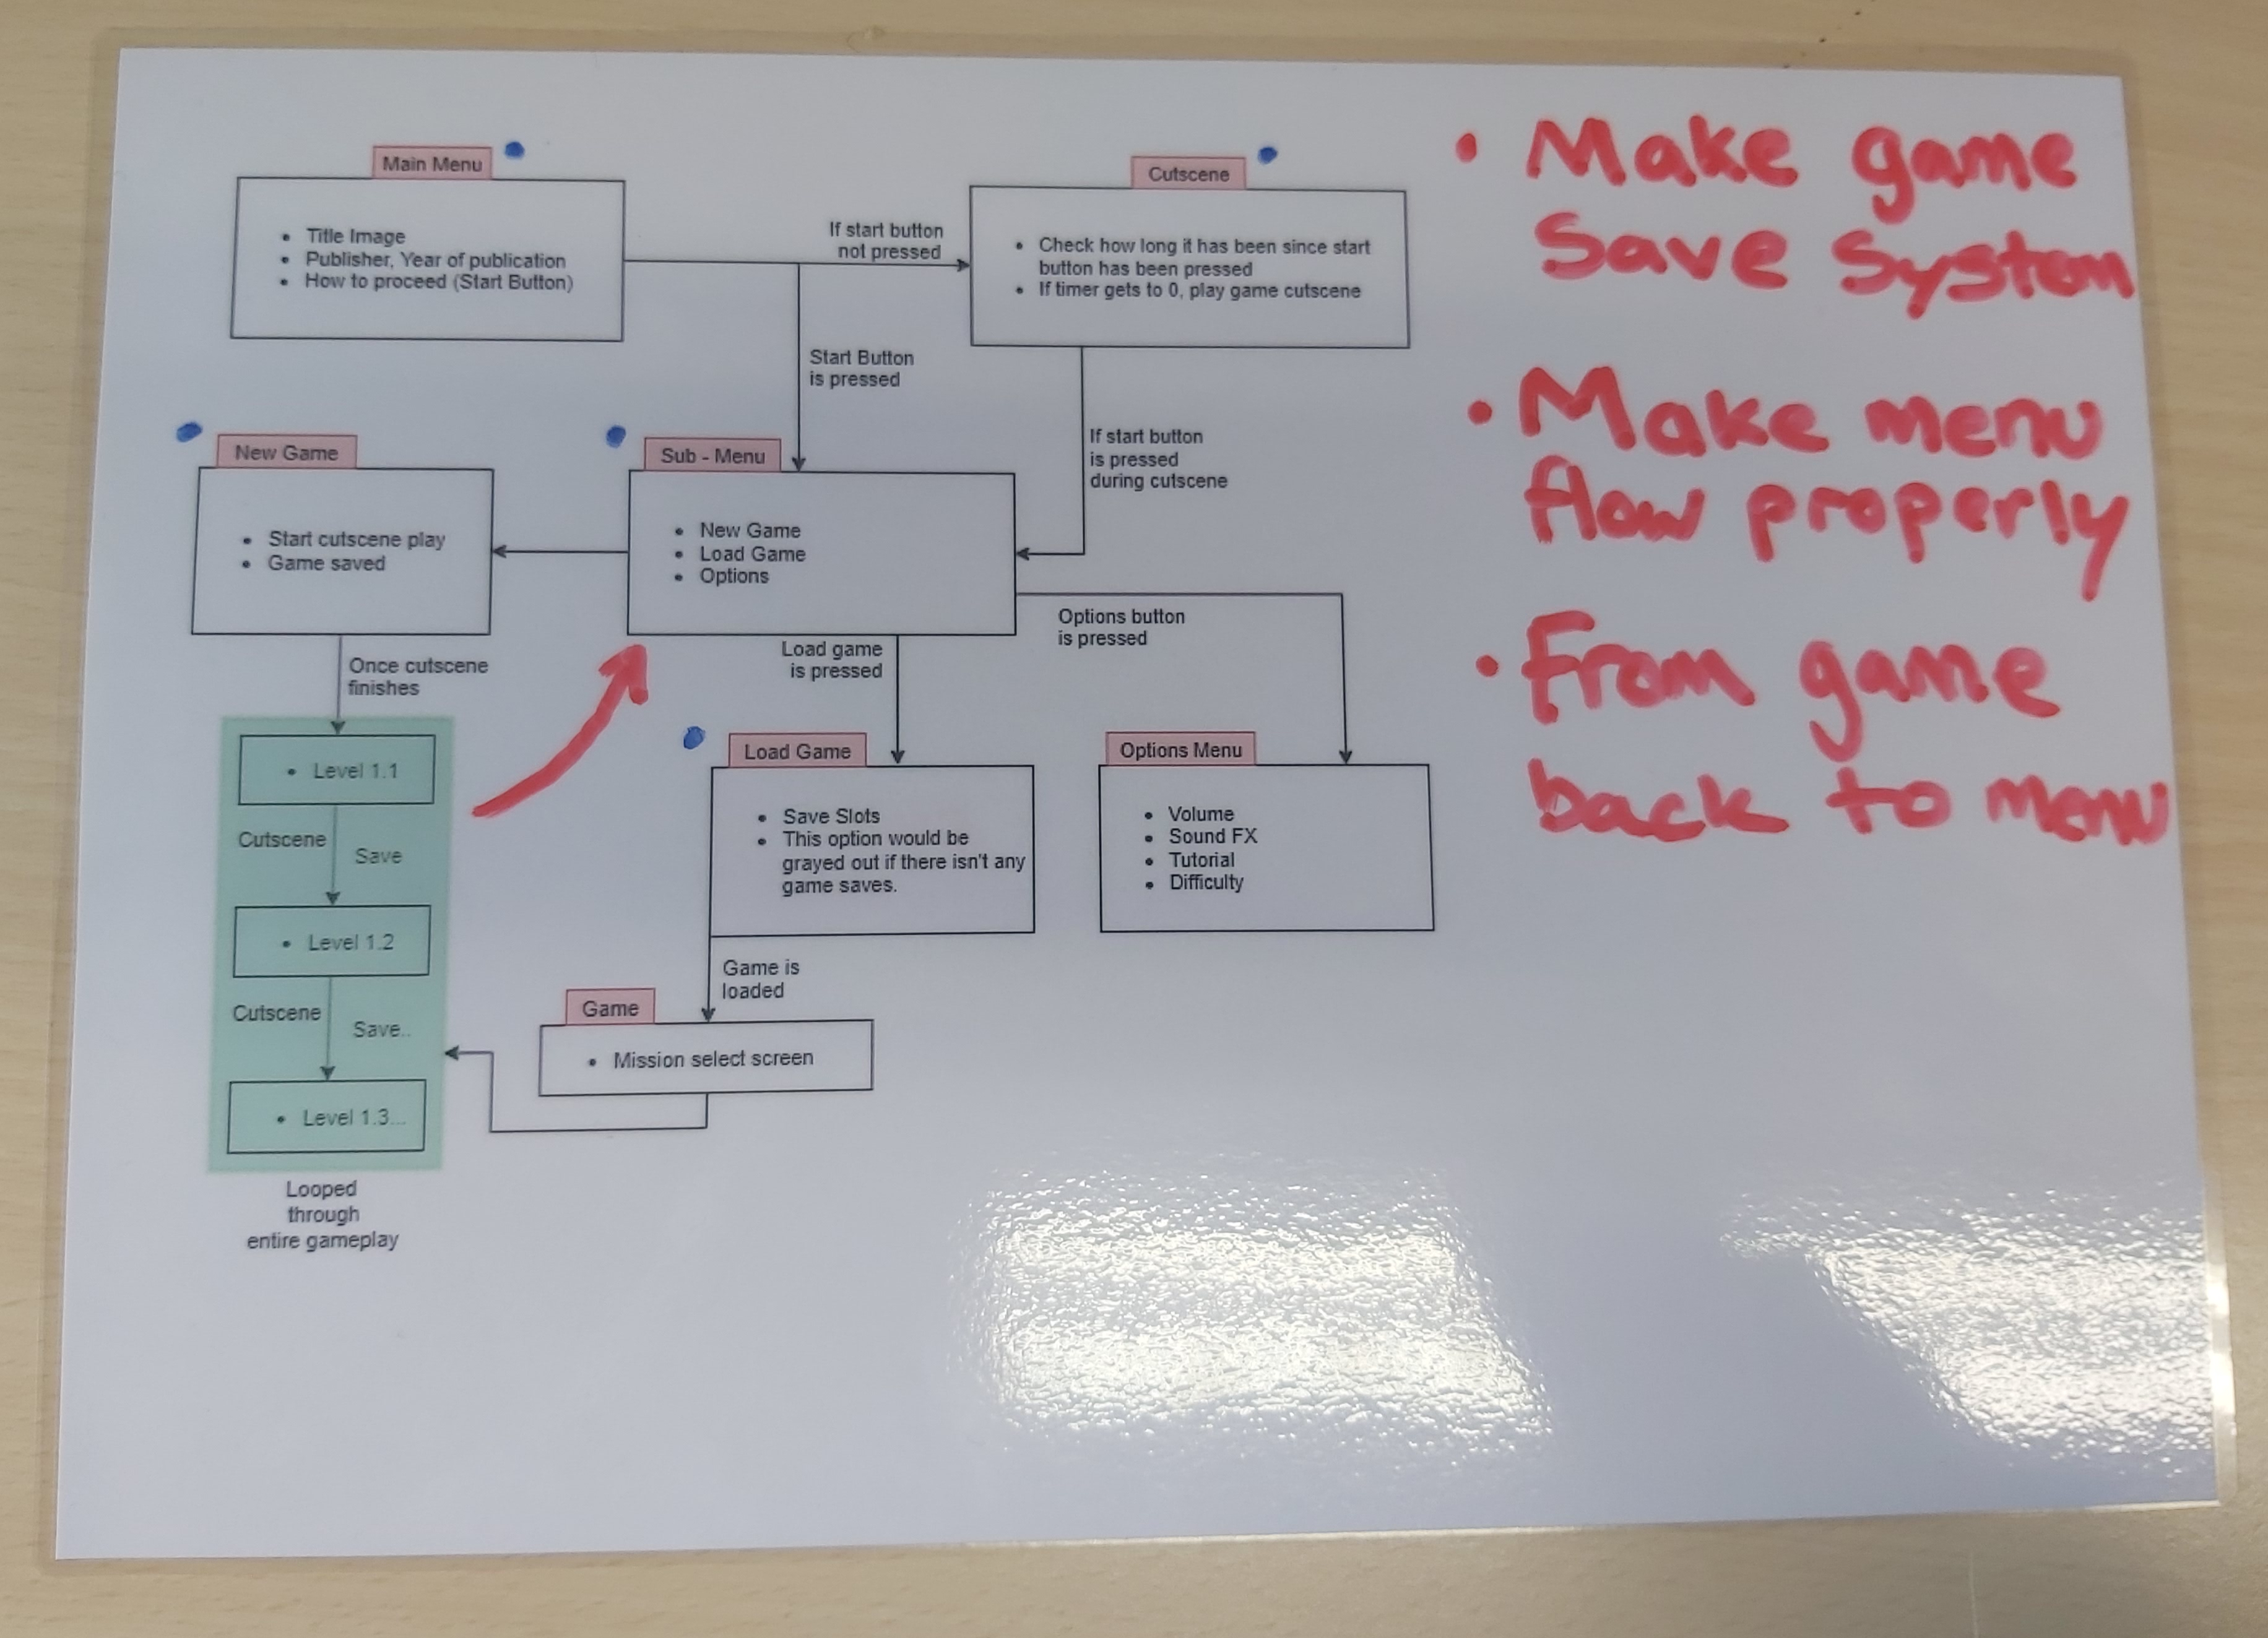
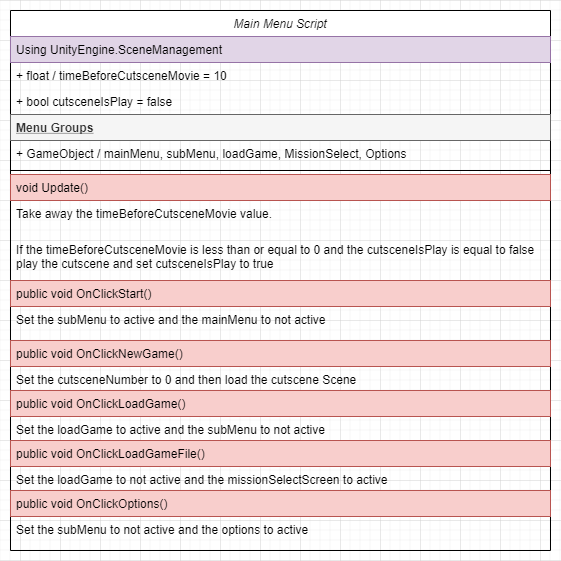
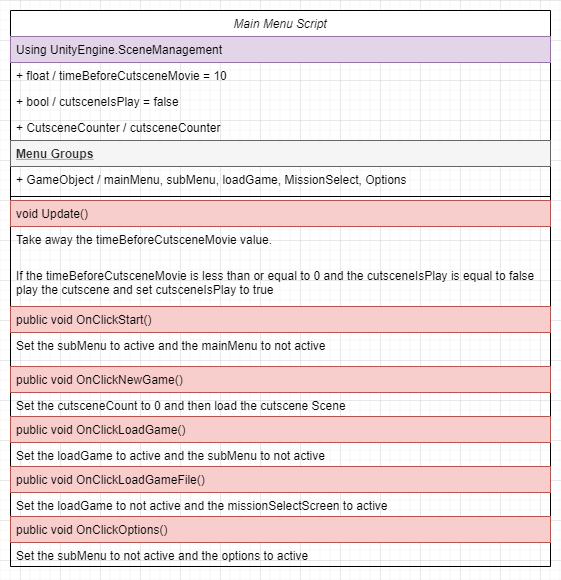
I broke down how my game would flow, and what I would need to consider when writing the menu script.
I printed this out and then laminated it so I can write some notes on it, like a day planner when I’m making the game of what I’ve completed and what I haven’t.
I then decided to also laminate my own planner, which I’ve made here, this would help me plan out how I’m going to do my work throughout the day.
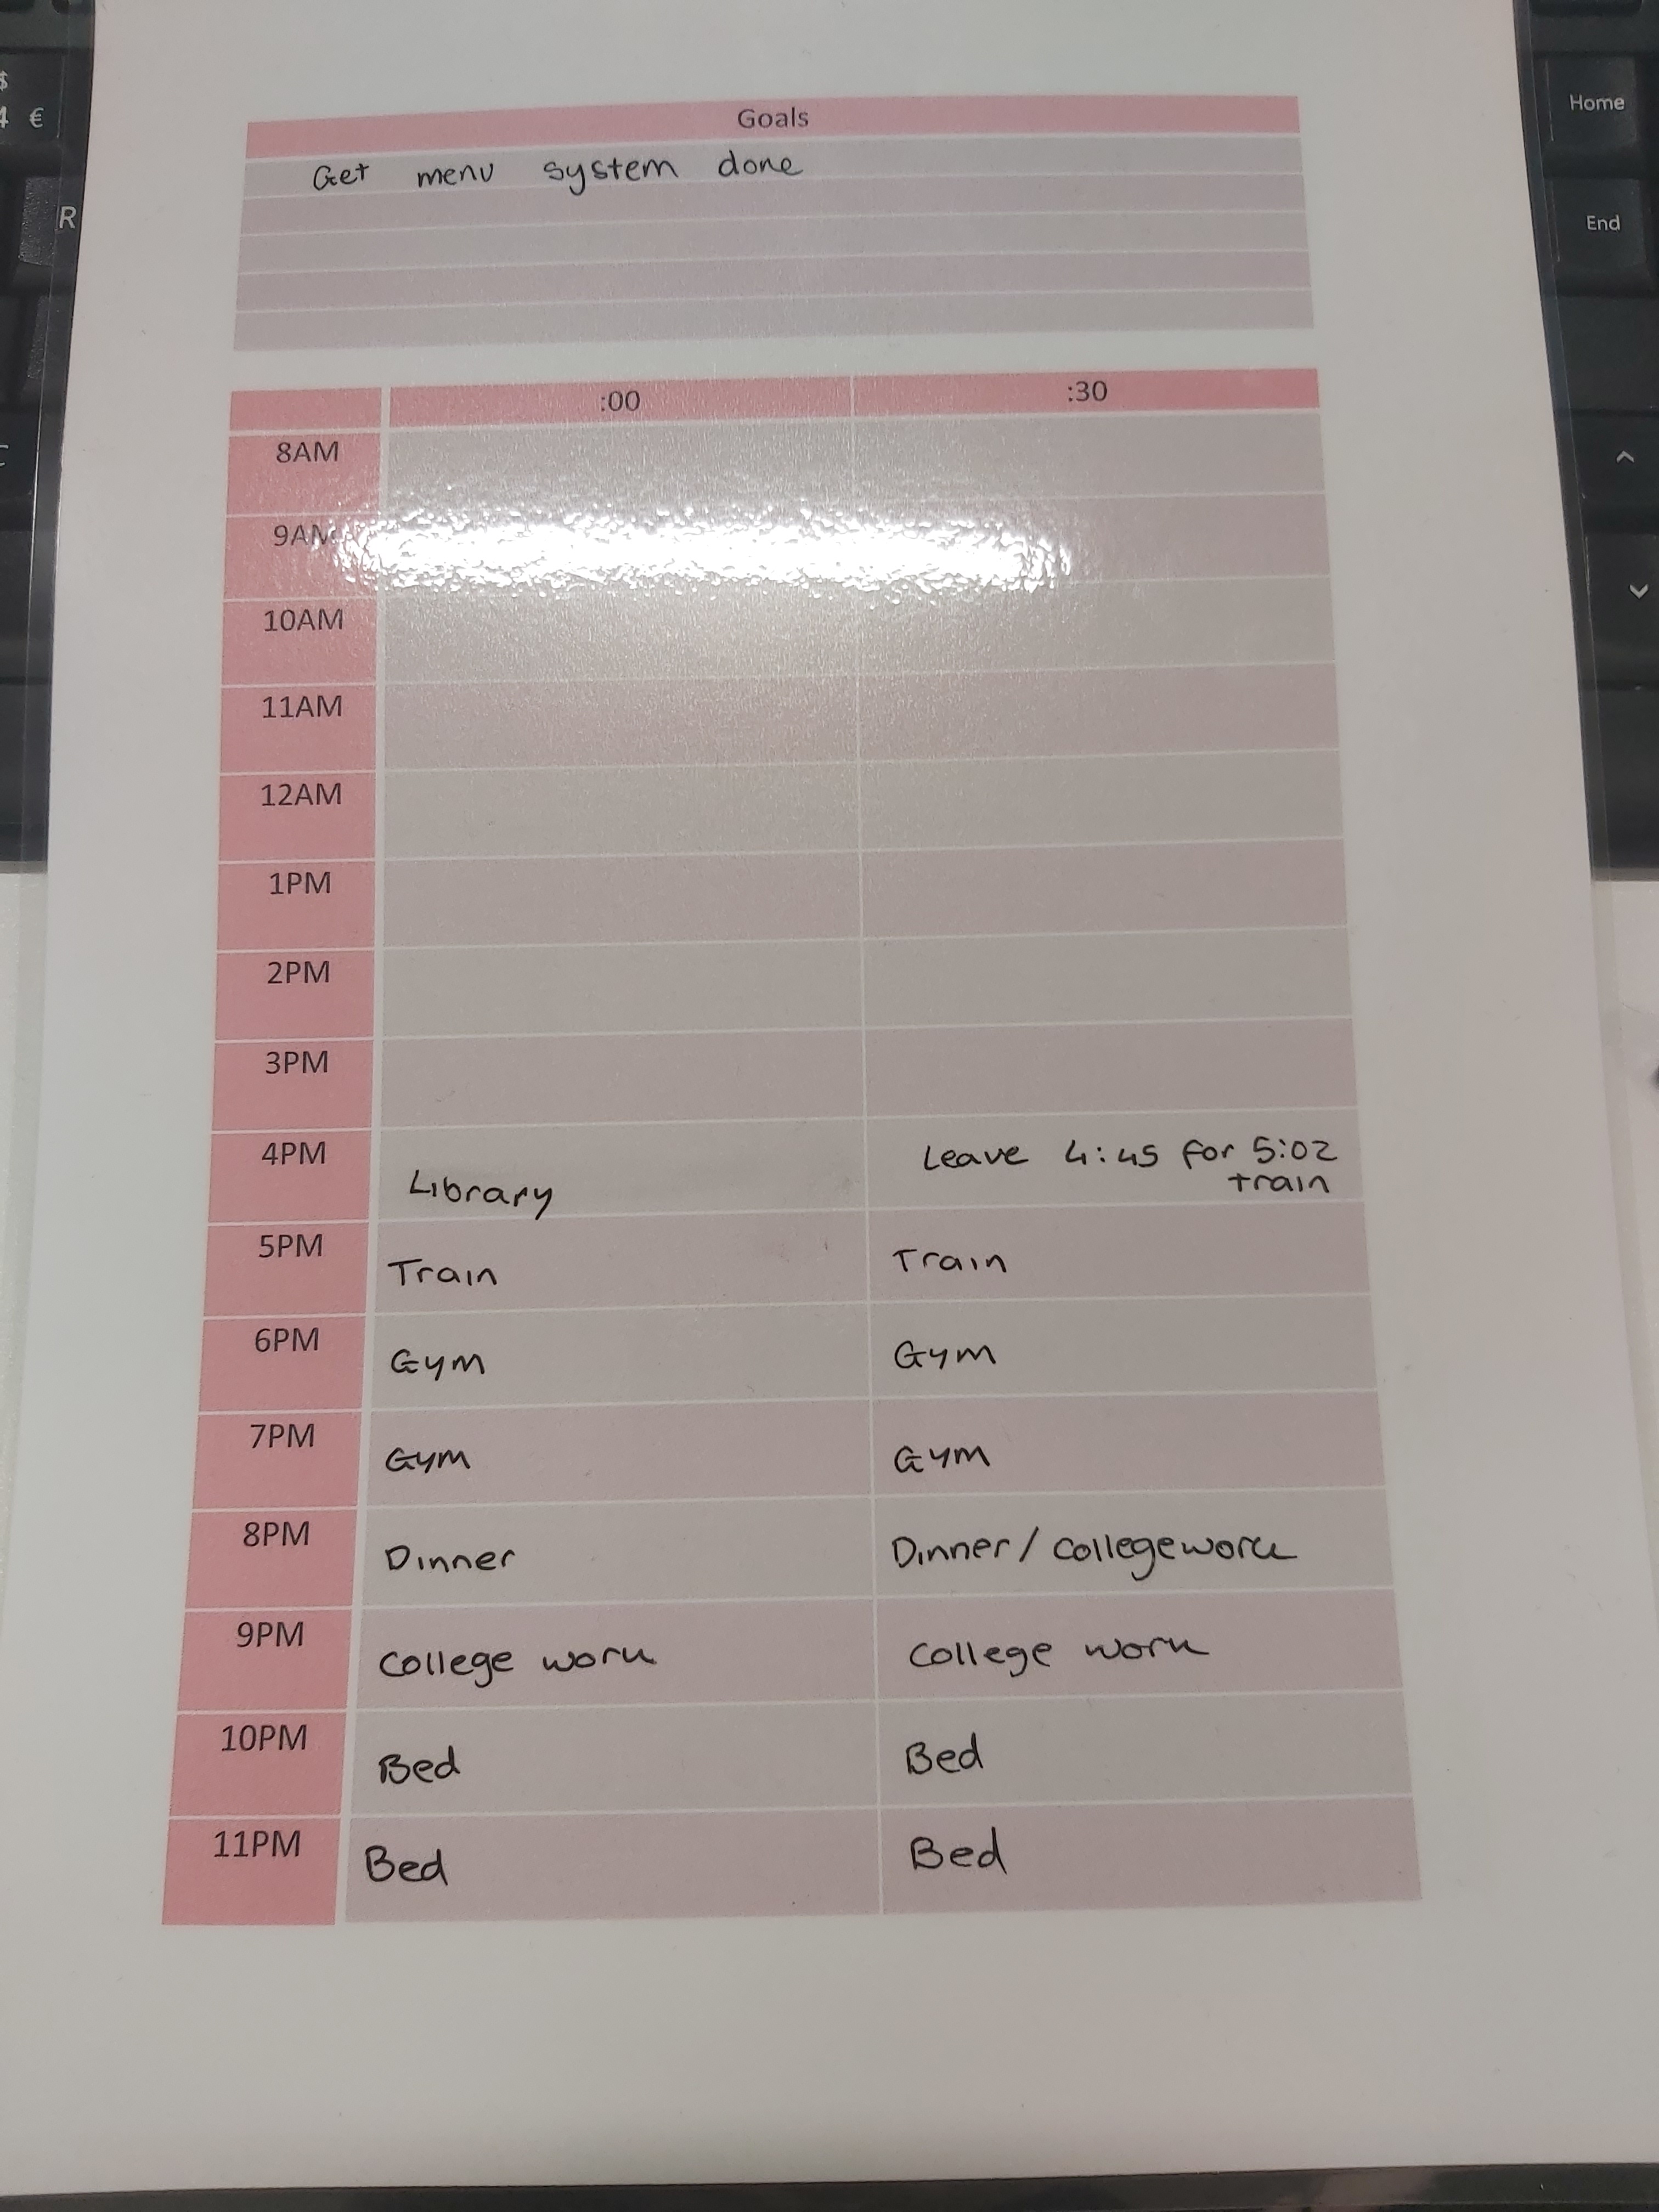
I feel like having both of these beside me when I work is very beneficial, it would help me plan out my work and time properly so I have time to do everything.
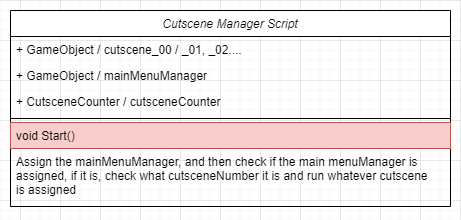
I made a UML diagram of how I basically want the script to work for this main menu, using CanvasGroups
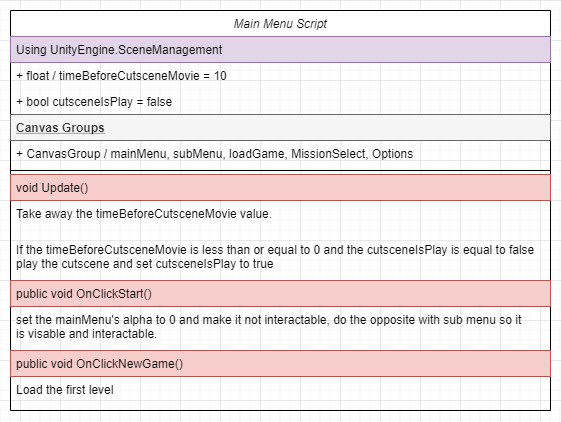
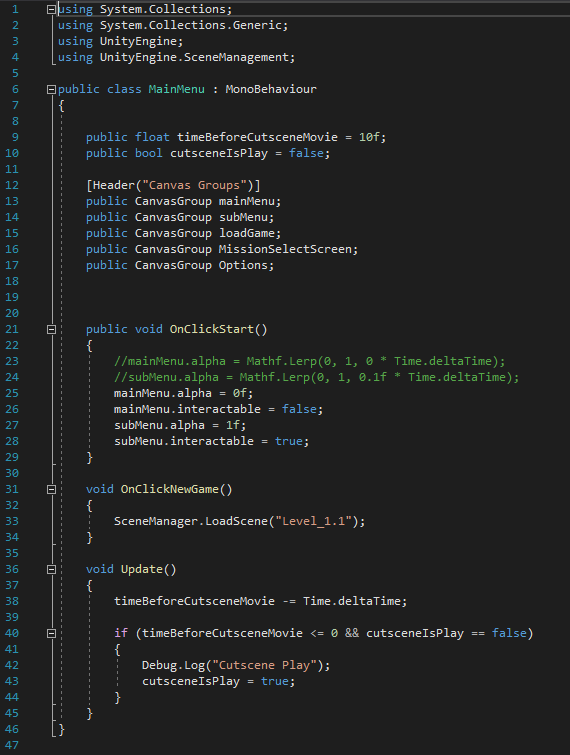 In Unity, I worked on simply getting the menus working and navigatable, I began by making buttons and placeholder titles and canvas groups, I then made a MainMenuManager script where all the script for the main menu is held.
This is what the script looked like
This is nowhere near finished, but writing a part of it helps me plan out what the rest of the menu script would look like.
It also informed me that I would need many more canvas groups for the menu, since I forgot about the mission select screen, the load game screen and the options screen.
Doing this also gave me the idea that I wanted a cutscene movie in my menu screen, if the screen is left idle within a certain amount of time, the games trailer cutscene will play. The reason why I want this is because I want my game to grab peoples attention when it hasn’t been played and left alone, I also want to find a way to make the game easy to understand to people who might not have that much experience with playing games.
This is what the main menu scene would look like during play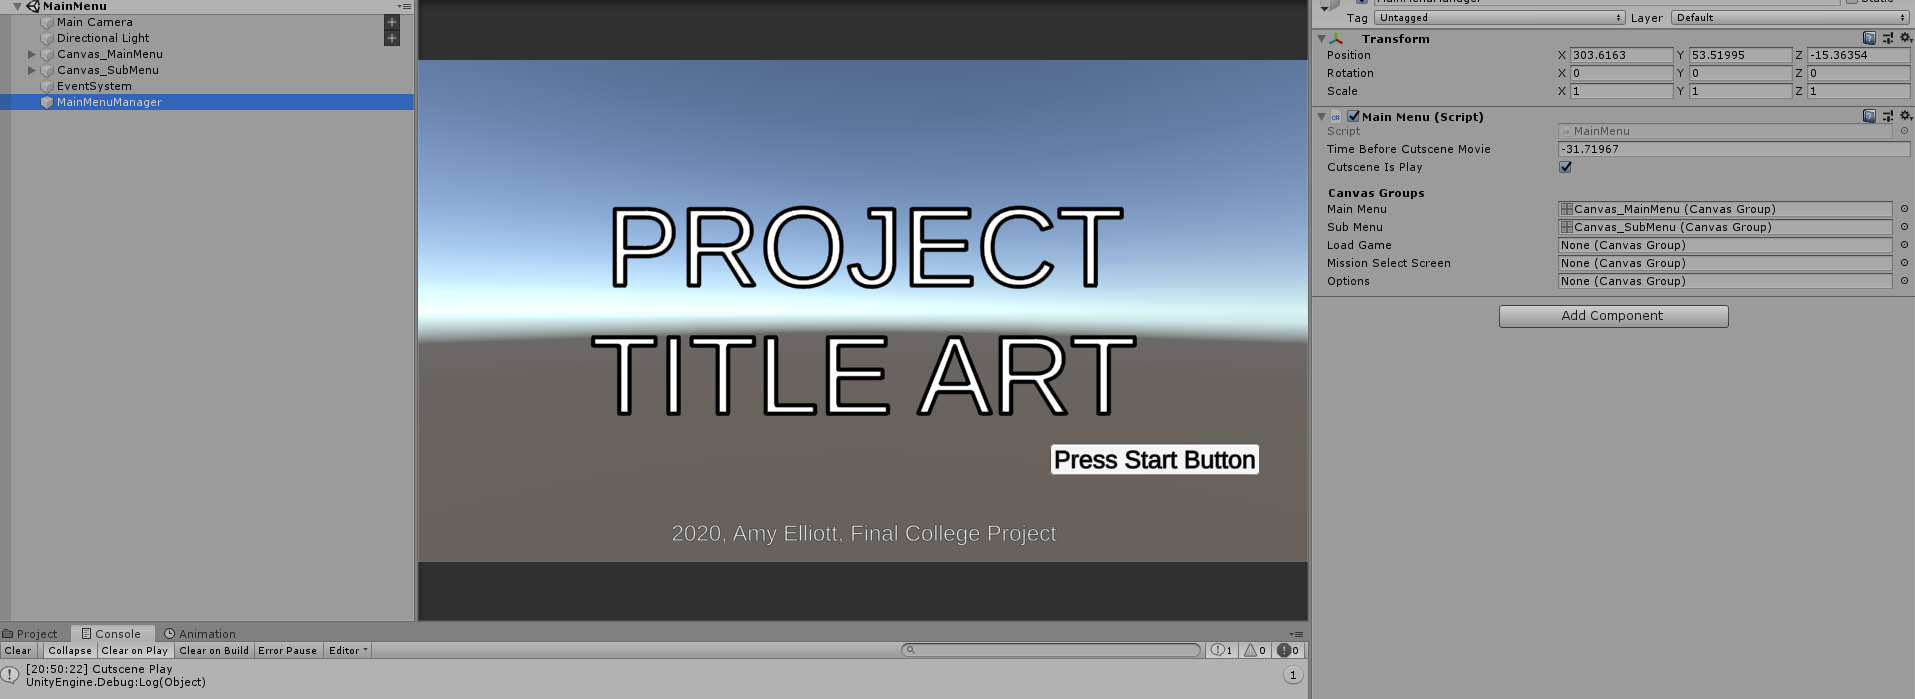
As you can see, in the console, it says Cutscene Play in the debug log, this is showing that 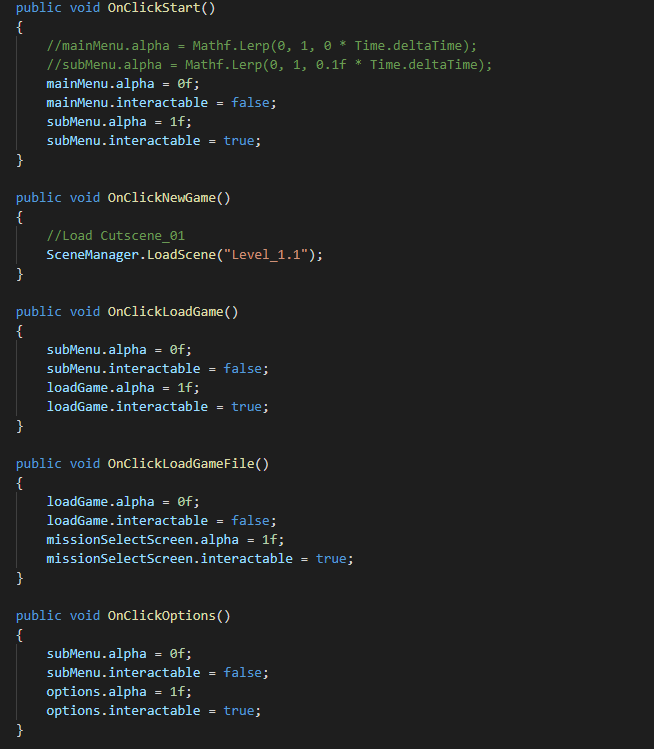 the cutscene counter timer works, where that debug log is loaded, I would play a cutscene, which would be a separate scene which holds every cutscene and plays them when requested.
I just realized that all of this which I wrote could’ve been cut down to a few lines of code, so I made that in a UML diagram and then wrote it in a script. here I am setting the alpha to 0 or 1, and 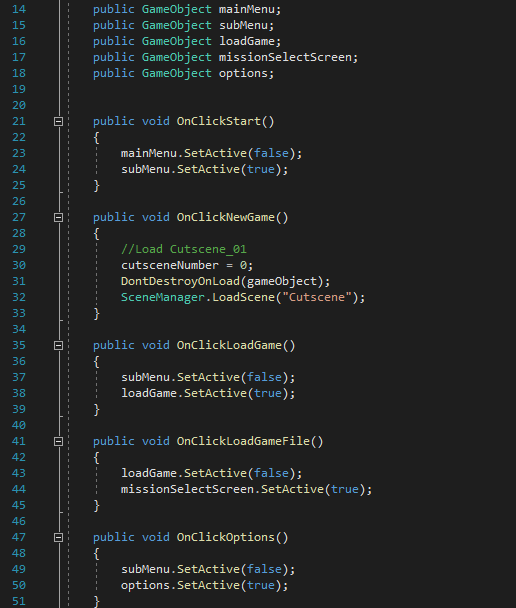 then setting the intractable to true or false.
I could’ve done exactly the same thing by enabling and disabling the canvas gameobjects, so I went ahead and done that. And this is how much shorter that script is when doing that instead.
I was then facing another problem, in my game, I needed to store a value of what cutscene the player is on, so the right cutscenes play at the right time.
On this, I tried to have a cutsceneNumber integer, and set it, and then I would make it so the gameobject is not destroyed so I would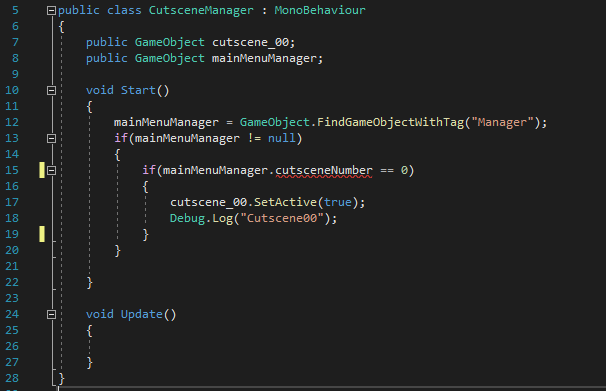 retain this script with the integer value in the cutscene scene, and then, in the cutscene manager, I tried to get this value, but that wasn’t going to work.
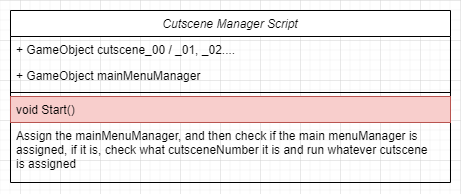
So now I thought of 3 different ways I could go about this, I could use singletons, scriptable objects, or I could save this cutscene number to PlayerPrefs like savedata.
I began by looking at a unity form post for help, and I came across this form, and reading through the replies helped me realize a few things.
It made me realize that using singletons may be bad to use, since
Singletons by nature couple code, complicate testing, and make polymorphism very difficult. Of course you can over design your Singleton class to handle all of that, but its far simpler and less confusing to simply make a ScriptableObject – JoshuaMcKenzie
Taking this form post into consideration, I instead started by making a scriptable object to hold my cutscene number integer.
This is the scriptable object script.
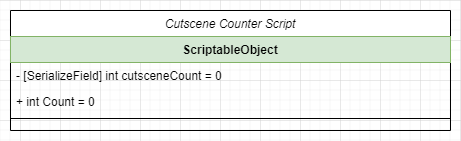
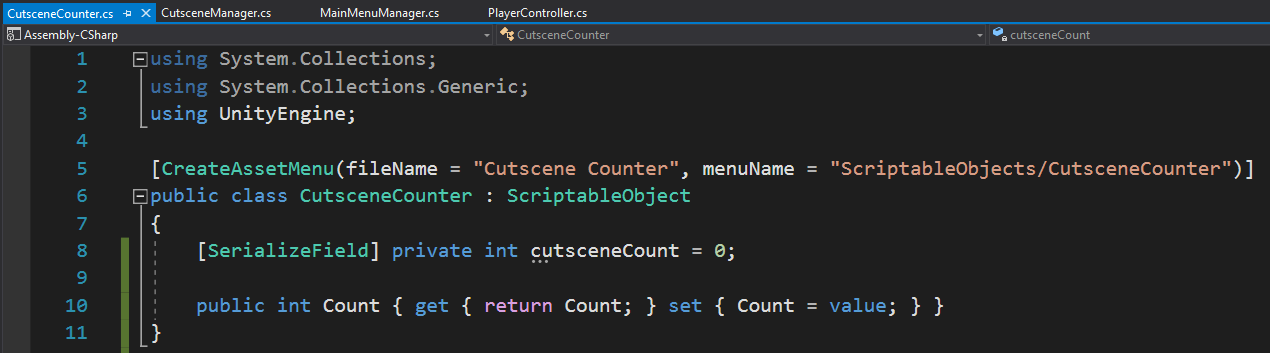
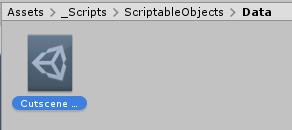 From this, I made a scriptable objects folder in my scripts folder, and placed this script here, I then made a data folder, and made a scriptable object data for this counter.
This scriptable object shows me a counter, which is stored and is accessible throughout the entire game and different scripts.
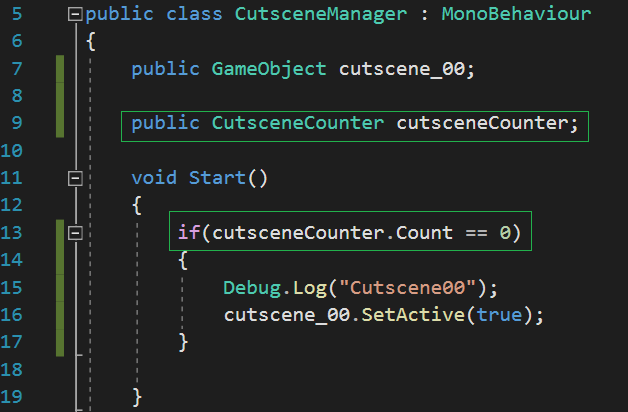
To access the Count Integer, I simply inserted these lines (green outlined) into both my CutsceneManager and MainMenuManager.
MainMenuManager
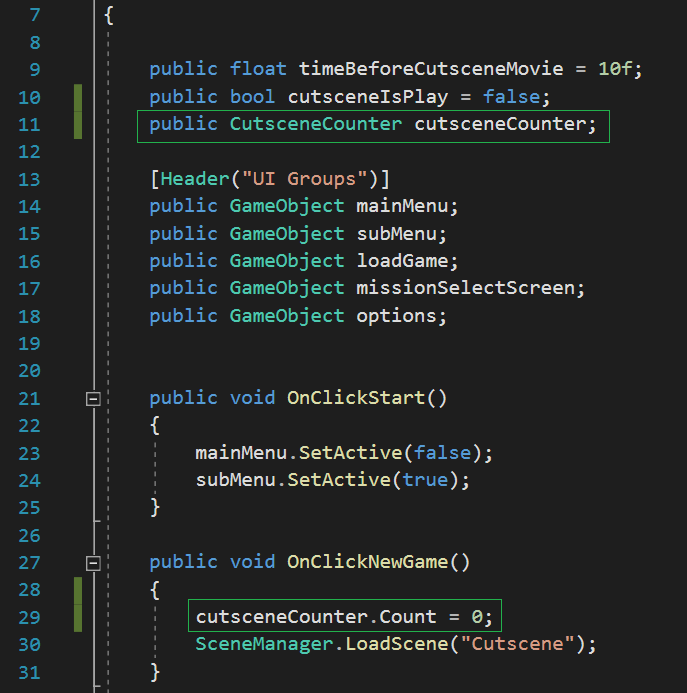
CutsceneManager
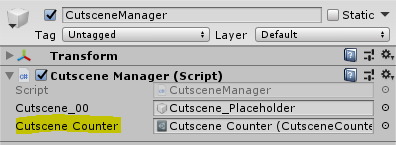
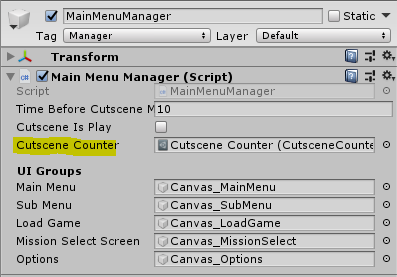 And then, in the inspector, I had to assign some data, this was only on the MainMenuManager gameobject, and the CutsceneManager gameobject.
As you can see, from this, I am assigning the cutscene counter data, which is saved and holds the value throughout the scene. I then ran the game, and came by this error. (Below)
![]()
This error is a recursion error, which means the integer was called too many times, this is fixed by simplifying the scriptable object code.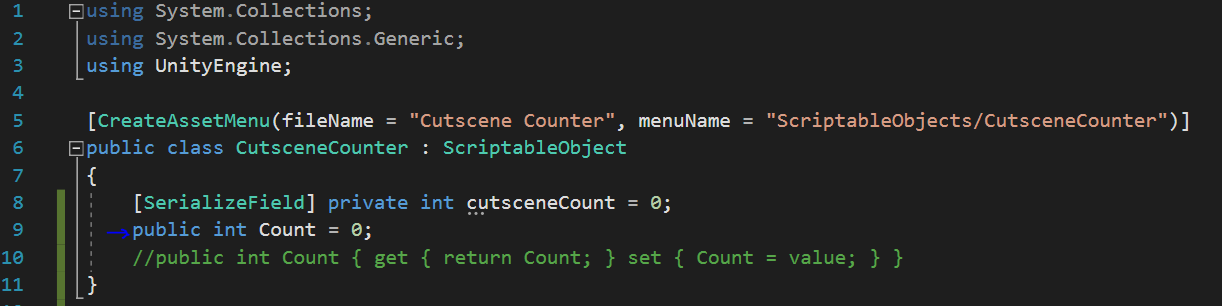
As you can see from this script, instead of getting and setting the count, I just made it a public integer and assigned it a value.
 This ended up working just fine.
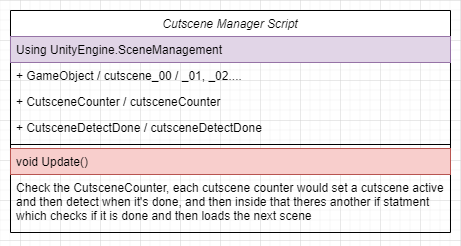
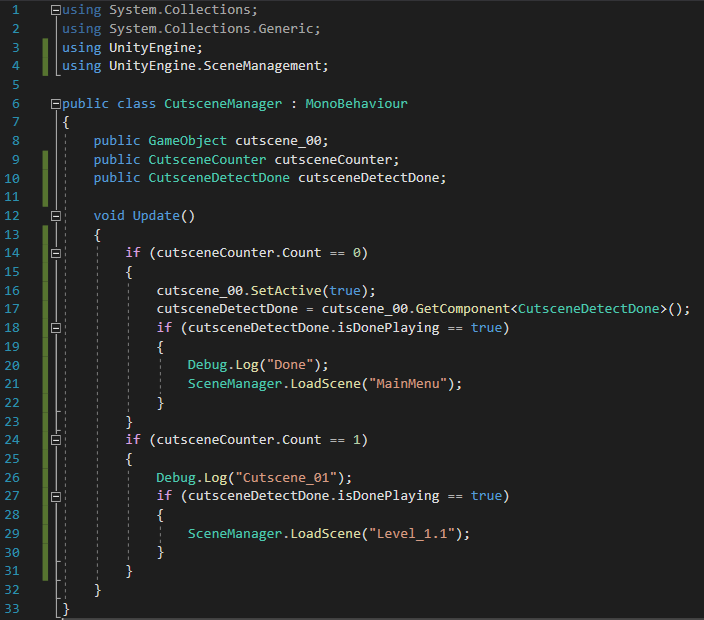
I then needed to figure out how to get it to detect if the playableDirector is finished playing to go onto the next scene.
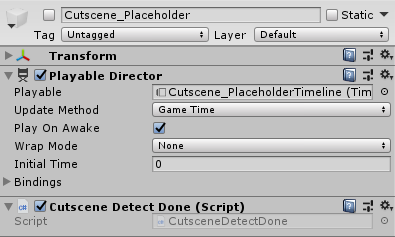
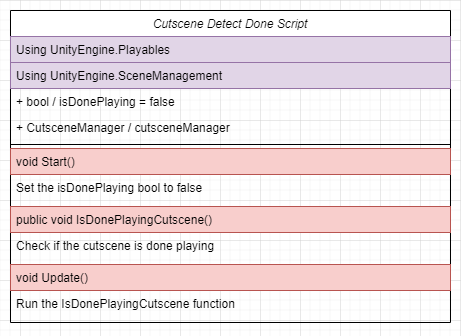
I made a completely separate script for this, which I called ‘CutsceneDetectDone’ and this script was placed on Cutscene gameobject containing all of the cutscene assets as a child.
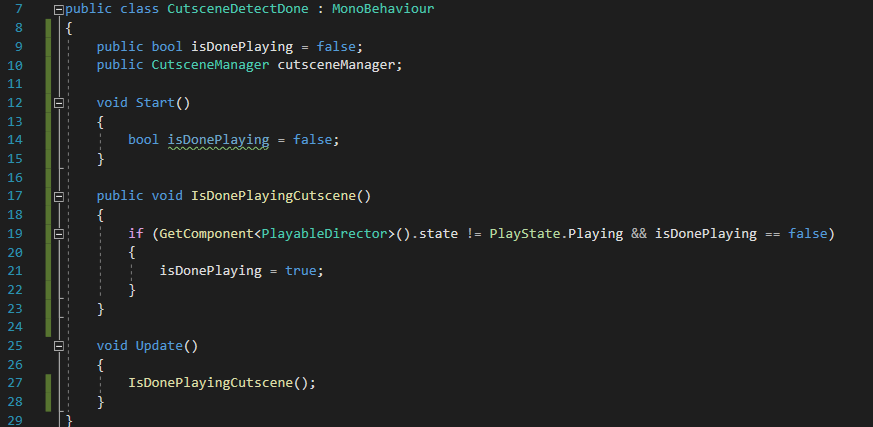
This is the cutscene detect done script, and it detects if the scene is finished and then runs an if statement when it is, the only problem with this, is in the future, when I have a cutscene for the beginning of every level, I would need to put line 21 in the cutscene manager script and call a level loader in this update function, so it takes the player to the right level.
This is the results of the menu navigation, I need to add some back buttons to the options and level select but that won’t be too hard.
Everything here is placeholders at the moment and it is nowhere near done, that cutscene 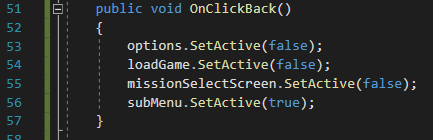 isn’t official, its just me learning how to get this all working before I make the actual cutscenes and images.
To add the back buttons, I simply had to add another button to the load game and options canvas.
After that I began adding loading specific scenes after cutscenes, this was pretty simple, this is all I had to do.
Cutscene Manager
On the cutscene manager, I had to constantly check the bool and see if the cutscene is done, in each if statement, it loads a separate scene.
At first, I had this in my start function, and I didn’t know why it wasn’t loading, but then I found out that it was because that start function is only called once.
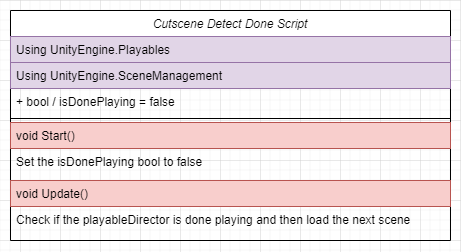
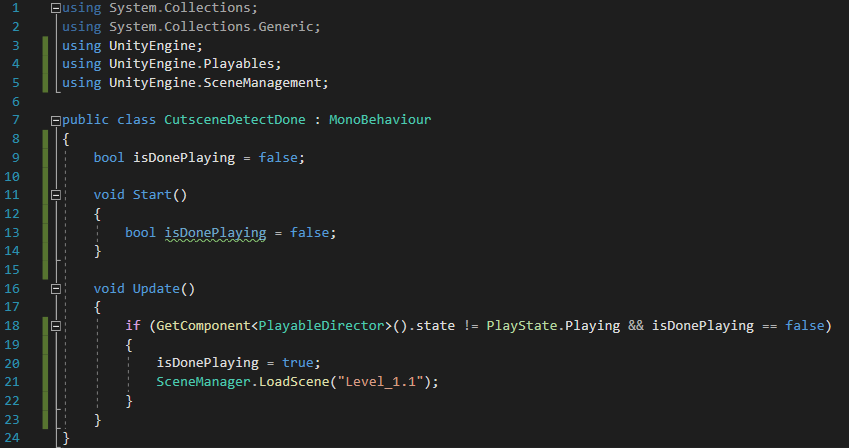
Cutscene Detect Done
In this one, I simply made a function for detecting if the cutscene is finished, and ran that in the update.
I then got rid of the line which loaded the particular level.
This was now complete.
- What went well with this task?
I felt like I was able to implement these menu screens really quickly, it’s just the fact that I need to polish them now, and that isn’t too hard to do, doing this has also taught me a bit more about scriptable objects, and how to access values outside of a scene, by using a data class. I’ve also got all the cutscene mechanics working, so all I have to do is make the cutscenes and apply them.
- What didn’t go so well with this task?
I felt like I could’ve done more with the options, but I also feel like that’s not my top priority at the moment, so I may work on that later on.
What did I find difficult or easy?
I found working with the targeting system this week was very easy and fun, I was expecting to write a lot more code for what I did, and I loved when I added the one shot targeting sound effect so the player knows they’ve targeted an enemy.
I found getting the menu screens working fun, because I learnt so many things, and I’m very proud of how it turned out, I’m also very proud that I got cutscenes working, getting this working was easier than I thought it would be
What tasks didn’t I complete from this week?
I completed everything which I had planned, now I’m moving onto task 4 to model my enemy models.
Planning for next week –
How do I plan to catch up? Do I need to change anything about my work or planning?
Next week I would be continuing all of my work in task 4, since I feel like I’ve done all my prototyping and I have a game which I’m happy with polishing and building up.
