Week Number & Date: Week 5 (09/03/20)
List of Tasks planned for this week:
I’m still part-way working on task 3 and making my way over to task 4, so I’ve only set myself a single task 4 task this week since the others are for task 3.
If I complete everything on this list, I would add more to it, and it would all go into this development log.
Current Position –
What did I do this week and why did I do it? (Screenshots/Videos/Photos)
Polishing (3D) – Enemy_01

I’ve set myself a long deadline for this task, so I can complete it on time, I only wanted to work one enemy at a time so I can pace myself, I don’t necessarily need all of the enemies which I have listed, I would only do a few since I need to make the game playable first, I don’t put enemy models in top priority.
For this enemy, I previously made some concept art for it, which I am going to use when I do the 3D modelling for it.
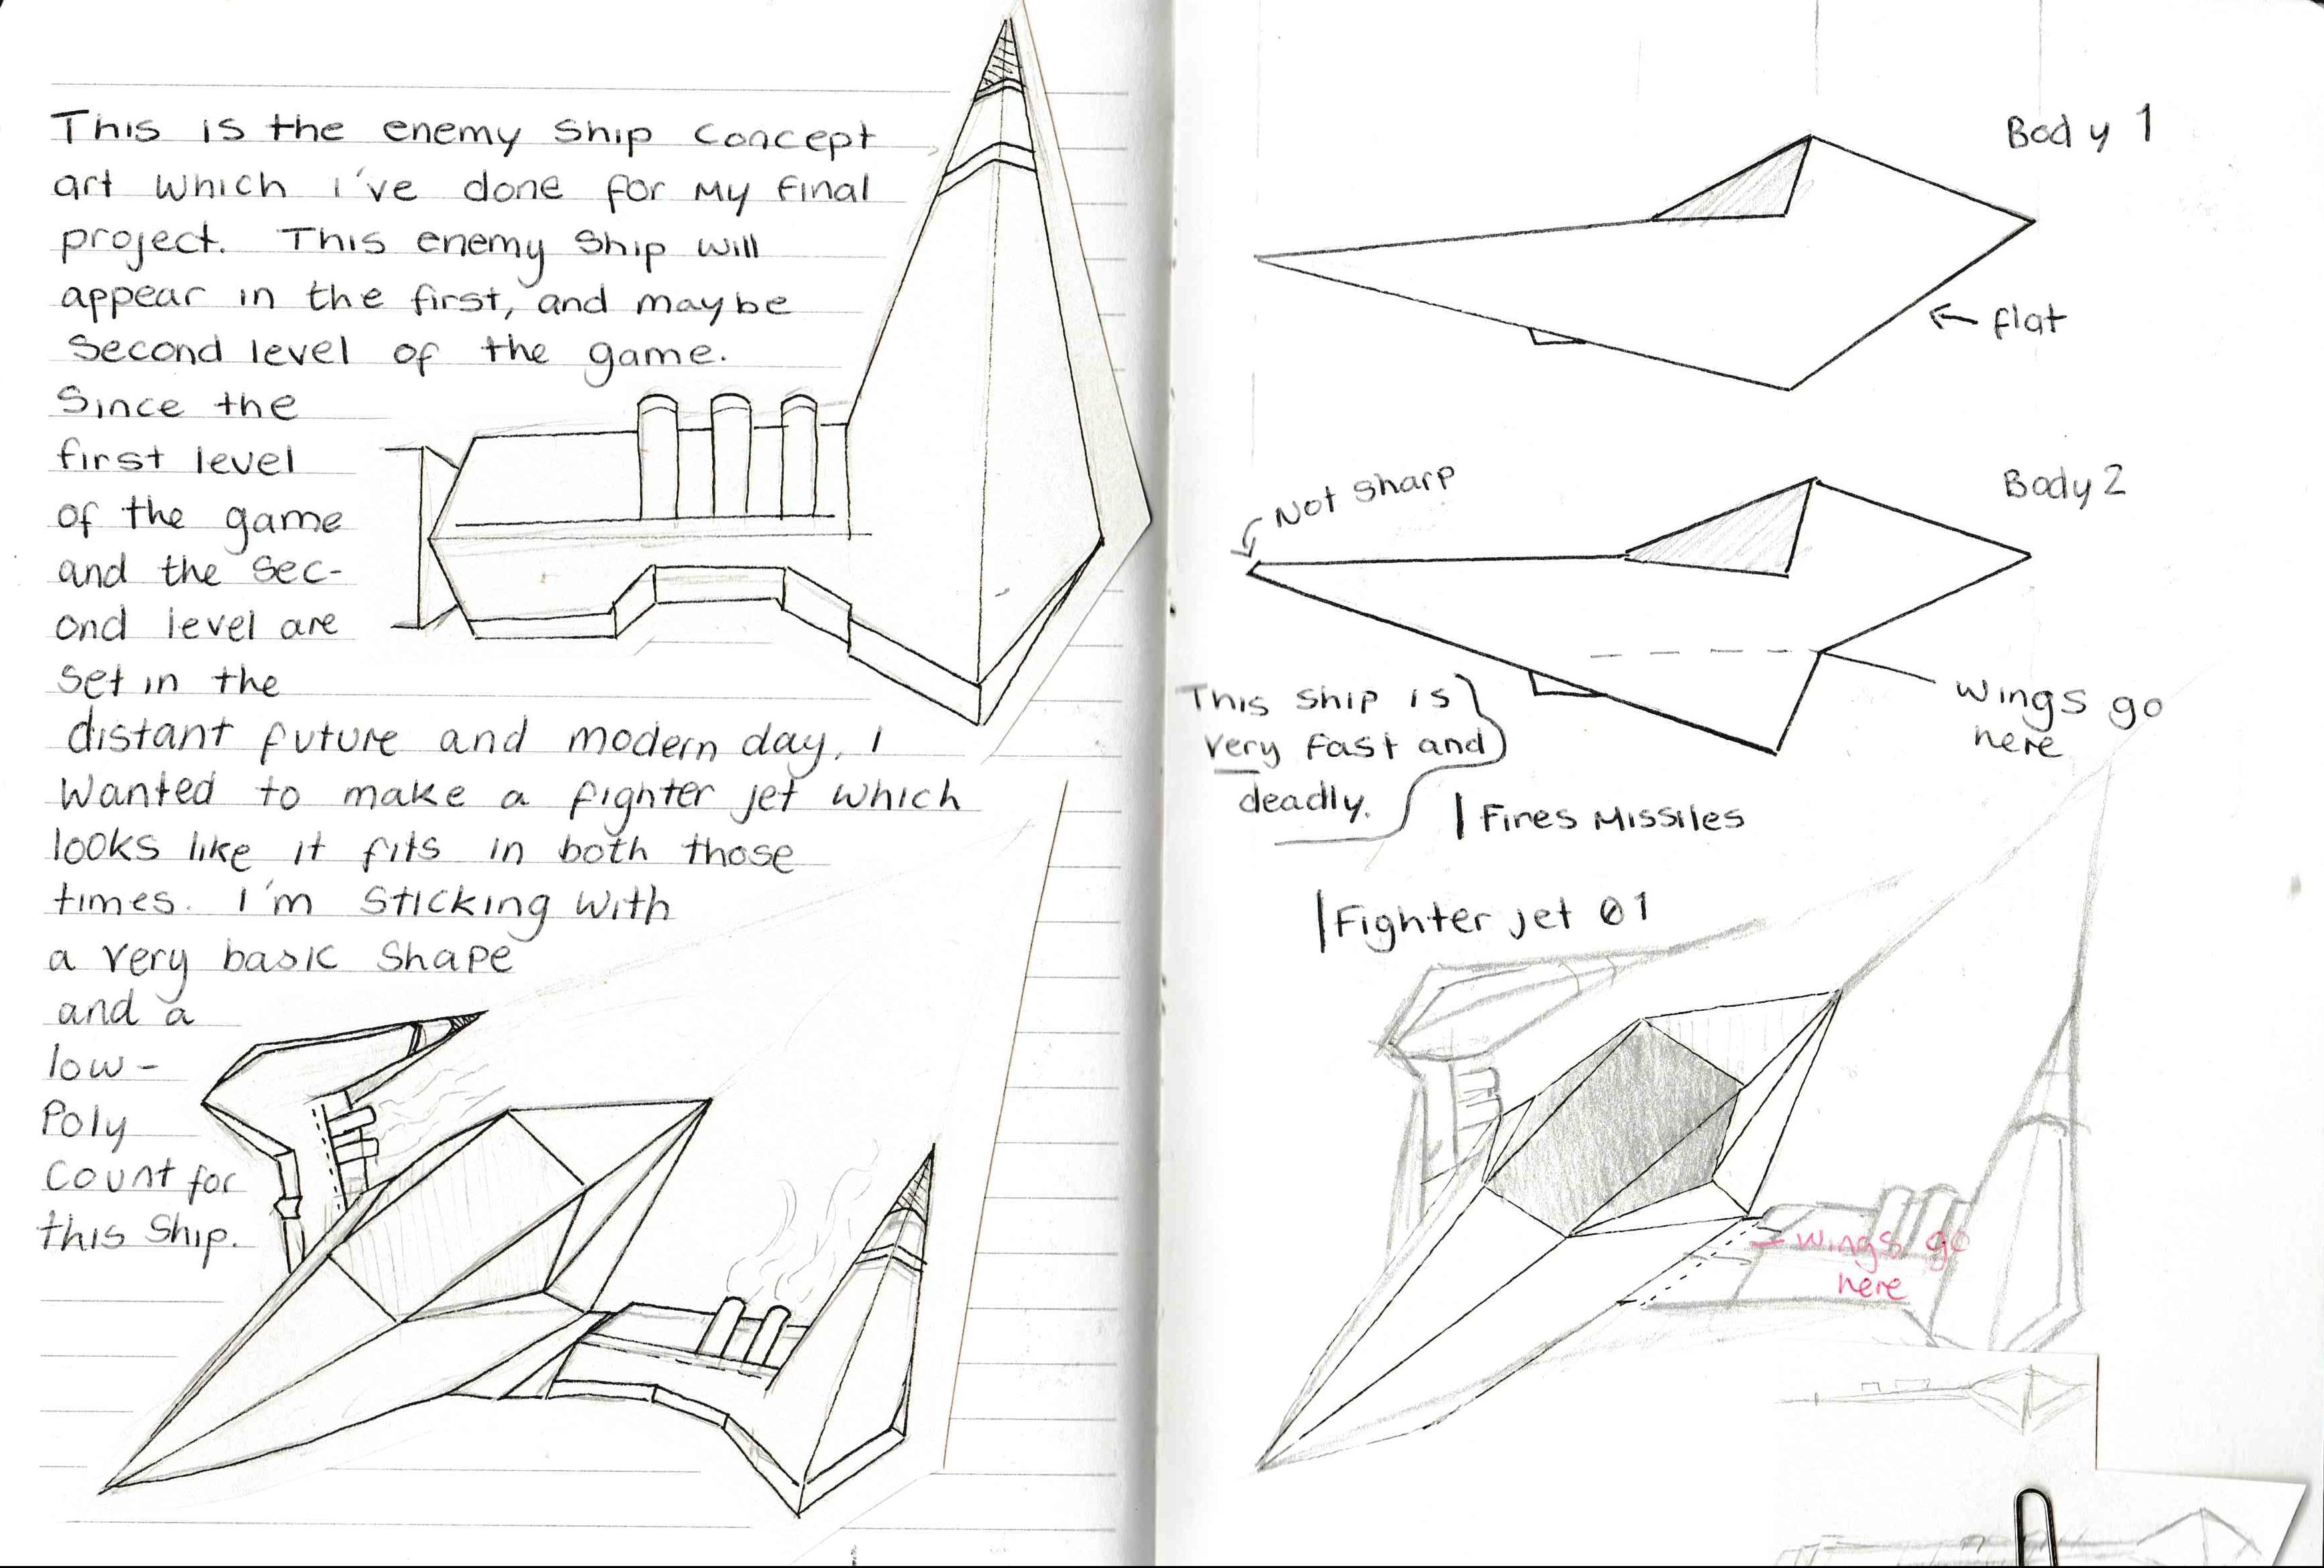
I like this concept a lot because of how simple it is and how I’ve broken it down into simple shapes, so I’m hoping because I’ve made it simple, it wouldn’t take too long to model.
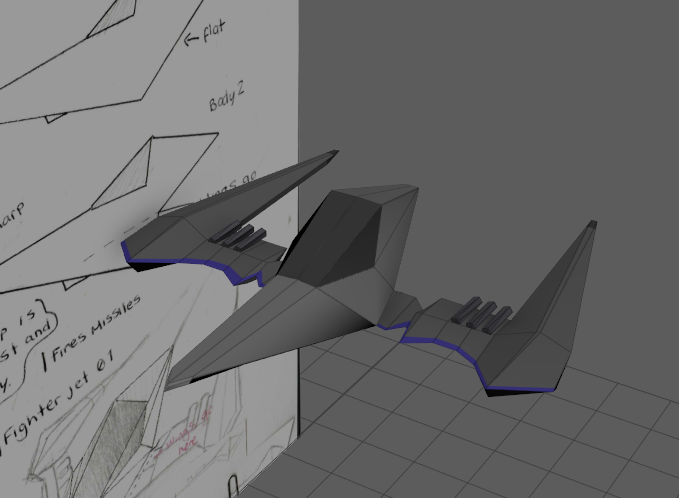
Final 3D Model
I began by modelling half of the ship, this is what it looked like.
And this is what it looked like after mirroring it.
I thought this looked too thick, and wasn’t pointy enough, so I made some adjustments

When I re-opened the file, this had happened, and it ruined everything, I had saved everything, but it somehow messed itself up!
I then had to delete what was messed up and was back at the beginning again 😦
I finally managed to fix this again, but I would need to adjust my textures now to fit again.
The reason why the UVs broke in the first place is because I didn’t delete the history when saving and closing my file, which caused the model to distort when it tried to mirror it again on reopening, this form here (https://www.reddit.com/r/Maya/comments/6ztwb8/mesh_horribly_broken_and_distorted_after_opening/) helped me realise this and make sure this was to never happen again, it was these posts on the form which helped me out :

![]()
Unwrapping
This is what the ship looks like after some adjustments, I like how this looks so I’m going to start unwrapping it.
Unwrapping was pretty simple, I just selected the edge around the whole ship and cut that, I then cut the start of each wing and around each wing to separate them.
After I done that, I sewed the wings back to the body for both sides of the ship, I also dealt with the pipes on the wings but I don’t plan on them being too detailed.
I had to re-do the unwrapping when it all went wrong.
![]()
Texture Ideas (Paint Over)
I began this by taking this picture from Maya, this is perfect for painting over the top of, and I feel I can get some good concept ideas out of this.
Texturing
Once I was done, I laid out the texture sheet neatly and brought it into paint, putting labels onto it.
I then began texuring this, a very simple texture since I will be coming back to this later on.

This is not finished! But this is what the texture looks like on the enemy ship, I will be coming back to this later on, after I have picked a final texture idea.
I had to re-do this texturing when it all went wrong.

I decided to export this as FBX so I know the model is safe, and I may come back to it and add more texture detail later on if it doesn’t mess up the next time I open it.
Result
- What went well with this task?
I was able to really quickly produce a 3D enemy model, I feel as if my modelling skills are improving, with how quick I was able to proudce this, I feel that I’m able to produce many more enemies for the game.
- What didn’t go so well with this task?
I felt like it really set me back when the ship messed up, I eventually found out it was because I didn’t delete the history when I saved and shut Maya down, on re-opening it, the values got messed up due to that history not being deleted.
Polish (Unity) – Speed Boost
This wasn’t originally on this weeks plan, but I added it because I managed to do this rather quickly, and I felt like it was a good addition into my game.
I started by adding a few things into the player controller script, since this is what controls the speed of the player. I added a few timer properties to start, this is what controls how long the player is boosted for and how long they have to wait between the boosts, it also includes an AudioSource and AudioClip for the players taunt sound when they boost forward, this is useful to provide player feedback, which makes the player know they have boosted forward, later on I also plan to add some more feedback to this.
Here’s what it looks like.
In the video, you can see the values on the right hand side change, which tell you what audio is to play when you boost forward, and you can also tell how long the boosts are going to last and when you can next boost.
- What went well with this task?
I felt like this went really well since it makes the game feel so much better and fun to play, all I need to implement now is feedback, like animation, for example, I could make the dragon flap his wings faster, I also really like the sound effects since it gives character to the player
- What didn’t go so well with this task?
I felt like I spent a little too long on this task, at the beginning, I was getting myself confused since the naming of the variables were all hard to identify, and I believe they still are very confusing names, but I’m glad I got it working

Polish (Unity) – Button Change
This wasn’t originally on this weeks plan, but I decided to do this as I was adding the speed boost to make the game more comfortable to play.
 To begin, I knew I wanted to change the targeting button from the trigger buttons to one of the front buttons on the controller, and I eventually decided with the square button on a PS3 controller, once I decided on that, I had to find button mapping online for a PS3 controller, to find what key to map it to, and then add this to my input mapping list on Unity.
I then changed a few things in my script to get my game to respond to these new inputs.

After playing around with these new settings, I felt this was a lot better for playing the game and it makes a lot more sense to target with the square button.
- What went well with this task?
It was quick to implement and made my game feel a lot nicer to play, which is good since it would allow players to play for longer, which is what I want.
- What didn’t go so well with this task?
I may have to change all the buttons eventually if I’m changing to another controller, like a wired Xbox 360 controller.

Polish (Unity) – Cutscene implementation
This wasn’t originally on this weeks plan, but I added this since I had plenty of time to.
My plan for this is to have a play around with the Unity Timeline tool and learn how it works, and then begin to make some placeholder cutscenes which I would obviously improve later, these cutscenes then will be placed in the game as if the game was flowing, so between levels, and when the player is on the main menu for too long.
This is the placeholder cutscene
I’ve learnt whilst making this that I can have dynamic cameras, and I can switch between animations, I also learnt that I can use my own audio clips and have them play when I wanted, I then took this placeholder cutscene and duplicated it, and began to make rough plans for all of my cutscenes. THESE ARE NOT FINISHED
Cutscene_01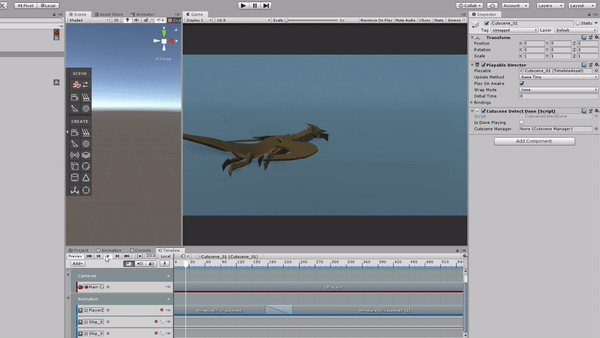
Cutscene_02
Cutscene_03
Cutscene_04
These are only a few of the cutscenes, but these help me have an idea of how I’m going to have them laid out, I also recorded some sample voice notes to help me further, I will use these to make a final voice recording for these instead of them being so choppy, I then inserted these into the code I’ve already written, so these cutscenes are activated and de-activated.
- What went well with this task?
I felt like doing this made my game feel more complete, and I am now building this up to a polished, complete game, I like how my game transitions between the scenes.
- What didn’t go so well with this task?
I feel like the subtitles are too choppy, I think when I next do further research into the cutscenes, I would make a script where I think more about this and how the camera moves and how the models are animated.

Polish (Unity) – Voice Lines
 For this, I recorded voice lines for the cutscenes myself to put in my game, I wanted to do this because I wanted to make sure they were just right and what I needed.
I didn’t want anyone to know that I recorded the voice lines myself so I put on a deep voice and used a voice modulator which made my voice sound like an evil characters, which is what I needed for these cutscenes.
This is all of the voice lines I have already recorded, but not all of them are in the cutscenes, I’ve only done short voice clips and later on I plan to re-record them and make them into full sentences, this is all just planning out how I want everything to work.
- What went well with this task?
I felt like I was able to record these voice lines very quick and easily, and I’m really proud of the result since I can’t even tell it is my own voice and it doesn’t make me cringe, I’m also happy I’m able to add this into the game since it gives the game a lot more personality.
- What didn’t go so well with this task?
My throat was really sore after this 😦

What did I find difficult or easy?
I found modelling the ship easier than I thought, since I am getting used to 3D modelling now, I was able to model and texture this quickly, which was a lot quicker than I initially thought I would take to model this.
Since the ship doesn’t need any animations, it’s just going to be flying forward. I may add particle systems in for the rockets on the ships wings.
I found making the speed boost work a fun challenge, since I didn’t know how to go about it at first, but eventually after trying out a few different things, I got it to work properly, and that was really satisfying.
I found making the cutscenes at first, hard, but I’m glad I’ve used the timeline tool on Unity because I have now learnt how to use it and I think it would be really useful to use that in my other projects as well.
The voice lines were fun to do and insert into my unfinished cutscenes, since it gives that layer of polish which makes my cutscenes feel more alive, but my throat really hurt after recording the voice lines, it was difficult to keep hitting the lower pitch on some words.
What tasks didn’t I complete from this week?
I’ve completed all the tasks I had planned.
Planning for next week –
How do I plan to catch up? Do I need to change anything about my work or planning?
I plan to stay on track with my work next week, and complete work set on my trello board.
Week Number & Date: Week 6 (16/03/2020)
List of Tasks planned for this week:
This is the list of tasks I plan to do for this week.
I am already a little behind because I was working on some research up until Wednesday.
This is also the week that the Corona Virus got worse and now I’m working from home instead of at college, but I’ve got what I need to do this work so I’m okay.
I plan to work on polishing up some flying stuff, and I also plan on having more feedback on the targeting system so the player knows they have fired, this includes visual FX, so this ties in with the dragon VFX task too, and if I have time after all  of that, I would move onto Level Design and animation implementation.
Now I quickly realised that this was far too much work to do in a week, so I broke it down into simpler steps, and extended some due dates and moved some tasks into next week.
I wanted to break this down because looking at the first image of my tasks for this week was very daunting, and I thought I could get it done if I started on the Tuesday, but I didn’t realise how long my exhibition research would take me.
Current Position –
What did I do this week and why did I do it? (Screenshots/Videos/Photos)
Prototypes (Unity) – Wing trail/Dragon VFX

 I made a start to this, just making it so everything works as it should before making everything look pretty with art and properly planned VFX.
I referenced StarFox when planning out what VFX I want for my dragon, and I managed to make a list of them.
This list was just ideas which popped into my mind whilst watching a StarFox gameplay video.
 I began this all by doing a wing trail, since I assume that would
 be the easiest, although I plan to add more style to this later on, this is only just for functionality.
I didn’t have to do much for the wing trail, all I had to do was make a trail object on the end of the players wings, and I had to adjust where this trail was on the wings, and then edit some of the trail values.
Later on, I would change this by making the trail start thicker, but with a texture similar to a sword slash VFX, to emphasise how much the dragon is flapping his wings.
I then moved onto the barrel roll, this barrel roll is different from the wing trail because  this barrel roll has to be called before it is played, this is all in the player controller script.
To start the barrel roll VFX, I began by making a simple faded circle image in Photoshop, this is going to be changed later on when I’m designing and polishing this, but for now It’s a simple circle.
This PSD is inserted into my Unity’s  Texture folder, and then made into a Particles/Standard Unlit material which I can use in the particle system. The colours were also slightly changed since they’re HDR colours in the material.
I then made a particle system, which is a Particle System object placed as the child of the PlayerParent, since this is where I wanted it to emit from. I only changed a few values for this.
As for the other two, I feel like I’m going to work on them as I’m polishing the other VFX.
- What went well with this task?
I’m quite proud how I was able to make two working VFX in my game, even though they’re not polished, I really like how the wind trail looks since it gives a feeling of the dragon flying really fast, and it makes my game feel a lot more polished
- What didn’t go so well with this task?
I don’t like how I started with the barrel roll VFX and I feel like I should’ve done something different to emphasise that the player is dodging. I also don’t like how the wing tail is playing all the time, I still think that needs a lot of polish.

Polish (Unity) – Character Dodge

I began this by doing some research on tweening, before I heard that it was quick and easy to use tweening and it was especially good for things like simple rotation and UI animation without doing the animation part of it. From watching some Mix & Jam videos, I found out about DOTween, I downloaded it and put it into my project.
I began scripting how I want my character dodge to work, this is what the script looks like and it was inside my player controller.


This website here really helped me with picking an easing function. It details all of the different easing functions which you can use and I used this with my tweening which ended up smoothing the rotation of the player so it  isn’t stiff and unrealistic.
This function was then called on the update function to check if the player has pressed any of the trigger buttons. The two lines at the bottom are doing the exact same thing, but a lot simpler.
This ended up working, but not how I wanted it, this is what it ended up looking like
As you can see from this GIF, the dragon spins fine-ish, the first 2 spins were right, just in  the wrong axis, but then after that, when I tried moving the character whilst spinning, I came by some issues shown in the GIF, it just looks messy and doesn’t work how it should do, but I didn’t know what to do from here on since I was new to DOTween, so I sent a message to the creator of it and got a very good response!
Contacting him made me realise why this was happening, and a solution to how to stop this from happening, so I began to do this.
I began by organising my game objects, so they sat neater in the hierarchy.

 On the cinemachine object, I changed it to follow the player parent, instead of the actual dragon model, this is so the object wouldn’t rotate when the player does a barrel roll dodge, since this wouldn’t be good.
 In my player controller script, I began by making 2 floats for the current dodge speed and the max dodge speed, the currentDodgeSpeed is what controls the players dodge speed so they don’t dodge forever to the side and the MaxDodgeSpeed is how much the player dodges to the side by

This is the function which moves the dragon to the side to dodge, and then returns the speed back to 0 so it doesn’t dodge forever, lerping this so it smoothes out the speed so it doesn’t look jagged.
I have also changed the QuickSpin function.
It’s now rotating the RotTransform, this is the empty object which is a child of the PlayerParent, this object is what the model would rotate around without it looking weird, and then the currentDodgeSpeed is set in the right direction.
To make this all work, HandleDodge and QuickSpin is called in the update function.

Result:

- What went well with this task?
I really like how the dodge turned out since I’ve always wanted a dodge/barrel roll in my game, I’m very happy that I’ve learnt how to use DOTween with my project and I was able to make each trigger of the controller move the character to the left and right as the dodge animation plays, I’ve always loved it when a player can dodge enemy fire by spinning themselves.
- What didn’t go so well with this task?
I don’t think anything went badly with this task!

Animation (Unity) – Implementation

 To begin this, I know I wanted to add a dodge animation when the player dodges, so I had to go into Blender and make a dodge animation. I already had one, but this one rotated the player, so I had to get rid of the rotation and just have it so the dragon tucks in his wings.
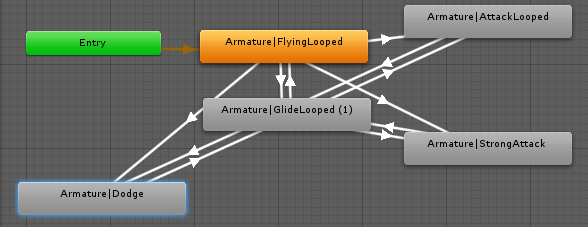 Once this was done, I added this into Unity, and into my Animator, adding transitions to link it up to the flying and gliding, since the player can go from flying or gliding into dodging.
I changed the attack parameters so they’re triggers instead of bools, this means if the attack is triggered, it would only animate once and then go back to flying, instead of  having to make a bool true and then make a false after a certain amount of time.
On the flying looped, the parameter box was ticked next to the multiplier, so then the parameter values could be changed with a float, this multiplier would deal with how fast the dragon is flapping it’s wings, it’s initial value being 1.
 Inside my player controller, I made a public float called flap speed, which is the same as the parameter in the animator, along with this the animator was also referenced, and then I made a float called the GlideThreshold. The glide threshold handles when the player would switch between gliding and flying, this works by checking if the glideThreshold is greater than the speed.
All of the animations are handled inside a function called ControlAnims, this function controls the animator and overrides the flapping when the player boosts, and then this function is called in the update function.
Result:

- What went well with this task?
I was able to get all animations (besides attacking) to work in my game, I really love how I did this, and how seamless it all looks instead of it always being the flying animation playing at the same time, it really makes my game feel more polished and complete.
- What didn’t go so well with this task?
I felt like I should’ve adjusted the GlideThreshold to be a little higher, but that is a quick fix since the value is a public variable which can be edited in the inspector.

Polishing (3D) – Enemy_01
I decided to come back to this task since I never completely finished the texture ideas, and I wanted to see if there was anything I wanted to change from the finished product.
I began this by taking the photo which I set up last week and painting each separate part a bright colour which was on multiply so I can tell each part apart, this is what it ended up looking like.

After I done that I began baking 2 ideas for what I wanted the texture of the fighter jet to look like, this is the two ideas.


In the end I decided that I was happy with the texture on my fighter jet anyway, so I didn’t end up making any changes
- What went well with this task?
I think I was able to come up with some really cool colour and design ideas for this ship, I especially like how there is an outline on the window, it makes the jet feel more futuristic in my opinion because of the sharp shapes.
- What didn’t go so well with this task?
I didn’t end up using these ideas at all, since I felt like the design I already had was alright.

What did I find difficult or easy?
I found that designing the enemy ships textures was actually quite challenging, since I wanted to make something which looked good, even though I was already happy with the design which I already had.
I found the animation implementation a little tricky, but I was able to do it, it was mostly tricky because of the Animator in Unity, and how I don’t completely understand it, but now I’ve used it a little more, I do understand it.
I found the VFX a little complicated to do since I do not completely understand the particle system yet, and I still feel like I have lots to learn about it, I used some Unity videos to help me out with the particle system.
I found the dodging quite hard to do since I kept messing up at the beginning and almost gave up because of that before contacting people for help on how to go forward, I got some amazing suggestions and was able to figure it all out and why exactly it wasn’t working so I wasn’t able to make that mistake again.
What tasks didn’t I complete from this week?
I didn’t end up completing the level design which I had planned for this week since I only had 1 and a half days to work on this weeks tasks, but that isn’t including small things which I’ve worked on after work and during the weekend.
Planning for next week –
How do I plan to catch up? Do I need to change anything about my work or planning?
I plan to get ahead of my work since I have booked Monday and Friday off of work, so I want to work throughout the entire week, I plan on working on level design, polishing on visual fx, starting on Enemy AI, and getting Dolly Tracking to move my character along a path for the boss battle levels and more player feedback.
Week Number & Date: Week 7 (23/03/20)
List of Tasks planned for this week:
This week is full of planning work, from planning how I want my levels to work and where I want my enemies, how I want the feedback for the player to work to how I want the visual FX to look.
After all that planning is done, I would work on the Dolly Tracking for the boss level and make it work properly, I would then work on enemy AI, so the enemies also shoot back at you and you can lose health.
This is a lot to work on for this week, but I have through from Monday to Sunday to work on this so I believe I can do it!
Current Position –
What did I do this week and why did I do it? (Screenshots/Videos/Photos)
Review Project Timetable
- How many weeks left before you have to hand in your final project?
I’ve only got 4/5 weeks left of the production of my final project, and another week for my presentation, which is scary now I think about it, this entire project has gone by so quickly.
- How many hours do you need to spend on your project each day?
I feel like, now I’ve got time off work and I’m working from home, I can work on my project until I get burnt out each day, I really want this distinction so I’m going to work on it every day which I am able to
- Will you complete your project in time?
I would complete it if I cut back on some content which I have initially planned, I don’t have time to do 9 levels and many different enemy bosses, so I want to concentrate on just making my game feel like a game now. doing this review has made me realise how little time I have left to do this work.
Research (Unity) – Level Design

Plan – Level 1
I started this by sketching some ideas and plans from the top of my head, and how the levels could work, I done this without research though, and this is what I came up with


In my opinion, I thought this felt very disorganised, and some of the notes really make this much more difficult than it really needs to be, so I began looking around and I managed to find a really useful video which talks about level design in a really different way then I originally thought, this is the video
The video details how this man, instead of using names like ‘Level 1, level 2..’ he uses themes to represent and design his levels, now I didn’t think of this first, I was just going to have level 1 and level 2 and level 3, but then, I thought that if I’m going to cut down to 3 levels, I could just have the first level be easy, and represent the military and order, being very ordered when they fight the dragon, but then level 2 could represent chaos, having not just fighter jets, but lots of different enemies, which don’t spawn in orderly and are way more chaotic than the first level.
And then the final level, the boss level would be order & chaos.
I think it’s a really good idea to represent levels through themes so you can give them much more personality other than ‘level 1, level 2’
I began writing down my ideas for the first level in note form so I knew what I wanted.

Once I done that, I began drawing out a plan again, with the word ‘order’ in the back of my head.

This is a plan for the first level, on the right hand side of the page you can see 2 different ways the level could progress, it can either go up in numbers or go down in numbers.
When looking at this, I think it would make much more of an impact if the numbers were dwindling, this emphasises the fact that the military are loosing troops to send out, so near the end they send the better troops but in smaller numbers, this makes it so the  difficulty increases as you progress the level but not dramatically.
I was happy with this design choice, so I feel like that’s level 1’s level design complete.
Whilst producing this design, I decided to change the Level Design board, so I made a checklist for both design and the finished production of these levels, I have also extended the deadline for this since I knew this whole level production would take longer.
And also taking into consideration that I would probably want to prioritise the level design of my  game over everything else, I decided to rearrange my Trello board as well so I can have full focus on the more important things first.
I feel like if I fully focused on my level design and production this week I can get it all done and then move onto polish.
I know I can’t probably get the boss level fully done in time yet, but I’m planning to do as much as I can in Level production so I have a working game and can move onto polish.
With my level 1 plan now complete, I decided to now move straight on developing it and getting it all working like the first proper level.
I feel like if I get this done today, I would be very happy.
After all, the plan for the first level is quite simple and quite ordered so I don’t expect it to take too long
Production – Level 1
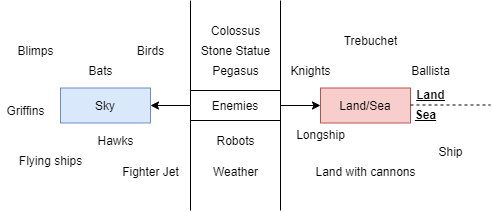
To start off, the appearance of the level. Order means normal, so we need to make things look as orderly as possible, this means a normal atmosphere and terrain.
Since it would be the military fighting a dragon, I wanted to test out what this game would look like if the dragon was flying over the top of a city (which the player doesn’t have access to since it would be out of bounds) – So for testing purposes I found this big, low poly city which I can use.

In the end, I didn’t really like how it looked, since I was thinking of putting boundaries on it anyway, you couldn’t see the city from the ground anyway, so I decided to get rid of it and just have my player roam around the sky.
But I knew I wanted some sort of land and some sort of boundaries, so I decided to search up how to get large terrains in Unity without using up too much memory, and I found this very useful blog post.
Using this blog post, I found the tool L3DT, so I experimented with using that to see if I like it. Using this I generated a world map.

 With this world map, I had to export the different layers, and make sure I exported them as RAW files, since that’s the file type which Unity would take, I started by exporting the height map.
Once I done that I headed back into Unity and created a terrain, by right clicking in the hierarchy and going  to 3D > Terrain.
Once on the terrain tool, I clicked on the cog, to get further settings.
 And I scrolled down until I came across the section where I can import my Heightmap.
This is what it looked like when I imported it into Unity. I didn’t like the results.

 So I re-imported it and changed some of the settings, this is the original settings which was used with the first import.
The most important one here is the Y axis in the terrain size, since that would be how tall the terrain is. I wanted the terrain to be a little bigger though so there is more land for the dragon to fly around. These are the settings which I ended up with.
This allows the world to be really large, and give the dragon plenty of room to fly around.
Once that was done I exported the terrain’s texture map and Normal map as a PNG and inserted that into my project, and then onto the terrain.

I’m quite happy with the results, since I know it’s not the best quality terrain, but I needed some sort of terrain below the player, the player won’t be interacting with the terrain since they would be within boundaries, and there will also be a lot of fog.
The terrain was done so I got back to the spawning waves mechanic.
I started by making an Enemy Wave Manager script, writing comments in the script of what I would need and how I can achieve it, and this is what I came up with. This Enemy Wave Manager would be an empty object in the scene.

I then made an Enemy Wave script, which would be on the prefab parent of each wave.

I began setting up the empty game objects and the prefabs, the first level is just going to have enemy fighter jets, so I made 3 prefabs for the fighter jets with different difficulty for them, you could tell how difficult they were from the colour of the trails I set on them.

I then began planning out where I want my spawners to be, these spawners would be where the enemies spawn from in the map, I want them all to be really spread out, so the player gets to know how large the environment is.
I made cubes which I called spawners just so I can get a sense of how spread out they are, this was my first attempt at this, spreading them out evenly by 200 each time. This wasn’t big enough, as seen from this footage taken.
So then, I liked the distance between the first spawn point and the last spawnpoint, so I took that and spread that across the map, and added a little more, so now there was 1000 on the z axis between every spawn point. This was the result.

It didn’t feel far away enough. But I really liked the distance between the two on the side of the spawn points in the middle, they were 2000 away on the X axis, so I made all spawn points 2000 away. This was too far demonstrating from this video.
On this video there is an average of 3.35 minutes between each spawn point, I worked this by taking the time of each wave point, adding them (10.04) and then dividing it by 3. (Wave 1 to 2 = 3:24, Wave 2 to 3 = 3:20, Wave 3 to 4 = 3:60)
I felt that 3:30 was too long to travel between spawn points, if they were 1000 apart, it would only take the player 1:30/1:40 (roughly) to travel between points, and I feel like that’s a more suitable time since I’m only recording the normal flight speed and not using any boosts.
So from my results, I decided to make the spawn points only 1000 apart from each other in any direction, now I was done making my 10 spawn points, I moved them downward slightly in the Y axis so the enemies would have to fly up to meet the dragon.
Scripts for wave functionality
Getting back to the scripts and the wave spawning functionality, I done this to each of the scripts to get everything working.
Wave Manager

Enemy Manager

Enemy Script
I didn’t screenshot the whole script for this one, since it’s not a new script and I’ve only added 2 lines to this.


Wave Script

 This was all the script done for the wave spawning for the levels. This is what I had to do in the inspector.
I started by making an empty Wave Manager game object which I put the Wave Manager script onto, this is what the Wave Manager script looks like in the Inspector once everything is put in.
The list of information is what was stored in the  WaveData class, and it allows me to make each wave of the game unique.
This is what each wave should look like. The wave parent should have the Wave script on it with the children all being the enemies which need to be destroyed. When the game plays, each enemy gets removed from the wave parent and added as a child of the enemy manager.
Production – Level 1 (Order)
Now I was ready to actually start the production of my first level.
I was going to stick with the idea I had on my plan, by starting with a large number of easy enemy for a few waves, these numbers dwindling down a little, and then moving onto waves of medium enemies but in smaller numbers, and then the last few waves would be the hard enemies, but only small in numbers.
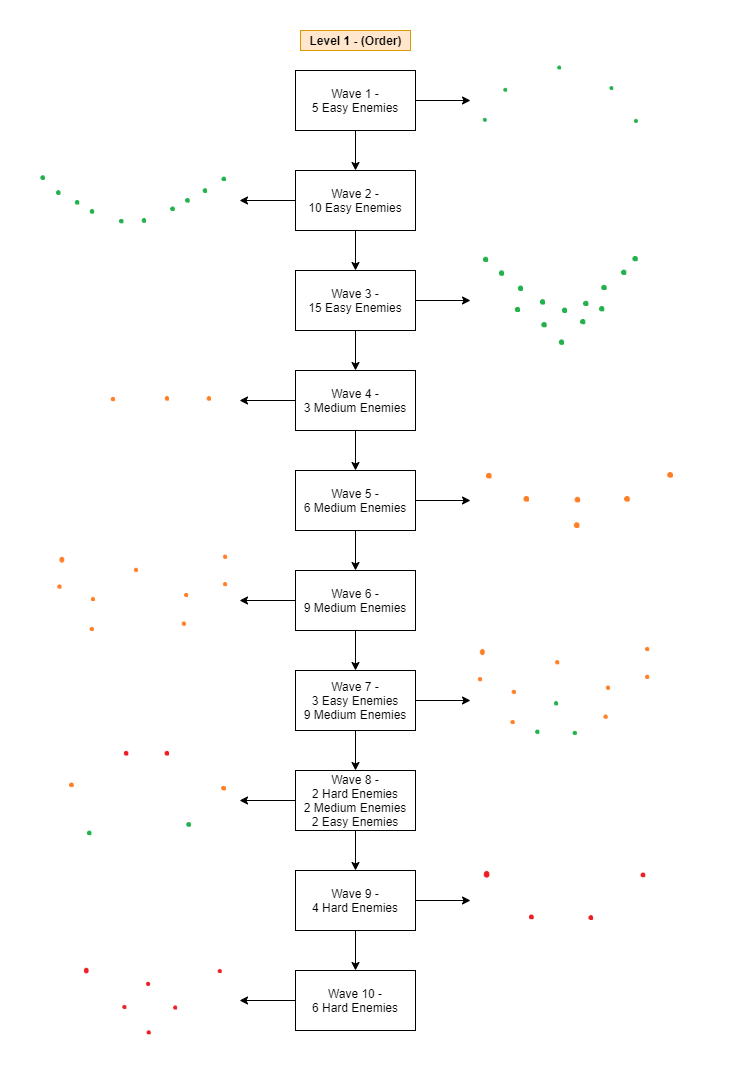
This is the idea I had for each wave so I began producing these wave prefabs myself, I stuck with the same plan, and mostly the same pattern which I have drawn down.
Wave 1 –

Wave 2 –

Wave 3 –

Wave 4 –

Wave 5 –

Wave 6 –

Wave 7 –

Wave 8 –

Wave 9 –

Wave 10 –

 Once I completed all of these, I placed them all in the wave manager with their respective spawners and I was done!
I played out this level to see how I like it, and it all worked out fine, and I was happy with level 1 being finished after I added all of this, of course when I come to polishing the levels, the wait time would be longer to give me time to add dialogue between waves which I think would add a lot more character to each level.
- What went well with this task?
I feel like now that I have all the mechanics in place for each level, I am now able to produce the rest of the levels really quickly, all I would need to do for the other levels is make different waves and add them all into a separate scene.
- What didn’t go so well with this task?
I was expecting to get multiple levels done this week, I felt that I worked too slowly on these mechanics and I should’ve been able to produce more, but hopefully next week I can get the rest of the levels done.

Polish (Unity) – 180 Spin

I added this task to my weekly Trello board since I done this really quickly between working on other things, it was really simple to do and only took a few minutes, it was really worth it since it’s useful if the player can turn behind themselves quickly.
The code for this was exactly the same as my dodge mechanic besides the fact that this spin wouldn’t need to move the character to the side or anything, this spin also would need different values in the vector3 which rotates it, this is what I wrote, and the commented out code is what I wrote initially.

The reason this didn’t work the first time was because I was rotating the RotTransform, which isn’t the main dragon, so when I rotated it, everything would be inverted and in the wrong direction, but now I’ve changed it to the actual dragon’s transform, it all works how it should do.
This is then called in the Update function when both R1 & L1 are pressed simultaneously, I thought this would be the best input for it since it only makes sense when R1 is to dodge right and L1 is to dodge left.

Result:

- What went well with this task?
I was able to complete this task quickly and with little issues, it really is a game changer to have a spin like this in the game as it can make it so it’s much easier to attack enemies from behind you, similar to barrel rolls in Starfox, which allow you to get behind the enemy and get the upperhand.
- What didn’t go so well with this task?
There’s nothing here which really went wrong really.

Polish (Unity) – Arrows to enemy direction

I also added this to my weekly Trello tasks since I was able to complete this during my level production.
I wanted to add this since the world was really big, so it would be hard to find the enemies if they’re very far away, so I decided to add this to the game.
I was mainly inspired by Ace Combat since they have this feature in their games.
(6:50 timestamp)
This is the script which handles this, with comments which describe what each section does.


 This script is placed on an empty object which is inside the canvas for that scene, this is what it looks like in the inspector.
How this works, is there is an arrow for each enemy in the game, and if that enemy gets defeated then the arrow which was following it gets deactivated and can be reactivated if another enemy enters.
Result:

- What went well with this task?
I’m happy with how the arrows turned out, they look really nice and they can indicate 2 important things in a flying game, like what direction the enemy is in and how many enemies you have left to defeat. These thing are really important in a flying game because if you get lost in a really vast area, you’re soon going to get really bored, and stop playing, and knowing how many enemies you have left is really important for motivation to carry on playing as well!
- What didn’t go so well with this task?
Nothing really! I like how the arrows are laid out, one thing I’m not 100% with is how the arrows point upwards, it gets confusing if you’re looking at 2D UI which is pointing toward a direction in a 3D game.

Polish (Unity) – Aim Update
This wasn’t originally on my weeks planner, but I added it in as a quick task which I wanted to do since I wasn’t happy with it as it was.

I started this by trying out lots of different code which didn’t work, but this was because I was trying lots of different things which I would expect to work on a 3D game object to make this crosshair move, and that was my mistake.
As you can see in the youtube video, I was using Transform.Position, which is why I was having the faults I was having in this video
 This was part of the script I was using as seen in the Youtube video.
Starting from the top line, I was using a Vector 3, which isn’t needed when you’re transforming the position of a flat 2D canvas object like a crosshair, I noticed this immediately when I was going through my code again and changed it to this line of code
![]()
On the next line, everything after transform.position is fine, this whole thing wasn’t working because I was using transform.position, and I noticed that I had something wrong because I was trying to move the position of a rect transform, so I done some quick research on RectTransforms, this lead me to the Unity Docs, and after reading this I knew exactly what I had to do.

I began by making a reference to the RectTransform, since Monobehaviours don’t ![]() automatically have a reference to the RectTransform.
automatically have a reference to the RectTransform.
After I had done this I had access to all the properties, so I had to replace all my Transform.Position’s with rectTransform.anchouredPosition, and it was that easy!

The reason I had the clamps on is because I didn’t want the player to lose the crosshair, since it’s important for aiming!
This is the result
It’s quite hard to see the crosshair on the video, but you can see it’s values clamping on the right hand side.
After playing around with this I decided it would be best if these only clamp to the corners of the screen instead of going off screen.
I began this by doing some research into Unity forums to see how other people dealt with this, this is a forum which I read through: https://forum.unity.com/threads/trying-to-clamp-player-to-stay-on-screen.634264/

This post on the forum made me learn that there was a screen.height/width API which I’ve never heard of before, so I began doing research into that. I found this on the Unity Docs, it didn’t help much so I just went straight in and tried it.

To try it, I first debug.logged the screen width to the console, to check out what it was, my value was around 800, and this was the width of the screen, so I decided that it was best that I took this value and divided it by 2, like i’m splitting the screen in half, and this worked the first time!

I wasn’t completely happy with the result so I tried some other things. I started off by writing a CalculateBounds function, and this is what was written inside of it.

 Now since on the canvas, the canvas is always matching the width, so the width is going to be the reference point, so we can set that value to 800.
Here is an example of how this all works when put to the test, it’s not perfect but it does what I need it to do.

The screenbounds is then made into a new vector2 which hold these values, and they’re also divided so the crosshair doesn’t go right to the edge of the screen, you can see this in this quick clip of the video which I’ve taken.
To make this functional, of course I had to feed this into the Update function.

The calculate bounds is called before any of the clamping, so it all could be done as the screen is being adjusted.
I also made it so the vertical movement is inverted, since a lot of people like inverted controls, but if I don’t like this in the long run it is something which is easy to change.
Another thing I had to do is make 2 functions, one which gets the crosshairs position, and one which gets that same position but with a deadzone, so we can make it so the player rotates when the crosshair is within that deadzone.
These are the functions, they’re both the same besides the last line on both of them, and the fact that the rotate amount divides by screen bounds whereas the crosshair position adds the screenbounds

 The rotate amount is then called in the player controller, this is so when the player rotates they only rotate whenever they’re within the rotation deadzone, and they rotate by a parameter called flyingSensitivity, which can be adjusted until I’m happy with it.
The crosshairPosition is referenced in the Targeting system.
Beforehand, this crosshair function only checked if the player was targeting in the middle of the screen, but now it is checking if the crosshair is going over it since now the crosshair moves, but it has the same values as before since we are subtracting the values to get to the values which we did have before, but with the crosshair being over the top of it so it has the same deadzone, and as I was doing this, I made it so the distance is measured between the player and the enemy, checking if the enemy is close enough to the enemy to target it, since beforehand you could target the enemy from far away.


The distance is calculated using a handy syntax called Vector3.Distance, which will, as you can probably tell, calculate that value between the two inputs, it is then compared with maxDistance which is a simple float.
- What went well with this task?
I felt like I was able to learn some math whilst doing this, I haven’t done much maths for a while, and it’s really refreshing and fun to be able to do some and apply it to my work, I’m happy that this all went well and it all works now, it feels like a much more smoother game to play now that the crosshair isn’t locked to the centre of the screen
- What didn’t go so well with this task?
I did get stuck at the beginning of trying this out, but once I put pen to paper and done the calculations myself, it all clicked and was a lot easier to understand

Prototypes (Unity) – Enemy AI

I knew I had to get this done as soon as possible because I was drawing closer and closer to the final projects submission, and I haven’t even got gameplay into my game, so I worked on this.
I started off by planning out how I want the script to work, how I want the enemies to operate.

I then began writing out this in the EnemyScript. This would be on the enemyScript since each enemy has this script on them, at first I began writing this into the enemyManager and I quickly figured out my mistake.
This is the entire script with comments to annotate what each line is supposed to do.


 On this script, I want to detail about how I found out about the Vector3.Dot operator.
This is a tweet which made me understand it a lot more .
https://twitter.com/freyaholmer/status/1200807790580768768?lang=en
 Especially the GIF which really helps in understanding it. From the GIF, you can see why my Vector3.Dot is checking if the value is greater than 0.9, since, from what I circled on this GIF, the front would be greater than 0.9, the sides of it would be at value 0, and the back of it would be -1.
I also used Unity Documentation to help me out with this.
And I thought doing this would be a lot quicker than using a collider to check if the player is in front of the enemy.

The bullets which the enemy fires are the same as the fireballs which the player fires, but in this case, the script is switched around so the enemy fires toward the player instead of vice versa with the players fireball.

And this is the result! Still not perfect and still needs work, but I got it functioning.

- What went well with this task?
I feel good that I now have the basics of enemy AI in my game, since I feel like I’m falling behind in the regard that I don’t have much gameplay, but now I have this done I can work on the level design and start to get some game in my game!
- What didn’t go so well with this task?
I feel like the enemy fire still needs a lot of improvement, it doesn’t seem to feel rapid enough and it doesn’t even feel like a threat to the player at this point, I need to make it more brutal

What did I find difficult or easy?
I found getting the 180 spin to work in my game the easiest this week because it was just a copy and paste of existing code which I have already written, which was slightly adjusted.
I found the Enemy AI slightly hard, since I didn’t know how to approach this until I broke it down into detailed steps, but once I broke it down into simpler steps, I was able to get it done.
I found the Aim Update annoying to do, because I thought I had it working, but I then found out a better solution, so I wasted my time with the first method and done it again for the second method, but in the end, it is all about learning from your mistakes!
I found making the mechanics for the spawning system quite tedious, but I was able to get it working in the end with a lot of note taking, I took this really slow, but I managed to get it done how I wanted it!
I found the arrows to the enemy direction the hardest to do out of everything this week, but even though it was the hardest, I was very proud of how it turned out!
What tasks didn’t I complete from this week?
 I had to change this weeks schedule to allow more time for Level Design, so I moved some of this weeks tasks over to the next week, but I still haven’t completed my Level Design/Production this week, so it’s also a task for next week!
None the less, I’m still proud of what I achieved this week anyway!
Planning for next week –
How do I plan to catch up? Do I need to change anything about my work or planning?
I plan to catch up by working on my Level Design/Production much more so I can actually get the game done and move straight onto polishing it.
Week Number & Date: Week 8 (30/03/20)
List of Tasks planned for this week:
This week I plan on finishing all of the levels for the game, since I only plan on having 3 levels in the game, this isn’t that big of a task, if I manage to get all the level planning and production done this week, this allows me to spend more time polishing my game since if I get them done, that’s the main game done.
I also plan on making a mini-map for my game since I don’t feel like the arrows work that well, they show what direction you need to go, but not that well, I feel if I have a mini-map the game would be a lot easier for the player to play since they would clearly be able to tell what direction the enemies are in.
Along with this, I plan to make a health system for the player and enemies, and link this to the FMOD parameters so the music is adjusted when the players health is low, along with the music getting more intense as the player advances in waves.
I plan to make the dolly tracking working this week but I wouldn’t worry too much if I don’t get this done in time since the dolly tracking is for the final level boss battle.
I also plan on making feedback to the targeting system so the player knows when they can fire and they have more feedback to that.
And finally, I plan to polish the cutscenes in my game since the ones I’ve made are only for testing purposes.
Current Position –
What did I do this week and why did I do it? (Screenshots/Videos/Photos)
Polish (Unity) – Enemy Fire
This wasn’t initally on this weeks Trello board, so I decided to add it, since I feel it’s important to improve the enemy fire.

I started this off by really simply adding a delay to the enemy fire, these are the only lines I had to add in for this to work.

I then started working on making it so the enemy just fires forward instead of the bullet following the dragon until it hits it.

This didn’t work at first, so I tried a few different things to try and see what would work.![]() I tried moving the rigid body by transform.forward, and this didn’t work, it just kept moving the bullet in circles.
I tried moving the rigid body by transform.forward, and this didn’t work, it just kept moving the bullet in circles.
I thought about the enemy fire for a little bit, the player moves very fast so if the enemy fire just moves forward, the player can really easily dodge it, so I personally think a better way I could make this work is make it so the bullet follows the player for a set amount of time and then just carries on forward, I could also do what I do with the enemies with the enemy fire, so I got rid of the previous line and wrote this instead.
Enemy Fire
 I began by adding these variables into the existing script, obviously from looking at this they deal with the timer properties for the enemy fire.

Then, on the MoveTowardsPlayer function, on line 32, the timer for the timeToDestroy float is being taken away, this timer is a timer on each of the enemies bullets, and if the enemies don’t hit you when that timer is up, the bullet gets destroyed (which is lines 41-44 on the script above) – This is useful because we don’t want hundreds of bullets flying around and being midair when they’re not going to hit anything, it’s just going to make the game slow.
On line 47, we are doing an if statement which checks if the time to follow is more than 0, I’ve set a timer which would be for how long the enemy bullet perfectly follows the enemy until it fires straight.
In the if statement, line 49 I made a targetRotation variable which is a Quaternion, this is what is used to represent rotations, and then Quaternion.LookRotation takes a Vector3 in, so I passed in vectorToTarget, which is the distance between the player and the enemy.

On the next line down, line 50, I took the line which I used in the Enemy Script to make the enemy follow the player and rotate around them.

And then line 51 deals with taking away the time to follow so when it is at 0, the enemy fires straight ahead and stops following the player.
- What went well with this task?
I feel I was able to quickly and easily get this working, and it makes my game feel so much better and more challenging to play now I can properly implement my health parameters.
- What didn’t go so well with this task?
Nothing really went bad with this task overall!

Plan & Production (2D/Unity) – Level Design

 I wanted to at least finish the planning for Level 2 & 3 and the production for level 2 this week, since I knew with these new levels I would want to make some new 3D models for the other enemies, so I began this by looking through the small enemy chart I made a while back to give me an idea what I could put into my other 2 levels.
Since all of my levels would be in the sky, with no contact with the land, I will focus on the enemies which I have in the sky section and the middle section.
For level 2, I wanted to have a mixture of enemies, I know I would have the hard fighter jets, but I also wanted to have a blimp, and a flying ship, along with maybe a few bats, this is because the 2nd level is meant to represent chaos and the first level was made with the  one fighter jet all in military order, the second level would be the military, and a bunch of random pirates just throwing themselves at you. I began to make a plan for this, and to the left is the key code for the colours which I use in the photos of the level plan.
Plan – Level 2
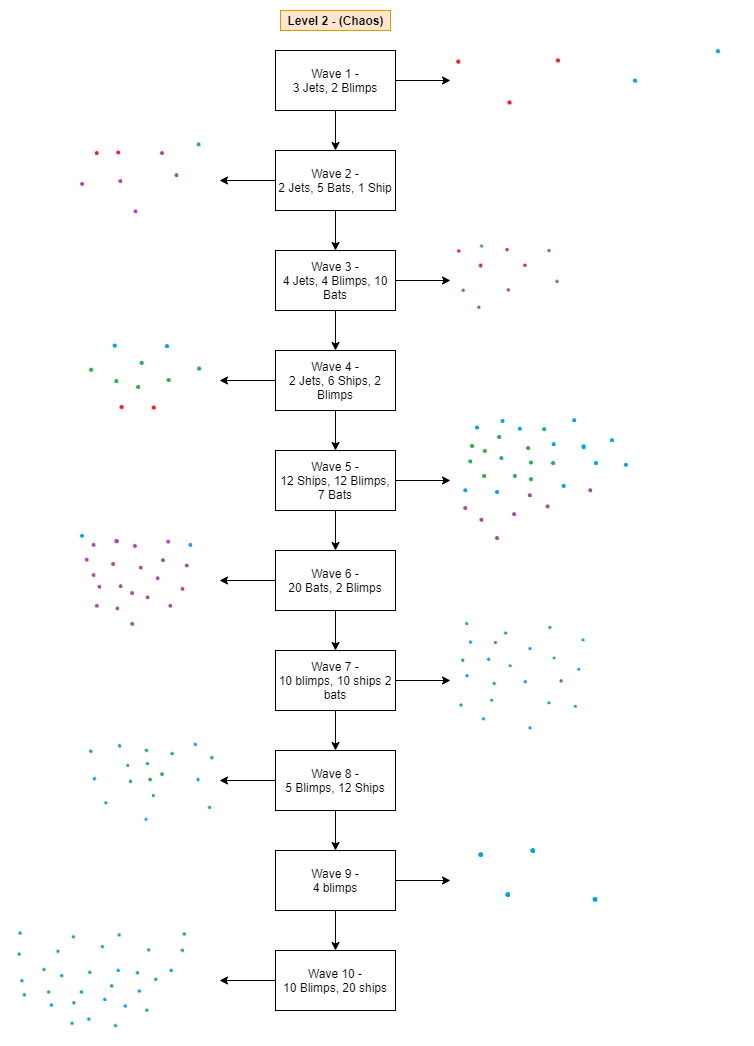
Now this level is titled Chaos, and you could tell why, the waves are all over the place as are the enemies, and it’s certainly not orderly like in the first level. I done this so I could relate my game more to the theme since I don’t think my game would look like Order & Chaos by itself.
Plan – Level 3
Along with this I planned out level 3, which I made the title of the level Order & Chaos, making it the hardest, and showing both themes throughout this level I also would have a boss battle in it.


Production – Level 2
 I started this by making prefabs for each enemy which I didn’t already have a model of, which was everything but the
  jets, these prefabs would all have the enemy script on, and I made a few notes on the stats of each enemy which I would set on the prefabs.
I thought about each enemy carefully and tried to balance them all out equally, so some of them are better than the others at certain aspects, for example, the jet is fast, but it’s disadvantage is that it only has 100 points of health, whereas the ship on the other hand is very slow, but it has 1000 health.
I’m pretty sure these values would change as I develop and test this game, but this is just what I am going to start at.
For the other jets (medium and easy) I’m not going to use them in Level 2 and 3, I want to just stick with the hard jet since I really like the speed on the hard-levelled jet and I feel it is a lot more challenging so it’s better for level 2 & 3.
I began by making the next levels scene by duplicating the current scene since it has everything I need in it.
Wave 1 –

Wave 2 –

Wave 3 –

Wave 4 –

Wave 5 –

Wave 6 –

Wave 7 –

Wave 8 –

Wave 9 –

Wave 10 –


Once I was done, I placed these into the wave manager for the 2nd level, so I had to make sure I was on the right scene.
I decided when adding in my waves to the wave manager, I wanted to make it so they spawn from different points in comparison to the first level, this level is more chaotic but I made it so the player hasn’t got to fly so far to get to the point with the enemies, I feel like this is better since I don’t plan to have much happening between waves in this level, whereas in the first level I wanted to have dialogue from the enemies.
This only leaves me with one level to produce, but I first needed to plan out the final boss since it would be part of this level.
- What went well with this task?
I was able to quickly plan out and produce my 2nd level and I was able to plan out my 3rd level, I’m glad I was able to do this quickly since that give me a lot more time to polish my game and make it look the best I can make it.
- What didn’t go so well with this task?
I feel like I should’ve done more organising when planning these levels, like what sort of things should happen between the waves and what spawner they should spawn from, instead I just picked the spawners I felt like at the time, so I don’t think I done this task as well as I could’ve

Polish (Unity) – Minimap

I didn’t know where to start with this mini-map, so for planning purposes I decided to make a UML diagram to help me out with my planning, whilst I was making the UML diagram I began writing the code, so here is all the code and how it works.
Radar Reference script
This script is easy, and very self-explanatory, its explained in the comment on the code but this is needed for the referencing of the enemies relative to the player, it’s best to have this as a separate script instead of cramming it in with the Player Controller so we can set this script in the UI folder, and we know this is to do with the mini-map.


For this script, I had to make an empty gameObject and attach the script to it, this is what it looks like in the inspector once all references are linked up.

Enemy Icon Script
I knew I wanted something in this mini-map which would represent the enemies height relative to the player so they know whether the player is above or below the enemy, since it would be very useful information for the player to know, especially if we are using this mini map to replace the arrows, this is a tiny bit similar to the Ace Combat Gameboy’s game, where on the actual gameplay screen, the enemies on the ground are represented by a different icon than the planes in the air, and I also didn’t like how the enemies would automatically move themselves to be the same height as the player, so this is the UML plan which was written out alongside the script:

This is how I began writing out my script, leaving comments for what I would have to do for each part and then filling it all in as I go.

SetPosition Function

Starting from line 31, the function is a public void because it needs to be accessed in the minimap radar script (EnemyRadar) – It needs to be accessed because each separate enemy in the list gets their position set and then it’s called in the EnemyRadar’s update function, if this wasn’t ever called or referenced, then the enemy’s icon would never move. It takes a Vector2 position and a float maxDistance in the function because when calling this function in another script, it would set the position in that other function for each enemyIcon.
 On line 34, we have an If statement which checks the position’s (the Vector2 which is inside the function) – magnitude is greater than the maxDistance. We can get the magnitude of the position because it’s a Vector2, we need this to figure out this because if the magnitude is bigger than the maxDistance (The radius of the circle on the minimap) – Then, line 36, the position is normalized, what that means is the magnitude is set to 1 instead of whatever it should be.
Then this is multiplied by maxDistance (which would be whatever you set it to), here is a quick picture I drew of what was happening.
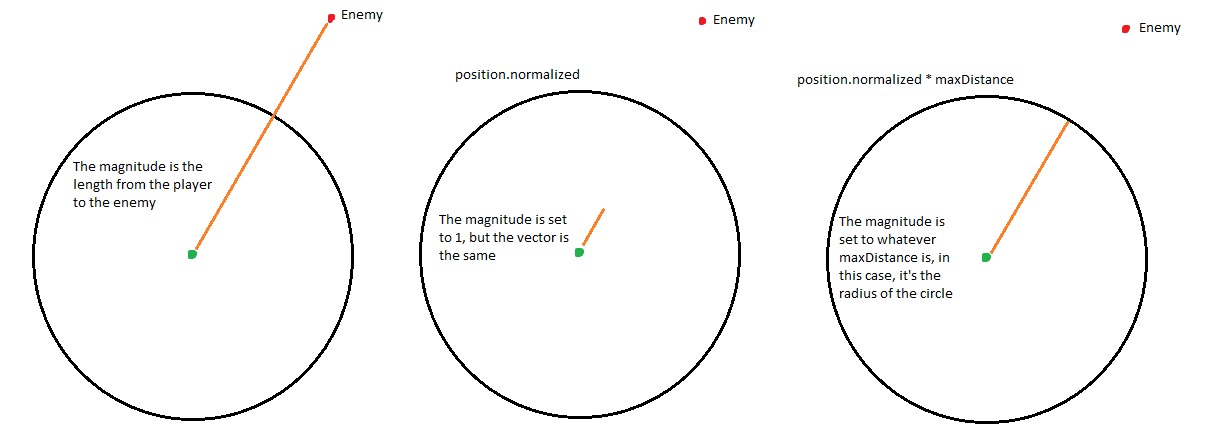
on line 39, all we are doing is setting the position of the enemyIcon, we do this on the anchoredPosition because the transform which we are referencing is a canvas image component, so we can’t just change the position because then it wouldn’t work.
SetIcon function

Starting from line 42, the function takes 2 Vector3 arguments, this is the playerPos and the enemyPos, this is because, when we call this function for each enemy in the EnemyRadar script, we need to take the input of the Vector3 of where the player is, and then the Vector3 of where that particular current enemy is, since all enemies would be in different positions, so we need to get that specific enemy in the list.
Moving onto line 45, this line deals with the difference between the player and the enemy on the Y axis, it does this by making a float variable called heightDiff, which we can reference, and this heightDiff would be the particular enemy’s y axis, taken away from the player’s y axis, this would give us another float of how far above or below the enemy is from the player.
Moving onto lines 48 & 49, we have a bool which checks if the heightDiff is greater than or less than the heightThreshold, the heighDiff is a float, which obviously is the difference of height between the player and the enemy, it could be a positive or a negative number.
This value is compared against the heightThreshold which is a float value which I set in the inspector.
From lines 52 to 66, all we are doing is firstly, checking the condition of the enemy, and  whatever condition it is, the image of the enemyIcon is changed to the appropriate image and the colour is also changed.
And then that was the script done.
The enemy icon wouldn’t be inserted into the scene, it would be a prefab which we put the script onto, since this enemyIcon script would be what gets instantiated onto the mini-map to represent the enemy, this is like each enemy, which are enemy prefabs which have the enemy script on each one.
The image on the right is what this enemyIcon prefab looks like in the inspector, this enemyIcon hasn’t got any polished sprites on it yet, this is just to test the functionality.
Enemy Radar Script

This script, I also wrote as I was making the UML diagram, here is the script, with comments for each section, I just had to now write the script for the parts which I have commented out, so for each function, I’m going to go through it one by one.

SetIconPosition function

Starting at line 31, we reference our enemyList from our EnemyManager, our EnemyManager is static, so it’s easy to get the allEnemies list from it by calling the instance.
Then on line 34, we are getting the playerPosition by getting the Vector3 of the players position which is in the radarReference.
The for loop on line 37 runs through each enemy on the enemy list, and for each one, we do the same few lines which are inside the loop, which are from lines 41 to 47.
On line 41, we are getting the enemies position, but since the enemies are in a list, we are getting each individual enemies position. On line 42, we are getting that enemyPosition that we just got and transforms the position from world space to local space by using InverseTransformPoint, which does just that.

But the differenceVector is a Vector3, which isn’t helpful because we only need a Vector2 because the UI is 2D, so to do that, we simply do line 43, which is getting that differenceVectors x and z axis, since they’re the only ones we need to use.
Moving onto line 46, all which is happening here is for that current icon in the list, their position is being set, which is referencing the SetPosition function in the EnemyIcon script taking the Vector2 difference2D, and multiplying that by radarScale, which is a float value which is manually set, and then it is checking if the enemies magnitude is within the radarClampDistance, and if it’s above it, it’s clamped to the edges of the mini-maps radar.
On line 47, the Icon appearance is set by comparing the players position with the enemies position, all of this function is inside the Enemy Icon script, and will simply compare the player and enemy positions to determine what icon to use on the minimap.
SetPlayerRotation function

Starting at line 56, we are simply setting the players angle on the mini map, Vector3.SignedAngle is used so the smaller of the two possible angles between the two vectors is returned, this syntax is laid out like so:
SignedAngle(Vector3 from, Vector3 to, Vector3 axis);

From this, you can see we are getting the vector from PlayerObj.forward, and then to the radarReference.forward and then the axis is Vector3.Up, so it would always face upwards, and the mini – map would turn so the player is always upward.
On line 58, we set the rotation of the player icon to the angle which we set above, setting the rotation by using Quaternion.Euler which makes it a smooth transition.
CreateNewIcons function

Starting on line 65, is a while loop, so we check whilst the count of the icons in the icon list is less than how many enemies we have in the scene.
And then if the while loop is running, we instantiate an icon and add it to the icon list, very simple.
ManageIcon function

On line 76, we are taking the enemyCount integer from the count of allEnemies which is on the enemyManager, which, like I’ve said above, is a static, so we can reference it anywhere.
On line 78, we are running a for loop, which checks through each icon and then line 80 checks if the count of the list of icons on the minimap is less than our enemy count, and if it is, should be active is set to true for each enemy which isn’t added yet.
And then line 81 sets however many icons need to be active.
This is what the whole EnemyRadar script looks like.


And this is what it looks like in the inspector.

And this is the result of the minimap in the game.
- What went well with this task?
I am happy I was able to get a minimap in my game which works and looks really cool, I’m very proud of the result I was able to get on this!
Whilst making this, I learnt a lot about vectors and magnitude, which I feel is really important to know when you’re doing programming
- What didn’t go so well with this task?
I felt like my minimap doesn’t look amazing, since I haven’t added any polished UI to it yet, I also feel the icons are too big for each enemy, but I feel polishing UI would be a whole different task

Polish (Unity) – Health System & Polish (Unity) – Parameters linked with game


 This was very easy to do, since I realised that I already had it for my player, it was the health parameter which was also linked to the music, so all I had to do was take away the amount of damage which the enemy had done from the health parameter.
This is the result.
Of course, the enemy fire hasn’t been dealt with yet, they would fire a lot less than this, but this is just to show it working.
 Next, the intensity parameter was pretty much just as easy to get working, after every wave, the intensity would go up, or down to what is set in each waves intensity value, I done this separate for each wave because I feel like it would allow for more customisation when it comes to planning the music out more with the levels.

This is the result:
 Now I’ve done everything relating to the player, I added a health system to the enemies, this is all I had to add into the script.
 Of course, on the fireball script, I had to also add this.

This would mean you would set the damage dealt by each fireball prefab, so you could make a fireball prefab which deals more damage to the enemy, and the enemy could have the same.
- What went well with this task?
I was able to very quickly and easily put all of this together without any trouble whatsoever, since health systems in games are very easy to do overall anyway.
- What didn’t go so well with this task?
There’s nothing that I think went bad with these two tasks.

Polish (Unity) – Targeting System Feedback

For this, I began by getting post processing to work with my game, this is because I want to do something similar to this video (at 5:30) where he uses post processing as a feedback effect, and I think that’s a really good idea, so I began to add post processing into my game, but I didn’t know how to do it with Cinemachine, I would know how to make this work if I wasn’t using cinemachine, so to help me I found this Youtube video made by Unity, and I followed along with it.
All I had to do to get this working is add a Post Processing Volume and a Post Processing  Layer on my Main Camera, this is also where all the Aura2 FX are held too.
I think it would be a good idea to use the post processing for when the player is boosting, and firing at the enemies, I also think it would be a good idea to use it when the player gets hit, and gradually make the screen change the more damaged the player gets, since I had lots of ideas for post processing, I decided that this would be a whole separate task on my Trello board which I should come back to later on.
 I decided to add a checklist to this task since I knew I would come back to this feedback next week so I wanted to firstly get everything sorted so it’s ready to be done next week.
I wanted to log everything so I know that all the feedback would work and when I come back to the feedback I wouldn’t have to be doing too much code besides setting the feedback on.
Starting with the Crosshair Feedback, I wanted to do this seperate since it has nothing to  do with post processing, my idea is that I wanted the crosshair to have 2 colours, one colour for the active crosshair, and another colour for the crosshair when you can’t fire from it, so the player knows.
Since the crosshair is bright red, I decided to change it to white, so the colours are easier to see and change, I done this by opening up my crosshair file from Unity and simply changing it’s colour.
 I went into the Targeting system and added these variables to the script, I used Color32 since it allows me to choose a colour between 0-255, whereas Color is just between 0-1, and I prefer using Color32 anyway.

The reason why I’m referencing the image in line 35 is because I need to reference what I want to change the colour of, and in this case, it’s the crosshair image in my canvas.
 At first, this is what I added into the targeting system script.
It didn’t end up working, and the reason for that is everytime the scan for targets function would run, it would make the crosshair always be the inactive colour, this is what it looked like when I played the game.

The way I fixed this is I changed where the lines of code would be, firstly, I placed the active crosshair right at the start of the ScanForTargets function, this is because it only makes sense, it wasn’t going back beforehand because it was inside a loop function which would never be re-called multiple times, so that’s why I moved it

I moved the Inactive crosshair down to the bottom of the targeting system script where all the cooldowns are.

This is the result of the changes:

This is great, but it’s not exactly what I wanted, it made me realise that I needed another colour, I needed one for when the player is holding down the targeting button, one for when nothing is being targeting but you’re able to target, and one for you not being able to target anything because of the cooldown.
I put all of the colours in the update function, just so it’s easier to see all in one, since it would all do the same thing, but I noticed that the targetingCrosshairColour wasn’t working anymore, even though it was beforehand.

I ended up fixing this by changing the order of one of the lines, the reason why they didn’t work in this order is because the way that the script executes means that every time this code is run, it would always be the active crosshair colour, since it need to process all the frames first so it would just override, so all I needed to do was change the order of the activeCrosshairColour line and it worked.

This is the result:
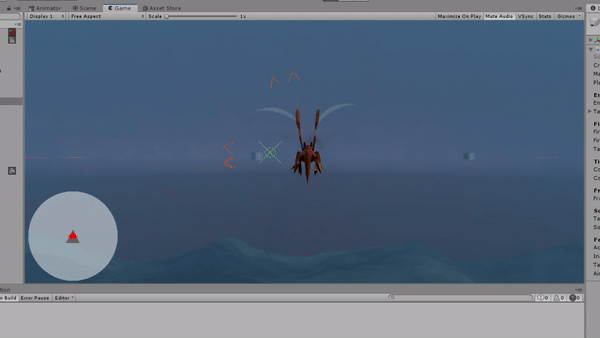

I then began writing some Debug.Logs and comments in my script for where I want to post processing to be called.
 The first one was the log for when the player gets hit by the enemy, this would be in the PlayerController script, specifically in the TakeDamage function, this one was very easy to find.

The next one is when the player fires a bullet, this one would be in the TargetingSystem script, so I began writing down on a piece of note paper, what script needs to reference the post processing.

The next reference was when the player is gliding fast, and I think it should check the speed and run if it is equal to that speed, which means when the player is gliding fast it should have one subtle effect but then boosting should be the same but emphasised, so you can tell the boosting is much faster, these were both in the PlayerController script.


And the final post processing reference would be the health, when the health is low, the post processing gradually takes over to distort the screen or change the saturation, or to make the screen more red and bloody, this one is easy, since we already have a reference to health in the PlayerController script.


That was all my feedback done and it’s ready for post processing to be added into it next week.
- What went well with this task?
I felt happy with how everything turned out, since everything was now ready to have stuff added into it and polished, this logging wasn’t hard at all since all the script was in there and ready.
- What didn’t go so well with this task?
I felt like it took too long to find the small mistake with the crosshair feedback, but I was happy that I did find out the problem in the end since I have learnt from that problem.

What did I find difficult or easy?
I found the health system and the parameter work the easiest thing to do this week since I already had everything which worked implemented, all I had to do was reference it.
I also found the Targeting System Feedback the next easiest thing to do on my weekly tasks, since all that was, was commenting where I would put the post processing and making the crosshair change colour from what action it has to take.
I found the Enemy Fire a little complicated at starters since I didn’t know how I could make it work where it’s easy to dodge but it can hit the player, but once I done some thinking, I was able to do the rest very easily
I found the Minimap to be the most complicated thing to do this week since it was quite a big task, there was lots of little things which I had to research on Unity Documentation and there was quite a lot of annotation to do on the blog side of it, but I was really happy with the outcome
What tasks didn’t I complete from this week?
I didn’t complete quite a few tasks which I had planned for this week, but I did end up doing other tasks in their place which I thought were more important to do, for example, I didn’t touch any cutscenes this week, I moved that onto a later date since I didn’t feel they were important enough, I done the same with Dolly Tracking, the image below is what I managed to do this week instead.
I am not unhappy with what I got completed this week since I feel like I stuck with tasks which are important, I’m glad I got the enemy fire sorted, the Minimap in the game and the parameter stuff sorted, but I also manage to finish the level planning, but that wasn’t in this screenshot since I moved that task to the next week since I still haven’t completed all the levels yet (Just level 3 production left)
Overall this week has made me realise that I just need to make sure I get what is most important done first.
Planning for next week –
How do I plan to catch up? Do I need to change anything about my work or planning?
There is nothing I really need to catch up on, I just need to carry on at this pace and make sure the main game gets done, but even if it doesn’t that’s fine since I already have 2 levels which I feel are already good.
Week Number & Date: Easter Break (06/04/20)
List of Tasks planned for this week:
I put this list of tasks in order of how important they are, I don’t expect to get them all done this week, but I’m hoping I can at least get UI Concept art and Enemy models done, but I would be very happy if I manage to get them all done today.
With the UI Concept, I’m simply making concept art for what I want my UI in my game to look like, I don’t expect it would take too long to do this.
For the enemies, I just have to do 2 3D models of a ship and a blimp, since the bat which I was going to do is a smaller dragon with a different texture sheet to save me time.
Once I get the enemies done, I would move straight onto the production of my final level.
The other 2 tasks I don’t expect to get done this week, especially sound FX, since that by itself would take a long time.
Current Position –
What did I do this week and why did I do it? (Screenshots/Videos/Photos)
Polish (Art) – User Interface Concept

Minimap
I knew I needed to make my minimap look much more interesting in my game, since I only use very basic shapes in it at the moment, so I feel, to make the game feel more complete, I need to draw concept art for a minimap, to come up with a proper idea and then make that idea digital and insert it into my game. – I started this task off by making a Pinterest board with minimaps in from different games, specifically minimaps which interest me since in my game, I wouldn’t need anything like terrain on these minimaps since the player would be flying in the sky, so I was mainly looking for blank minimaps.
Since this task is just drawing up the concept art, I don’t need to finalise anything, I began by drawing 4 circles with a compass, since I needed to work from a circle, and then I drew a few different ideas with a pencil, whilst drawing these, I got ideas from my Pinterest board and I was able to draw 4 minimaps which are completely different from each other.

I decided to scan these since I wanted to colour them in with Copic markers, and I wanted to make sure I had a copy of them just in case the colouring got messed up, so I can print it out again and try again, or alternatively work in digital if my copic colouring didn’t work so well and I wanted to work with different colour ideas.
Below is my finished coloured scan of the minimaps, the minimaps had been over-exposed slightly from the scanner but the colours still could be made out.
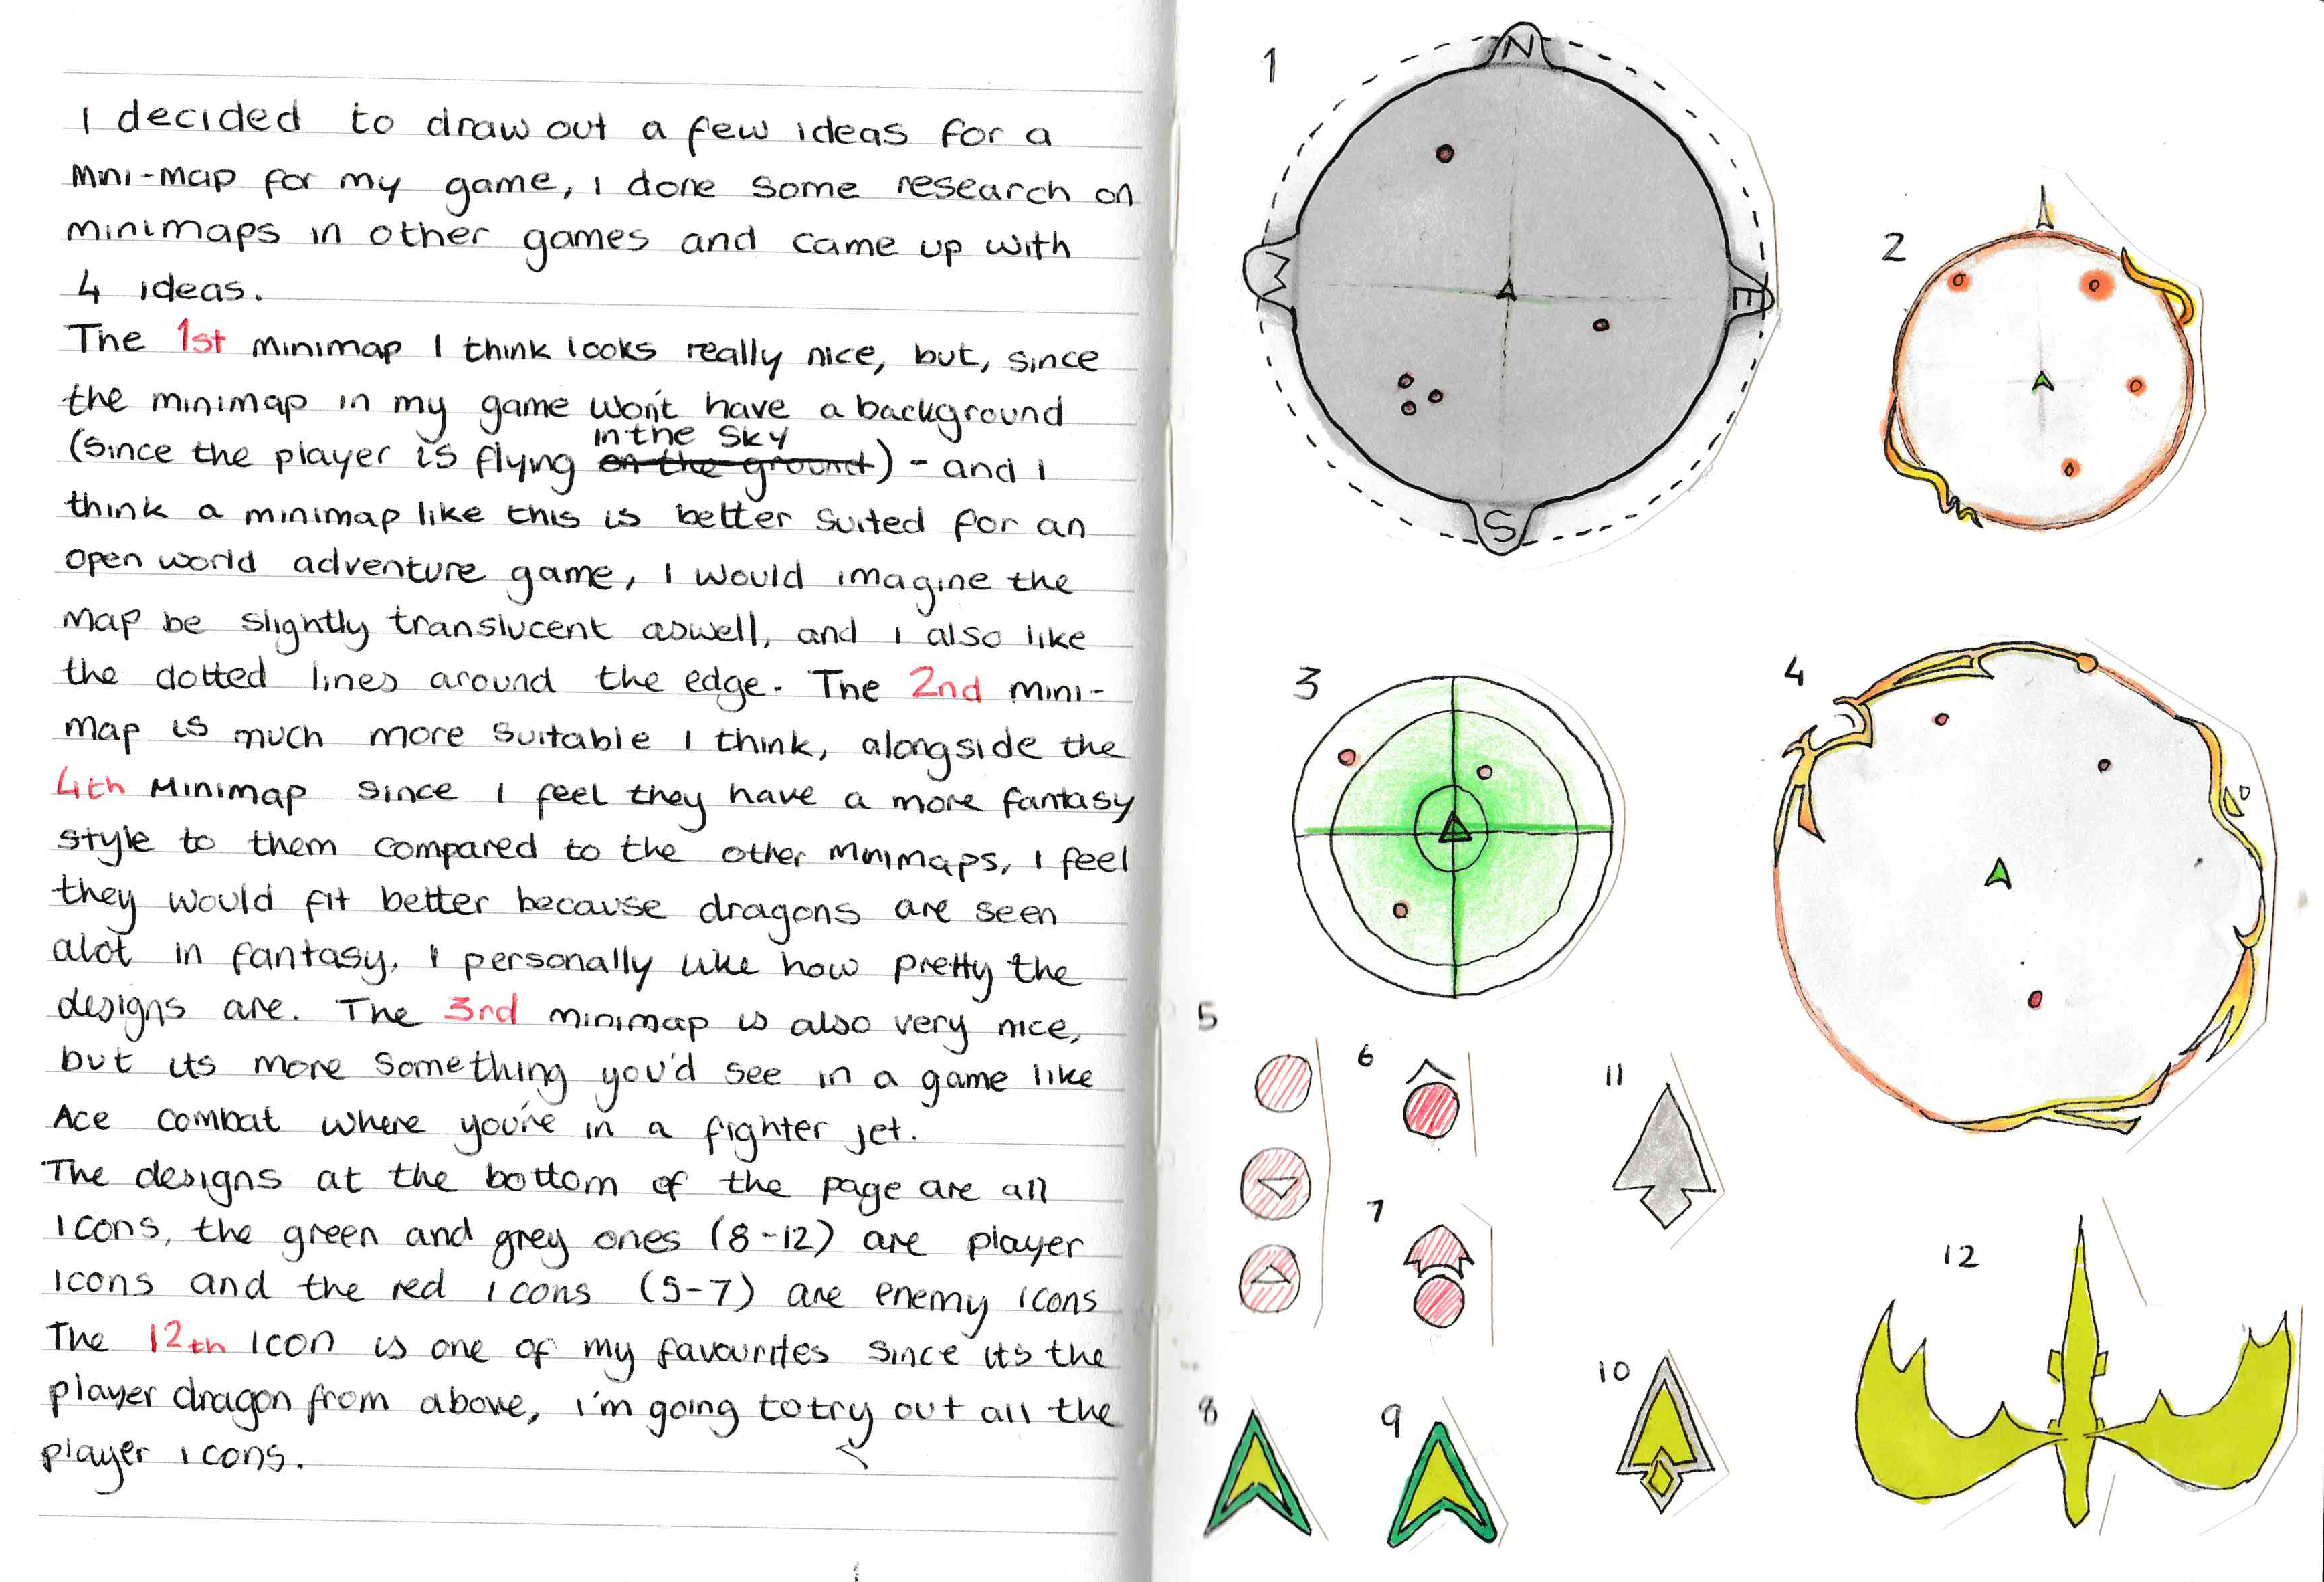
I also done some icons on the bottom of the drawing page as well, which are explained in the picture, but in short terms, the green and the grey are the player icons which are what stays in the middle of the screen, and the red are what I had ideas for with the enemy icons.
I really like adding pages into my concept art book, since it makes it feel more complete and I’m able to see my improvement on concept pieces over the time when I have them in that book, that is the main reason why I have done this in traditional art style, another reason I done this work in traditional art is because I wanted to have a short break from using my computer, a lot of my work done so far has all been done on a computer.
Overall, I was able to come up with some good sketches and I was able to write about each one and why I like them, but I wasn’t happy with some of the colours I picked so I decided to take the scan and colour my favourite 2 minimaps a few times.
I came up with a favourite 2 minimaps through my evaluative text on the image and why I like them, to shorten it, I like the minimap 2 and 4 since they fit in the fantasy setting of the world which my game is set in, I also done some tests with enemy and player icons too, to see if I like them on that minimap.
I started this by making my lineart have a transparent background, using this blog to help me, this is the result:


I tried out a mix of solid colours and gradients, and I really liked how the gradients looked since they looked much more unique, so now I know I want to use gradients in my final minimap.

In the end, I decided I would use this minimap, and I would further produce this next week in digital so it’s ready to be put into my game, I really like the use of grey and blue as if the unique shapes were silver, and I think going for a silver colour scheme is much better than going with a gold one, since it fits in more with the look of my game since the sky and fog is very blue in the game, I would also make sure it stands out though and doesn’t blend in with the sky.
- What went well with this task?
I was able to fill another page in my concept book with evaluative concept art, I also like the different variety of maps which I used in this concept piece, since they would each be very different from each other, and I didn’t stick with one strict theme for my UI, which would restrict it a lot.
- What didn’t go so well with this task?
This task did take a little longer than I planned due to my lack of motivation because of the corona virus, I’m finding it hard to keep in routine, and when I start work, I just get demotivated so quickly.

Crosshairs
Crosshairs are another important piece of UI which I need to have in my game, since the player would always see it, and may be looking at it most of the time when they need to aim at the enemies, so it’s very important that I make the crosshair look good. I firstly began to do research on crosshairs and made a Pinterest board on the different crosshairs which I can take inspiration from.
Upon looking at these, I’ve learnt that crosshairs have very basic shapes and a lot of lines and dots, so I used that new-found knowledge to make a few of my own, only very roughly though, drawing them out firstly with pencil and then outlining them with pen.
None of these needed colour since they will be drawn in black and then turned into white crosshairs so I can have full manipulation of the colour of them through Unity.

 On this page of sketches, on the right hand side, they were all small sketches which I have done as rough ideas, there was many more rough ideas which I had but I didn’t think they were good enough to be cut out and stuck into the book.
The designs which a star next to them are designs which I like, and from those, I further developed them into some solid plans of a final crosshair idea on the left page.

These designs didn’t need to be scanned, since they’re very simple shapes and could be reproduced which much better accuracy through Photoshop.
I plan to have these crosshairs animate between each other, but I don’t know how I’ll deal with that at the moment, I will be looking further into that when I reproduce one of these in digital format.
- What went well with this task?
Much like my Minimap concept art, I was really happy to add another page to my traditional concept book.
I’m also happy with the amount of crosshairs which I was able to make, leaving me a difficult decision to make later on when I want to pick a final design.
- What didn’t go so well with this task?
It took a while since I had to cut out each bit of paper and stick it down, this would’ve been quicker done in digital, but I wanted some time away from the computer.

Dialogue Boxes
I thought it would be best to do some really rough sketches of dialogue boxes but then do the rest of my planning in Unity, or with a screenshot of the game, since I feel that would allow me to plan them better since it’s really hard to draw a dialogue box with a specific font.

This is what I managed to do regarding the dialogue boxes this week, it’s not much, but I managed to do a rough sketch, I will do more research into them next week, but that is the concept art side of it done.
- What went well with this task?
I was able to quickly and easily come up with some good concept art ideas, exploring in the written text why I like each one and why I don’t which will allow me to further come up with a more complete plan next week.
- What didn’t go so well with this task?
I didn’t come up with a lot of unique ideas for this, I didn’t think too much about this since I don’t consider it to be too important at this point of time.

Polish (Music) – Final Boss

This task wasn’t originally on my task list for the week, but I done it because I knew it needed to be done and it was a very quick task, it was something which I completed in half an hour during the evening when I was very bored.
 I had my final boss music, a fan made song from one of my favourite games, I had full permission to use this from the person who made the song and sung in it, I was even able to get a instrumental version of the song too! (Thanks Milkyrisa!)
Taking the instrumentals and vocal version of the song, I went into my FMOD project for my game, added the music in and made a new music event called FinalBoss, this is what everything looked like once this was all done.

I didn’t need anything crazy for this final boss, I just needed the two tracks, the track with the vocals and the track without.
I then made a parameter which I called VoxControl, I wanted it so, during the final boss, when the player is targeting, the player would hear vocals, but when they’re not targeting they would just hear the instrumental, this is another type of adaptive music from what I had on all of my other levels.
From this blog, my games normal music has a mix of Phrase Branching and Musical Demarcation Branching, whereas my final boss theme would have more of a Bridge Transition, since I’m only adding on Vocals to the music.
 The way I achieved this in Fmod is I made a labelled parameter with 2 values, VoxOn and VoxOff, these work the same way as my other parameters, these values are represented by numbers, but they snap to them instead since I feel that’s best for the situation.
This means that when the player targets at the enemy all I need to do is switch that VoxOff to VoxOn and when they let go, I need to change it back, of course to get this to work I simply needed to add the conditions into each of the tracks,this is what it sounds like when I change the parameter.
- What went well with this task?
I was able to quickly and easily make this in my FMOD project so I wouldn’t have to worry about making this last minute, I also learnt a few things about adaptive music and parameters as I done this which would be useful to know later on.
- What didn’t go so well with this task?
Nothing really.

What did I find difficult or easy?
I felt it really difficult to stay motivated and carry on with my work, of course I was able to get some work done this week, I didn’t get as much work done as I really needed to, so I felt very disappointed in myself, it was hard to keep up the motivation due to all the corona stuff going on, my sleep schedule has been all over the place and getting up at 1pm really makes the rest of the day feel useless, I try to keep my sleeping schedule but I always end up sleeping more than I should, which in turn is making me do less work since I would be working from 1pm – 11pm, but even then I would be taking too many breaks and getting distracted, so it was very difficult to stay on track.
I did find doing the concept art very refreshing since I was away from the computer and doing traditional art, the concept art was easy as well since it didn’t involve too much thinking too.
The FMOD stuff was very easy to do and didn’t take too long at all.
What tasks didn’t I complete from this week?
This week I was very disappointed in myself since I barely finished any tasks set on my weekly rota, and the other tasks which I did were very very off track, but still relevant to my project as a whole.
I had to move most of my weekly set tasks to next week and focus fully on just the concept art for this week (+ the little extra tasks which I hadn’t planned)
Planning for next week –
How do I plan to catch up? Do I need to change anything about my work or planning?
There’s nothing much which I can do to catch up on my work except to just do it.
I plan to fix my sleeping schedule but that’s much easier said than done, if I do this, I can properly plan out my days and work a full day on my college work.
Week Number & Date: Easter Break (13/04/20)
List of Tasks planned for this week:
This week I have a lot of tasks to do because I was very lazy last week, I don’t think I would be able to complete them all at all, but I would try my best to get as many done as I can.
I put them roughly in the order of what I would do them in, the UI Concept being at the top since I have already started that so I would just continue on with that.
I plan to also have polished my User Interface with artwork which I make digitally and insert into Unity all finished.
I then plan to 3D model my enemies which I have made concept art of.
The 2 other tasks I don’t think I would have time to complete this week but I can always try.
Current Position –
What did I do this week and why did I do it? (Screenshots/Videos/Photos)
Polish (Art) – Concept Art

This isn’t on the list, but I needed to add it since I needed concept art to make my enemy models from, I couldn’t just 3D model these enemies off the top of my head.
Blimp
I started with the blimp because I found it the easiest to model out of the three, in my

mind, the blimp would be very similar to a hot air balloon with cannons attached to it, it wouldn’t be controlled by humans though, it would control itself. I started off by getting the idea of the blimp by looking at an enemy from one of my favourite games.
If you look at my concept art, the drawing on the top left corner is a drawing of this air balloon which I used as a reference point, I wanted to make something like that but add some new ideas, so I made a concept art sheet where I explored lots of different things.

In the end, I found out that I really liked the ones which I have put a star next to, so I decided to take those and make some digital art which I can then reference when I move onto 3D modelling.
I knew to make my 3D modelling easier, I would need a reference photo of the sides, but since each side is going to be the same, I would just need one photo, but it might help to split the blimp into part and model the separate parts and then but them together.

This is the digital art which I made to make modelling easier, it’s not very neat but it clearly has the shapes I need to reference to make my model, so it’s useful.
- What went well with this task?
I was able to make some unique concept art for the blimp that I wanted in my game, and then I was able to try out a few different shapes and then pick my favourite and reproduce it in digital art so I can use it as reference for my modelling, this was all done rather quickly.
- What didn’t go so well with this task?
I’m not good at drawing cannons

Flying Ship
I moved onto the flying ship next, using parts from the blimp to make this concept art design and the 3D modelling be faster, this is how my concept art sketches turned out for the flying ship.

Much like the blimp, I took this into Photoshop and neatened it up so I can reference it as I 3D model it, below is the neatened concept sheet.
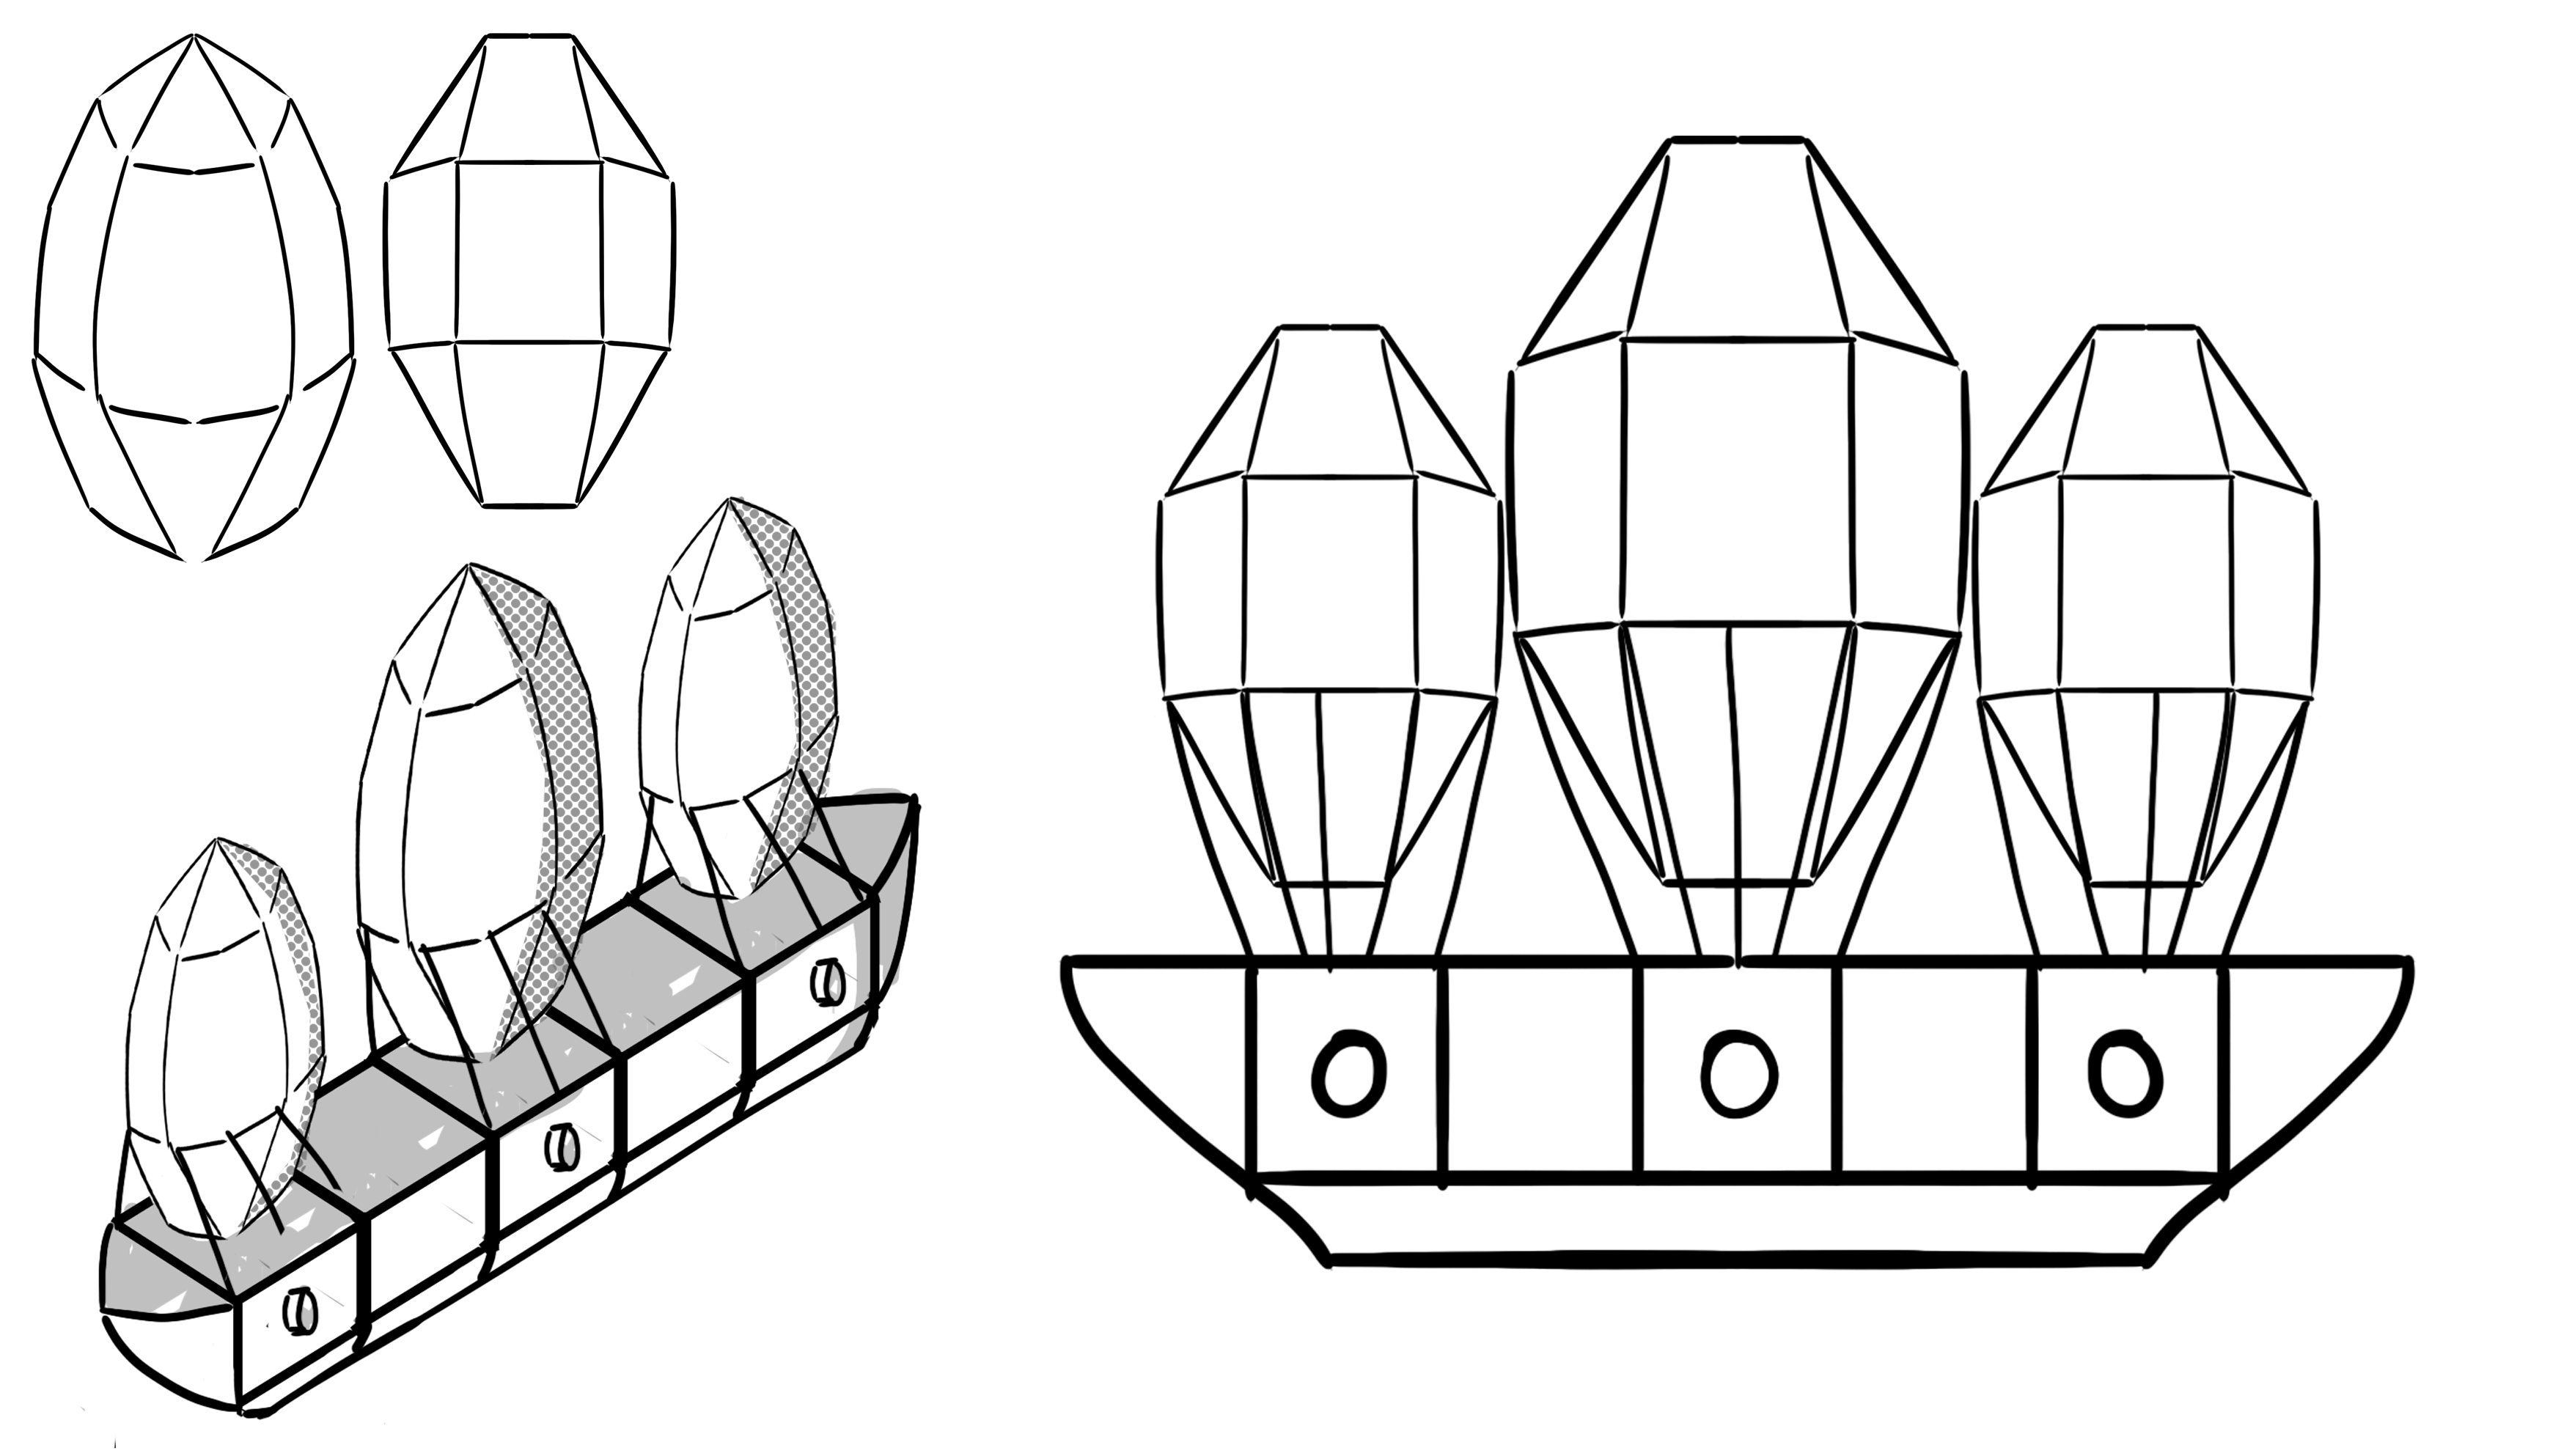
- What went well with this task?
I was able to quickly and easily come up with a concept piece for my flying ship and then make a digital copy which I can use with my modelling, I was able to use the same simple shapes which I used for my blimp so I can produce this model quick and easily
- What didn’t go so well with this task?
Nothing went bad.

Polish (3D) – Enemies

This is the task where I 3D model the enemies which I want to have in my games, these enemies already have prefabs, so all I would have to do is add the model into the prefab, these 3D models should be easy since they don’t need any animation (Besides the bat), since the ship and the blimp are just huge objects with cannons.
Bat
I decided for the bat which I want in the game, I would save time by just recolouring the dragon to a dark purple and making this the bat, I would also make this bat really small, since I wanted to animate it, I could just reuse the flying assets from the dragon.
To do all of this, I started by duplicating the FBX file which I had for the dragon model and renaming it Bat, I then opened this up in Blender, I opened it in Blender because I felt it would be easier to just change it in Blender because it already had all the animations on it which I had done in Blender.
I then duplicated the texture sheet which I used for the dragon, taking it into Photoshop and simply making it a dark purple colour, since that’s what colour bats are.
I then headed back into Blender and then changed the texture to the one which I changed the colour of, I had to use a guide to help me but it was using the old Blender UI, so I had to figure a lot of it out by myself.
 Firstly I had to click on this so I could see the texture on my ‘bat’, this is obviously very useful since I can see when I made the changes of the texture on my bat and if it worked.
After I done that, I had to expand the armature in the hierarchy to view the mesh, which had the little material icon next to it, this is where the texture is on the dragon which I would replace, I wouldn’t touch anything else since I didn’t want to break any animation or bones.
 Once I had that selected, I clicked on the red material ball and that brought me to the material properties, and this is where I changed it.
I expanded the base colour property and then changed it using the little file icon, I found my bat texture, and it was done.
It was fairly easy after that, all I had to do is export it as a new FBX and name it Bat, I saved this FBX inside of my Unity final project file and then headed into Unity.
Once in Unity, I went to my Bat prefab and dragged in the model for the Bat. I knew the bat would always be flying so I added the animation to it as well, here’s what the prefab looked like. I sized the dragon down to 0.5 on XYZ scale so it was more like a bat.

- What went well with this task?
I was able to quickly and easily insert the bat into my game by using recycled assets which I had modified the materials for to make them look completely different, this is good because it saves me a lot of time.
- What didn’t go so well with this task?
The bat doesn’t entirely look like a bat, it’s not a great idea to do this, but its coming near the end of production so I need to use my time wisely.

Blimp
Now I had my concept art for the blimp, I headed into Maya and inserted a plane with a picture of my concept art on it so I can model from that picture which I drew.
I made sure when I inserted my plane, I had the plane the right way so it would import into Unity sideways or something because I would’ve been modelling it at a completely wrong angle.

I then added another plane with the texture and made sure I had the texture at every side for my reference.

I then quickly realised I needed to make some quick changes to the positioning of the planes so they fit together in the middle of the main reference which I was going to use.


Once I done that I made a layer called REF, which stands for Reference, I added all the planes into that layer and then set this on the layer so that you wouldn’t be able to accidentally select the plane and move it.
This is very useful since I wouldn’t have to worry about selecting any of the planes whilst I’m modelling the blimp.

Modelling the main body was easy, I simply had to extrude a cube starting from the top  and then it was done. The balloon was a little different, I started with a sphere and bright the subdivision down to 5, that is so I can have all the sides and mould it into the right shape. I started this by getting rid of the top and then flattening it out, like hot it looks in the image which I drew. I then bridged this so I have a face on the top. I done the same to the bottom.
I kept tweaking this sphere until I got it right.

But then after looking at this for a while, it looked odd to me, and I figures that was because I made the subdivision 5, so it wasn’t equal the whole way around, ad you can tell from the photo on the bottom left, the edges aren’t in the middle.
So I started again, I made a sphere with 6 on the subdivision height and width, and it looks much better like this.

I then made the ropes by getting a cylinder and making it really small and duplicating it around the balloon at points where the rope would be extruding from.

Once I done that I made a simple cannon by extruding from a cylinder with 6 subdivison, the cannon was quite easy to do, and with that done, I felt like my blimp was ready to be unwrapped, this the result of the model.

I started my unwrapping with the cannon using a square texture layout for the UV, this is what it ended up like and what cuts I needed to make to lay it out.

Next I moved onto the main body of the blimp, using a square texture layout again for my UV since I felt like that would work the best with this since it is very square. – This is how it automatically unwrapped, which was pretty alright, but I think I should connect the UVs up more.

This is what I ended up with when doing it how I like.

I think it’s better this way since the whole body would connect up to each other and the texture would seem more seamless than when they’re all separated like in the automatic unwrap
For the balloon, I decided to go for a cylindrical unwrap, since that is what shape the balloon is, this is what the automatic unwrap looked like, and it was awful.

This is how my unwrap of the balloon ended up.

I then selected everything that needed texturing and laid out the UVs appropriately using the layout tool, I made sure there was a padding of 10 between each UV object.
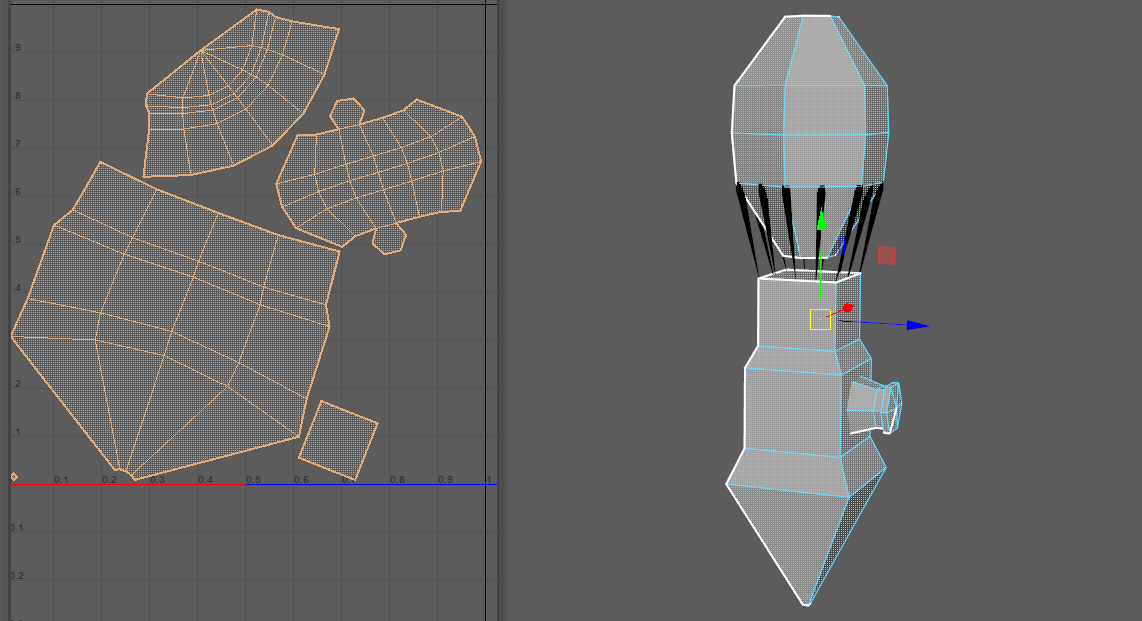
I exported this texture sheet as a PNG at 2048 * 2048, this is what the texture sheet looks like.

I began filling in this texture sheet with textures I want on the blimp.
I filled it in using the magic wand and the paint bucket tool which filled it all in like a charm, but when I went back to Maya, I missed some spots, and this is what it looked like.

 I decided the best route from here was to add an outline to all of the parts of the texture, I done this in photoshop using the Outer Glow layer style and it worked perfectly, as you can see from the picture on the right, this is how itlooks like but you have to set it to the same colour as whatever you’re texturing obviously otherwise it wouldn’t work.
Once I done that, I began adding some simple textures and detail to the texture, but nothing too crazy.

And that was my blimp done, I inserted it into Unity and replaced the Blimp Prefab cube.

- What went well with this task?
I was able to make a blimp model which I was really proud of, applying the little bit of modelling knowledge I know and building on it as I’m making this, I’m proud of how big and scary the blimps look in the game.
- What didn’t go so well with this task?
It took a whole day to model this, but I wasn’t working throughout the whole day and was wasting my time on other things

Ship
I now had the concept drawing of the ship which I can reference when I do the 3D modelling, so I put that on a reference plane in the scene much like I did in my blimp model, I also copied over the balloons from the blimp to use on this model too, I done this by exporting the singular balloon from the blimp over to this project as an FBX.
This is what it looked like once I done all of that.
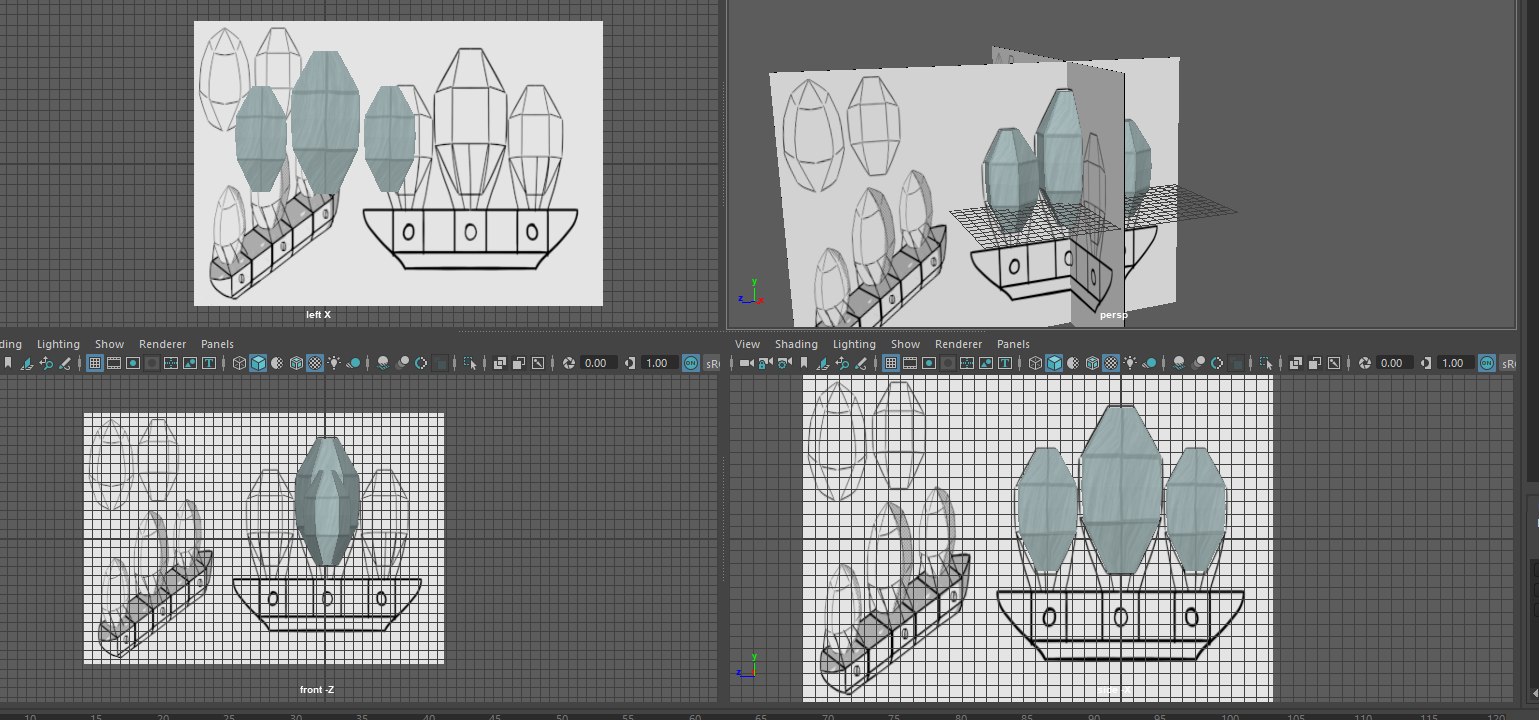

I began working on the body of the ship, this was very simple, the hardest part was adding the curve into the edge of the body.
To do the curve, I started by  extruding the end part of the ship out to the last point.
Once I done that, I selected the edge at the bottom and pulled it in, but I didn’t want to get rid of this edge, I began adding more cuts into the face by using the connect tool and subdivision set at 4 so then I can curve it like it is in my picture.
That was simply how I did it.

I done the bottom half of my ship by extruding and scaling in the extrude, I then moved onto the ropes, using the same technique as I did with my blimp, extruding and scaling the cylinders.


Now, since the balloon was already textured, the only thing I needed to unwrap is the body of the ship, I followed the same process as I did with my ship, unwrapping it so it’s easy to make out what it is.
I used the cube unwrap tool, since I felt that would be the best for the body of the ship

The unwrap didn’t work exactly how I wanted it to, but I was able to get the proper unwrap of the sides and bottom, the middle part was being funny and not letting me unwrap properly, but that was only going to be coloured in one colour anyway like on the blimp.
At this point I forgot to put the cannons on the ship, so I went to my blimp and exported the cannons I had on my blimp and put them onto this ship.
Once I done that I laid out my UVs and took a snapshot.

And then I finally textured the ship, and this is the final result:

- What went well with this task?
I was able to quickly model this and get it in the game the same day that I got the concept art done, I was very proud of the result and how quick I was able to do this.
- What didn’t go so well with this task?
The unwrapping for the body of the ship wasn’t the greatest.


Polish (Unity) – Sound FX

I decided I wanted to do this since I feel it is very important for my game to have sound FX to make things feel more immersive, I started with Wind and Glide/Boost Fast.
Wind & Glide/Boost Fast
For this sound FX I found a website called https://freesfx.co.uk/ with royalty free sounds which I can use, whilst searching around I found a Wind sound FX which I felt would be good, but it was under the Magic category, but that was fine.
This is the sound FX I got for Gliding.
This is the sound FX I got for the normal wind.
I had to edit both of these a little, starting with the Wind SFX, I had to make it so it looped, because otherwise it just faded in and out if I didn’t do anything and that wouldn’t sound right in the game, so I brought the wind sound into Audacity, and then cut off the fades, and it seemed to loop just fine like that.
I exported this as WAV, and then moved onto the Glide SFX, I knew I had to keep the Glide SFX around 2-3 seconds long since that is how long the player would be boosting for, so I made it shorter and faded it out using Audacity, I then exported it as a WAV too.

Once I done that, I put both the WAV files into Unity, I already had the functionality for the sounds, I just had to put them in, and once I tested them, I liked them quite a bit, so I think these sounds are very good.

Player Hit
I forgot to add this FX onto the list, but I needed one for when the player got hit by an enemy. Using the  same website, I found this Monster Howling sound which was long but featured a few sounds, so I downloaded that and I cut out the one which I thought was the best for the dragon getting hit by an enemy, I then made it slightly shorter, since it’s supposed to be a fast sound.
 I exported this sound as a WAV and then put it into my project, it was easy to get this to work, but whilst I was doing that, I tidied up my script a bit.
I made it so I have an entire section for each audio property and then I simply just have to call the audio source and then feed in what audio clip I want to play in that source everytime I want to play a sound.

What did I find difficult or easy?
I found drawing the concept art and making the models for the enemies to be the easiest part of this week, but that is all I have done this week, in a way, I think that’s okay since I have a gamejam this weekend (Ludum Dare 46) – So doing concept art all week this week means that I wouldn’t get burnt out from programming for my gamejam, but in a way, doing just concept art and 3D modelling makes me feel really unproductive for the whole week and I didn’t manage to complete all the tasks I had set myself.
What tasks didn’t I complete from this week?
I didn’t complete the production of my UI, I also didn’t complete the concept art for the main menu, and the concept art for the final boss, I was at least expecting to get these done since they’re concept art so I thought I would be really quick and be able to do all of them, but I was wrong.
Planning for next week –
How do I plan to catch up? Do I need to change anything about my work or planning?
I plan to get all of my concept art done and then start working on polishing my in-game UI, since I feel that is the most important.
Week Number & Date: Week 9 (20/04/20)
List of Tasks planned for this week:
I decided to finish production of my game slightly earlier since I looked at my proposals plan and realised that I didn’t have too long left, I didn’t want to keep adding stuff and not have time to finish them, I also didn’t want to fall behind on Task 5 or 6, so I decided to finish my production here and have a build of my game ready for upload by the end of this week. I learnt this is the best way to do things through the production of the games I’ve made during my Gamejams which I have participated in, it’s ideal to submit your game a few hours before the deadline so you know you’ve submitted a build just in case if anything goes wrong during the last few minutes of the jams countdown, you have your game up anyway, this also gives you time to gather good-quality screenshots and put together some art work to draw in the attention of anyone playing the jams games, the other reason why I don’t have too much planned this week is because I have just finished a Gamejam (my Ludum Dare 46 game) and it has really worn me out, so I thought art work would be a nice thing to do during the week to relieve myself.
Current Position –
What did I do this week and why did I do it? (Screenshots/Videos/Photos)
Review Progress

I figured out I was running behind a little when I checked my timetable on my proposal, I should’ve moved onto Task 5 at the moment and if I didn’t check I would’ve been running behind on my tasks.
The reason why I didn’t check this timetable is because I had all of my plans presented on my Trello Board, and whilst planning it out, I forgot about task 5 and 6, so they weren’t put on there so I thought I had plenty of time left to do my project work, but I was wrong, and this is a mistake I won’t be making, this is most likely also due to me being the type of person to only plan in the nearby future, and not the distant future like this proposal had me do, so I was purposely ignoring it, so I am very glad that I had another look at it.
From looking at this plan, a few things have changed, so I will break down how I would ideally like to progress week-by-week.
Week 9 – 20/04/20

 This is the current week which I am on, now looking at my old plan, I think I would work on the Game Cover, Posters and my Itch page this week, but I wouldn’t need to paint the 3D model since there won’t be an exhibition, so it isn’t necessary, but I was really looking forward to doing that, instead I would be making the UI art for my game to finish off it’s production so I can move onto doing these things properly.
I decided to also make a Trello board for this as well, since I work really well with Trello boards and I feel it helps with my production process, along with this, I would also be having a weekly-blog thing like on this task on Task 5, so I get plenty of work done, since I really like working in the blog format.
My Trello board is very busy, but that’s okay, because the presentation boards don’t have due dates as strict as the production cards when I was producing my game.
I know this all won’t get done this week, but I plan for it to also drag into the next week too.
Week 10 – 27/04/20

 This week should see me having my work completed properly, I wouldn’t have remembered this deadline if I didn’t check, but hopefully, during this time I would be finishing my Presentation work and moving onto my Evaluation, but I shouldn’t stress too much if I don’t get onto my Evaluation at this point, since I would need to get my presentation to the best standard, I planned this week out on my Trello board too.
I hope, by Week 10 I have a stable build which I can upload, so I can get my presentation finished and move onto my Evaluation and take my time on that.
Week 11 – 12 – 13 (04/05/20 – 18/05/20)

These last 3 weeks all have the same stuff planned, I hope I can finish all of my presentation by AT LEAST week 11 before I move onto evaluating. Week 11 is the latest at which I will start my evaluation and finish my presentation work.
Polish (Art/Unity) – User Interface

I started this task by getting the reference of my UI up, so I knew what I was working with, firstly I wanted to work on my minimap, and this is what my concept art for that minimap was.
I began this by opening Photoshop and making the circle outline, this is where all of the enemy radar stuff is restricted to.


I saved this as a PNG image and imported it into Unity. Once in Unity, I found the image and applied these settings to the image, so I can use it as a sprite on my UI.
This is a very important thing to do since otherwise I won’t be able to use this image in the UI of my game.
Once I did this, I went to where I had the circle image on my UI Radar and replaced it with this.

I liked how this looked but I thought that I need to make it much bigger so it is more noticeable, so I changed the size of the radar.
 Then I played the game, and realised that I shouldn’t have made the radar on a separate file from the original radar circle, so I went into Photoshop and opened up the original radar circle and applied the same effects on the original radar and saved it.
Once I done that, I moved onto the decoration around the outside of the minimap, starting with a test piece to see how it would work, I opened a new photoshop file and inserted the radar, the canvas was slightly larger than the radar, and then I drew some decorations around the edge, I then inserted this into Unity.
I had to have these settings on the rect transform of the decoration, since the canvas was slightly bigger so I had to adjust it accordingly so.
I then moved onto actually making the proper decoration.

This is what it ended up looking like, although the colours don’t look anything like the concept, I was proud of the results, this is the minimap in game

Once I done that I moved onto the aim crosshair, referencing my concept art when I made this.
I particularly referenced the crosshair at the bottom of the left page, I liked this one the most.
My code for the crosshair simply changes the colour of the crosshair, but what I would have to do in this case is change the sprite instead.
I made 3 separate sprites for each of the crosshairs.

These are the few lines I had to add into my script to get this to work.

This is the result:

- What went well with this task?
I was able to quickly put together some nice looking UI for my game, I really like the result since it makes my game look so much more polished.
- What didn’t go so well with this task?
Nothing went bad

Polish (Unity) – Controls for PC

I think this is very important to have in my game since I want to try and get a build out of this as soon as possible and I know that a lot of people won’t be playing this game with a controller connected.
The flying controls were already in my game with WASD, so I didn’t have to do anything for them to work.
The speed boosting was easy to implement, I had to just adjust some code and it was working fine, this is what I had to adjust

This basically now checks the button press first and then has an if statement inside of it, previously it was all 1 if statement.
For the rotation, I wasn’t sure what buttons I wanted to use at first, but then it made sense to use they keys ‘Q’ and ‘E’ since they were left and right from the forward key, I then opted to use ‘R’ for the full spin key.

This is what the code looked like for that, not much different than what it was.
Once I done that, I had to figure out what button I wanted to use for targeting the enemy, I decided that left shift was the best button, since in many games you have to hold down left shift to sprint, and you had to hold down the square button to target, so that’s why I chose the shift button, and this is what the code looks like.

This was all of the controls complete, but I personally prefer using a controller to play my game, this was simply made so it is more accessible.
- What went well with this task?
I was able to quickly and easily add these controls into my game, and test them out to see how well they work, I was able to make the controls also accessible to play with one hand, so it would be able to be played by a lot more people.
- What didn’t go so well with this task?
I don’t like how this game is controlled at all, it doesn’t feel good to play with a keyboard.

Present (Unity) – Stable Build

I needed to work on making a stable build which I can upload to itch.io so I can focus more on my presentation of my work.
I started this by getting rid of my main menu from the build settings, since I really didn’t want that in the build which I would be uploading, looking at my game, if I wanted to further produce it, it would be in a pre-alpha/alpha phase of development right now since I feel like I could add so much more into this game, and I probably would, since I am quite proud of how this had turned out.
 I began this task by writing down things which I NEED to do before I upload this, but this wouldn’t be big features, these would involve stuff which would break the game or make it unplayable.
The first thing on my list is making it so the game starts at the first level, since now it starts at a menu, which isn’t great.
The next thing on my list is the post processing and UI of my first level, it isn’t the same as my 2nd level so I would need to fix that.
The third thing on my list is I need to add in a note somewhere that this game is in it’s alpha phase, it is nowhere near completion.
And the final thing on my list is I want it so the player can just fly around at the end of the second level, since there is nothing after that.
Game Sequence
I had to check that the game can run through properly and there was no dead ends once you completed all the levels, I had to make another level which repeats itself over and over again so there isn’t any ending in the game (There will be if I carry on developing this!)
Level 1 Post Processing
This was easy, I just set the profile of the post processing to the one with all the effects on.
After Lv2
After Level 2, normally nothing would happen, but in this case, I simply made it so the level keeps playing over and over.
Other
I made it so the saturation of the screen gets affected if the players health goes down, I used this video to help me out with referencing the post processing stack, this is the code which I had to write.

Learning how to reference the post processing stack is very helpful since I can use it for other things, like game feedback.
I really like how this looks since it lets the player know how their health is doing without having a health bar.
After I done all of this I ended up with a stable build which I’m okay with submitting.
- What went well with this task?
I was able to bring my game together to make a stable build which I’m happy with and happy to submit for my final
- What didn’t go so well with this task?
The way I got this working isn’t the best, I feel like I could’ve cleaned up my project a bit more.

What did I find difficult or easy?
The only thing I found challenging this week is making the build stable, getting the post processing stack working required some research
What tasks didn’t I complete from this week?
I’ve completed everything I need to
Planning for next week –
How do I plan to catch up? Do I need to change anything about my work or planning?
I plan to move onto task 5
